最近有个需求,就是将 OxyPlot 图形导出图片。经过尝试,本文记录三种方法:1、OxyPlot 自带导出方法;2、网上找的导出 WPF 界面元素的方法;3、基于方法 2 的附加属性调用方式。下面将逐一介绍。.
一、OxyPlot 自带导出方法
同事说这个用 OxyPlot 官方提供的导出方法即可,我在 Demo 中试了一下,是可以的,代码如下:
/// <summary>
/// 曲线数据源(OxyPlot)
/// </summary>
public PlotModel PlotModel { get; set; } = new PlotModel();

ExportPngCmd ??= new RelayCommand(o => true, async o =>
{
    var pngExporter = new PngExporter { Width = (int)PlotModel.Width, Height = (int)PlotModel.Height, };
    //string exportPath = Path.Combine(AppDomain.CurrentDomain.BaseDirectory, "Export");
    string exportPath = Path.Combine(Environment.GetFolderPath(Environment.SpecialFolder.DesktopDirectory), "Export");
    if (!Directory.Exists(exportPath))
    {
        Directory.CreateDirectory(exportPath);
    }

    pngExporter.ExportToFile(PlotModel, Path.Combine(exportPath, $"{DateTime.Now:yyyyMMdd_HHmmss}.png"));
    await ConfirmBoxHelper.ShowMessage(DialogVm, "导出完成", 3);
});
各种导出方法可以在 OxyPlot 官方文档(https://oxyplot.readthedocs.io/en/latest/export/index.html)中查看
 这里用到的是导出到 PNG 文件的方法,不过用的 NuGet 包最新版(2.1.0)中,PngExporter 中并没有 Background 属性:
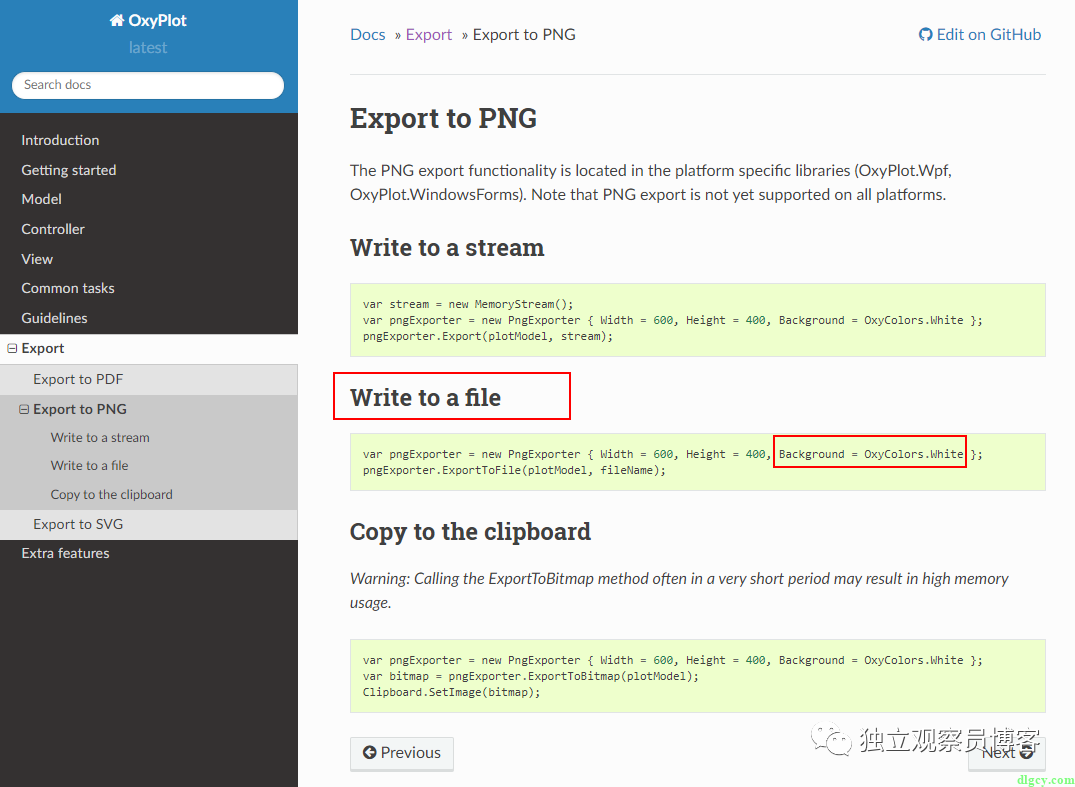
所以如果图表没有设置背景色的话,导出背景为透明的,可以设置上:PlotModel.Background = OxyColor.Parse("#FFFFFF");
总的来说,这个方法简单快捷,而且对 MVVM 友好。不过也有缺点,就是如果有些元素(比如说标题、坐标轴文字)不是使用 OxyPlot 图表控件来生成的话,则导出的图片就不会包含它们了:
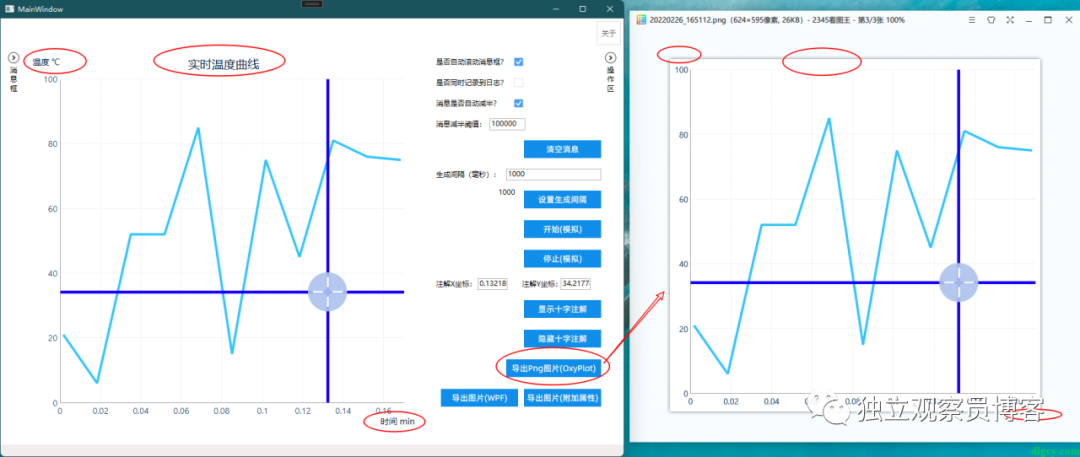 我在实际项目中确实遇到了这个问题,所以需要寻找其它方法,我们接着看。
二、导出 WPF 界面元素的方法
首先给出能够导出任意 WPF 界面元素(FrameworkElement)为图片的方法,来源于网络,地址在方法注释中已给出,略作修改,代码如下:
using System;
using System.IO;
using System.Windows;
using System.Windows.Media;
using System.Windows.Media.Imaging;

namespace WPFTemplateLib.WpfHelpers
{
    /// <summary>
    /// 导出图片帮助类
    /// </summary>
    public class ExportPicHelper
    {
        /// <summary>
        /// 保存为图片
        /// (修改自:https://blog.csdn.net/dhl11/article/details/108621634)
        /// </summary>
        /// <param name="frameworkElement"> 可视化元素,可以是 Grid、StackPanel 等类型的所有可视化元素 </param>
        /// <param name="filePath"> 文件路径 </param>
        /// <param name="errorMsg"> 错误消息 </param>
        /// <returns> 是否成功 </returns>
        public static bool SaveToImage(FrameworkElement frameworkElement, string filePath, out string errorMsg)
        {
            try
            {
                errorMsg = string.Empty;
                FileStream fs = new FileStream(filePath, FileMode.Create);
                RenderTargetBitmap bmp = new RenderTargetBitmap(
                    (int)frameworkElement.ActualWidth,
                    (int)frameworkElement.ActualHeight,
                    1 / 96, 1 / 96, PixelFormats.Default);

                bmp.Render(frameworkElement);
                BitmapEncoder encoder = new TiffBitmapEncoder();
                encoder.Frames.Add(BitmapFrame.Create(bmp));
                encoder.Save(fs);
                fs.Close();
                return true;
            }
            catch (Exception ex)
            {
                Console.WriteLine($" 保存图片异常:{ex}");
                errorMsg = ex.Message;
                return false;
            }
        }
    }
}
用这个方法首先要给界面元素起个名字,我这里给图表区用户控件元素起了个 “Plot” 名称:

这样在后台代码中就可以用来导出了:
private void ExportPicBtn_OnClick(object sender, RoutedEventArgs e)
{
    ExportPicture(Plot);
}

/// <summary>
/// 导出图片
/// </summary>
/// <param name="element">xaml 里面的某个可视化元素对象 </param>
private void ExportPicture(FrameworkElement element)
{
    SaveFileDialog saveFileDialog = new SaveFileDialog
    {
        Filter = "PNG 文件 (*.png)|*.png|JPG 文件 (*.jpg)|*.jpg|BMP 文件 (*.bmp)|*.bmp|GIF 文件 (*.gif)|*.gif|TIF 文件 (*.tif)|*.tif"
    };

    if (saveFileDialog.ShowDialog() == true)
    {
        string dir = System.IO.Path.GetDirectoryName(saveFileDialog.FileName);
        if (!Directory.Exists(dir))
        {
            Directory.CreateDirectory(dir);
        }

        string filePath = saveFileDialog.FileName;
        if (File.Exists(filePath))
        {
            File.Delete(filePath);
        }

        bool success = ExportPicHelper.SaveToImage(element, filePath, out string errorMsg);
        if (success)
        {
            MessageBox.Show($"导出成功");
        }
        else
        {
            MessageBox.Show($" 导出失败 {errorMsg}");
        }
    }
}
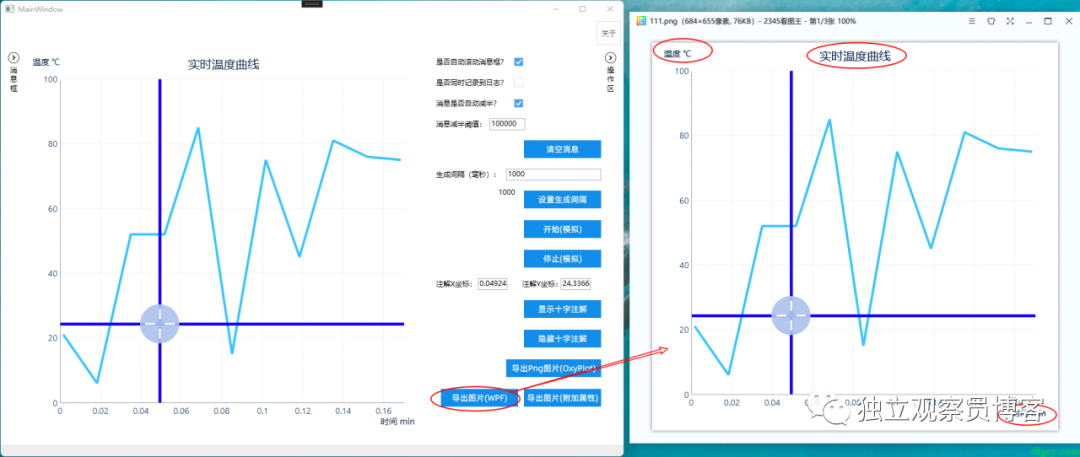
可以看到想要导出的内容都导出成功了:
优点是显而易见的,缺点就是导出逻辑要写在后台代码中,对 MVVM 模式不友好。下面来看看本人修改的使用附加属性的方案,尝试解决这个问题。
三、通过附加属性来使用
还是先给出代码:
using System;
using System.IO;
using System.Windows;
using WPFTemplateLib.WpfHelpers;

namespace WPFTemplateLib.Attached
{
    /// <summary>
    /// 导出图片附加属性类
    /// </summary>
    public class ExportPicAttached : DependencyObject
    {
        #region 是否开始导出

        public static bool GetIsExporting(DependencyObject obj)
        {
            return (bool)obj.GetValue(IsExportingProperty);
        }

        public static void SetIsExporting(DependencyObject obj, bool value)
        {
            obj.SetValue(IsExportingProperty, value);
        }

        /// <summary>
        /// 是否正在导出(运行时设置为 true 则将附加的元素导出为图片)
        /// </summary>
        public static readonly DependencyProperty IsExportingProperty =
            DependencyProperty.RegisterAttached("IsExporting", typeof(bool), typeof(ExportPicAttached),
                new PropertyMetadata(false, OnIsExportingValueChanged));

        private static void OnIsExportingValueChanged(DependencyObject d, DependencyPropertyChangedEventArgs e)
        {
            FrameworkElement element = d as FrameworkElement;

            if (element == null)
                return;

            if ((e.NewValue as bool?) == false)
                return;

            try
            {
                string exportPath = GetExportPath(d);
                if (string.IsNullOrEmpty(exportPath))
                {
                    exportPath = Path.Combine(Environment.GetFolderPath(Environment.SpecialFolder.DesktopDirectory),
                        "Export");
                }

                if (!Directory.Exists(exportPath))
                {
                    Directory.CreateDirectory(exportPath);
                }

                string filePath = Path.Combine(exportPath, $"{DateTime.Now:yyyyMMddHHmmss}.png");

                bool success = ExportPicHelper.SaveToImage(element, filePath, out string errorMsg);
                if (success)
                {
                    MessageBox.Show($"导出成功");
                }
                else
                {
                    Console.WriteLine($" 导出失败:{errorMsg}");
                    MessageBox.Show($" 导出失败 {errorMsg}");
                }
            }
            catch (Exception ex)
            {
                Console.WriteLine($" 导出异常:{ex}");
                MessageBox.Show($" 导出异常:{ex.Message}");
            }
            finally
            {
                // 此处设置为 false 没什么用,还是需要业务层在设置为 true 前先设置为 false 才行。
                SetIsExporting(d, false);
            }
        }

        #endregion

        #region 导出文件夹

        public static string GetExportPath(DependencyObject obj)
        {
            return (string)obj.GetValue(ExportPathProperty);
        }

        public static void SetExportPath(DependencyObject obj, string value)
        {
            obj.SetValue(ExportPathProperty, value);
        }

        /// <summary>
        /// 导出文件夹路径
        /// </summary>
        public static readonly DependencyProperty ExportPathProperty =
            DependencyProperty.RegisterAttached("ExportPath", typeof(string), typeof(ExportPicAttached), new PropertyMetadata(string.Empty));

        #endregion
    }
}
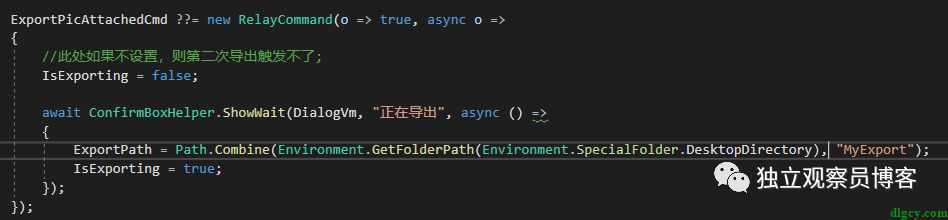
ExportPicAttached 类中包含两个附加属性,一个是导出文件夹路径 ExportPath,一个是是否开始导出 IsExporting。当 IsExporting 被设置为 true 则开始导出,如果导出文件夹路径没被设定,则导出到桌面文件夹,然后就是调用方案二中出现的 ExportPicHelper.SaveToImage 方法。
使用方法就是在要导出的元素上设置上这两个附加属性,然后把值进行绑定:
 在 ViewModel 中,先设定导出路径,然后把 IsExporting 置为 true 即可开始导出:
也是能正常导出的:
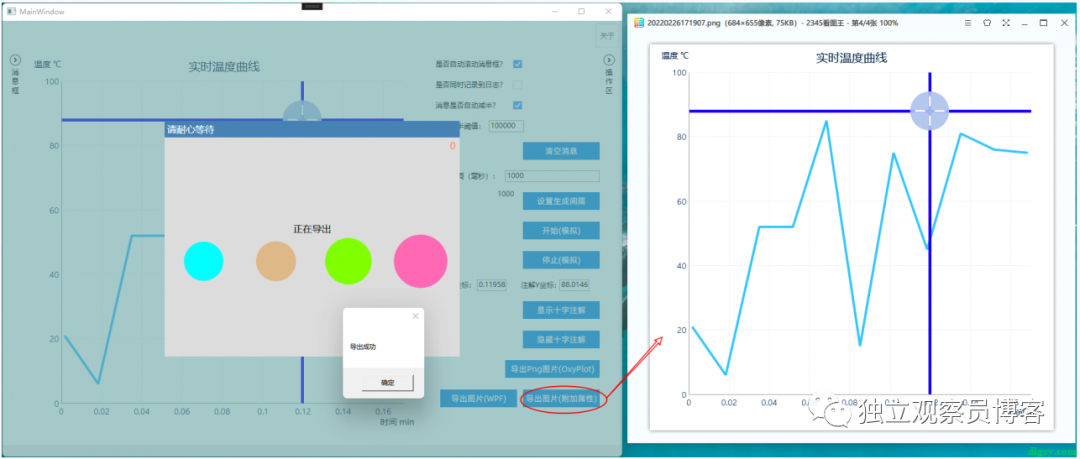
这个方案结合了前两个方案的优点,既能导出所有想要的内容,又对 MVVM 友好。
缺点就是导出的控制有点奇怪,需要先将 IsExporting 置为 false,不然第二次就导出不了了。尝试了在附加属性逻辑中自动置为 false,但是好像值传递不到 VM 中的相关绑定属性中,有了解解决方法的朋友们请不吝赐教。

全文完,感谢阅读,祝大家天天开心。
