前言
这个是百度地图上北京地铁的地址,我们先看下百度上面的效果图;.

-
我要实现的内容比较简单,就是绘制这些图,和在地铁线上滑动时,会有跟着走的地铁名的提示。
一、准备数据
-
我不会爬虫,所以,这里是用Fiddler把数据给扒下来,由于北京地铁官网,最近在维护中,所以进不去,不知道他们是不是提供了相关的数据,如果数据丰富的话,可做的东西还是很多的。
-
F12打开开发者工具,用鼠标工具,选择地铁图,会定位到相应的代码部分;
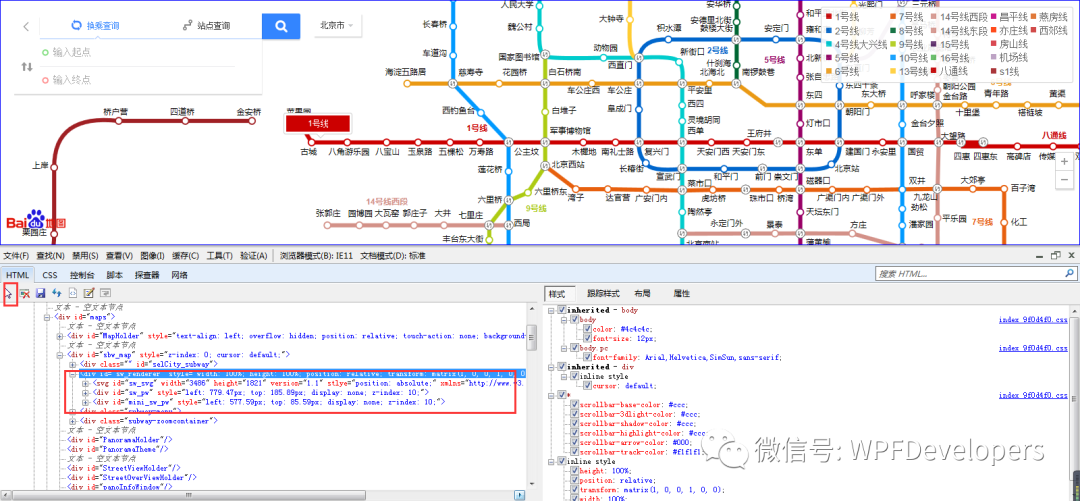
-
数据就在 SVG的结点下面,我们把数据复制粘贴出来,这些数据上,我们能发现,是分离开的,举个例子:1号线上有很多个站点,例如苹果园、古城等,但是在数据上,你看不出1号线和苹果园、古城的关系所在,也就是说,展示给我们的数据是相对独立的。数据上,提供了Path的路径,Textblock和Ellipse的坐标信息。那我们就用这些信息,简单的画一下北京地铁图。
二、读取XML文件
-
将扒下来的数据,放到 XML中,稍微修改下,因为会报错,命名空间的问题,很好弄,就不贴了,观察数据,以后,建立一个实体DrawInfo包含几个字段;
public class DrawInfo
    {
        private string type;//类型 : path text ellipse image
        private string pathData;//path的路径数据
        private string forColor;//颜色
        private double x;//坐标
        private double y;//坐标
        private string tooltip;//ToolTip
        private string id;//ID
        private string fontWeight;

        public string Type
        {
            get
            {
                return type;
            }

            set
            {
                type = value;
            }
        }

        public string PathData
        {
            get
            {
                return pathData;
            }

            set
            {
                pathData = value;
            }
        }

        public string ForColor
        {
            get
            {
                return forColor;
            }

            set
            {
                forColor = value;
            }
        }

        public double X
        {
            get
            {
                return x;
            }

            set
            {
                x = value;
            }
        }

        public double Y
        {
            get
            {
                return y;
            }

            set
            {
                y = value;
            }
        }

        public string Tooltip
        {
            get
            {
                return tooltip;
            }

            set
            {
                tooltip = value;
            }
        }

        public string Id
        {
            get
            {
                return id;
            }

            set
            {
                id = value;
            }
        }

        public string FontWeight
        {
            get
            {
                return fontWeight;
            }

            set
            {
                fontWeight = value;
            }
        }
    }

DrawInfo
-
下面是读取的方法;
private void ReadXML()
        {
            doc.Load(xmlPath);
            XmlNodeList xmlNodeList = doc.DocumentElement.GetElementsByTagName("g");
            foreach (XmlNode xn in xmlNodeList)
            {
                foreach (XmlNode item in xn.ChildNodes)
                {
                    DrawInfo drawInfo = null;
                    if (item.Name == "path")
                    {
                        drawInfo = new DrawInfo()
                        {
                            Type = "path",
                            PathData = item.Attributes["d"].InnerText,
                            ForColor = item.Attributes["stroke"].InnerText,
                            Tooltip = item.Attributes["lb"].InnerText,
                        };
                    }
                    if (item.Name == "text")
                    {
                        drawInfo = new DrawInfo()
                        {
                            Type = "text",
                            ForColor = item.Attributes["fill"].InnerText,
                            X = double.Parse(item.Attributes["x"].InnerText),
                            Y = double.Parse(item.Attributes["y"].InnerText),
                            Tooltip = item.InnerText,
                            FontWeight = item.Attributes["font-weight"].InnerText
                        };
                    }
                    if (item.Name == "ellipse")
                    {
                        drawInfo = new DrawInfo()
                        {
                            Type = "ellipse",
                            ForColor = item.Attributes["stroke"].InnerText,
                            X = double.Parse(item.Attributes["cx"].InnerText) - 6.5,
                            Y = double.Parse(item.Attributes["cy"].InnerText) - 6.5,
                            Tooltip=item.Attributes["name"].InnerText,
                        };
                    }
                    if (item.Name == "image")
                    {
                        drawInfo = new DrawInfo()
                        {
                            Type = "image",
                            X = double.Parse(item.Attributes["x"].InnerText),
                            Y = double.Parse(item.Attributes["y"].InnerText),
                            Id = item.Attributes["id"].InnerText,
                            Tooltip=item.Attributes["name"].InnerText
                        };
                    }
                    if (drawInfo != null)
                        DrInList.Add(drawInfo);
                }
            }
        }

ReadXML
-
由于是一个小 Demo,所以代码上写的不是很规范,例如DrawInfo里面的字段,好多,我在后期都公用了,而且定义的类型也不是很规范,用了string而没使用Brush、FontWeight等,在取XML结点的Name的时候,也应该定义一个枚举类型,我都没有去弄,就是为了写小例子的时候,省事一点,但是在实际的生产代码中,建议大家是规范的,利人利己。
三、绘制效果图
-
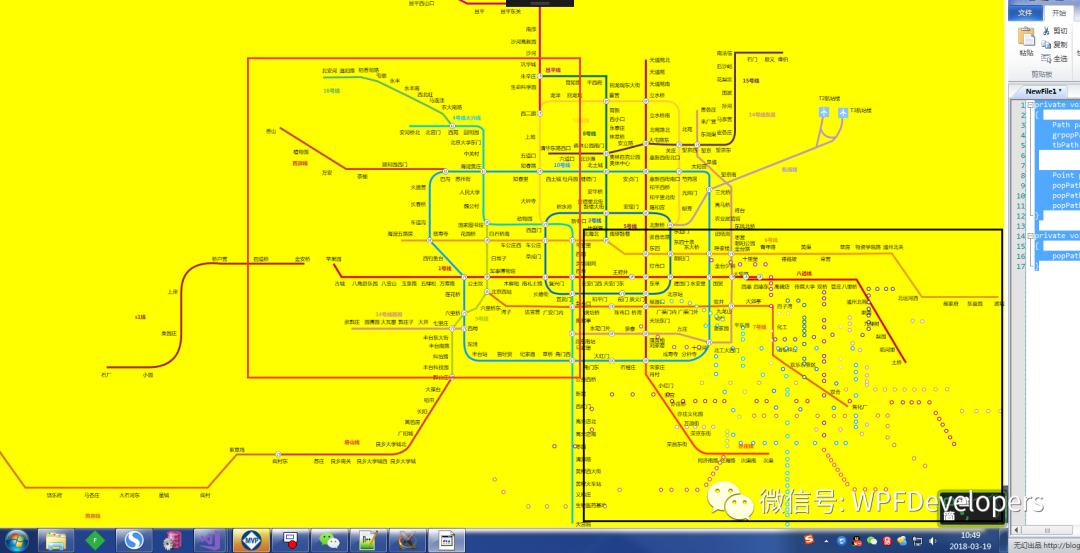
数据从 XML中拿到以后,绘制效果图,就方便多了,代码就很容搞定;
private void ShowSubWay()
        {
            foreach (DrawInfo item in DrInList)
            {
                if (item.Type == "path")
                {
                    Style style = win.FindResource("pathStyle") as Style;
                    Path path = new Path()
                    {
                        Style = style,
                        Data = Geometry.Parse(item.PathData),
                        Stroke = (Brush)brushConverter.ConvertFromString(item.ForColor),
                        ToolTip = item.Tooltip
                    };
                    path.MouseMove += Path_MouseMove;
                    path.MouseLeave += Path_MouseLeave;
                    grid.Children.Add(path);
                }
                if (item.Type == "text")
                {
                    Style style = win.FindResource("textblockStyle") as Style;
                    TextBlock textBlock = new TextBlock()
                    {
                        Style = style,
                        Foreground = (Brush)brushConverter.ConvertFromString(item.ForColor),
                        Margin = new Thickness() { Left = item.X, Top = item.Y },
                        Text = item.Tooltip,
                        FontWeight = (FontWeight)new FontWeightConverter().ConvertFromString(item.FontWeight),
                    };
                    grid.Children.Add(textBlock);
                }
                if (item.Type == "ellipse")
                {
                    Style style = win.FindResource("ellipseStyle") as Style;
                    Ellipse ellipse = new Ellipse()
                    {
                        Style = style,
                        Stroke = (Brush)brushConverter.ConvertFromString(item.ForColor),
                        Margin = new Thickness() { Left = item.X, Top = item.Y },
                        ToolTip=item.Tooltip
                    };
                    ellipse.MouseMove += Ellipse_MouseMove;
                    ellipse.MouseLeave += Ellipse_MouseLeave;
                    grid.Children.Add(ellipse);
                }
                if (item.Type == "image")
                {
                    Style style = null;
                    if (item.Id == "svgjsImage12298" || item.Id == "svgjsImage12302")
                        style = win.FindResource("imgAir") as Style;
                    else
                        style = win.FindResource("imgTran") as Style;
                    Image img = new Image()
                    {
                        Style = style,
                        Margin = new Thickness() { Left = item.X, Top = item.Y },
                        ToolTip=item.Tooltip
                    };
                    img.MouseMove += Img_MouseMove;
                    img.MouseLeave += Img_MouseLeave;
                    grid.Children.Add(img);
                }
            }
        }
-
代码很Low,羽神说,我把 WPF写成了Winform,不得不承认,是这个样子的,binding什么的,都没用,但是后来想了想不是我不想用,而是地铁图的路线不规则,没有规律,我就不知道怎么重写一个控件来绑定一个List集合,统一进行展示了,思考了挺久,但是依然没有好的想法,因为,我们在公司做的binding,都是基于数据层面的,说白了,就是前台的XAML变动不大,或者变动的比较有规律,例如重写Listbox的Template,来实现统一的效果,绑定数据以后,自动展示。

-
就像上面这个图,就可以重写 Listbox,然后实现效果,但是我这次的小Demo里没有做,因为XML的数据中没有提供相关的东西,也就没有去搞了,相信,做过WPF的,看了这个图,基本也就知道怎么搞了,如果有没有思路的朋友,可以留言问我。
四、类似于ToolTip的地铁名提示
-
这个功能特别的感谢 李伟哥@普通的地球人,不得不说,李伟哥的WPF特别厉害,轻松的搞定了我当时出现的困扰。最开始做跟着鼠标走的ToolTip的时候,首先想到的是ToolTip,但是发现,不好用,因为他会定位到一个位置,不会跟着走,后来也用了Popup,但是根据网上的方法,会闪烁,因为Popup是需要先隐藏,再显示的,所以,有闪烁的效果,在群里问了以后,李伟哥很快给了一个Demo,解答了我,厉害,在此谢谢李伟哥。
<Popup Grid.Row="1" x:Name="popPath" AllowsTransparency="True">
  <Border BorderBrush="Transparent" BorderThickness="0" Background="Transparent">
    <Grid HorizontalAlignment="Center" VerticalAlignment="Center">
      <Path Stroke="Black" StrokeThickness="1" Fill="White" Data="M 0,0 L 120,0 L 120,30 L 65,30 L 60,35 L 55,30 L 0,30 Z" />
      <Grid x:Name="grpopPath" Margin="5,5,5,10">
        <TextBlock x:Name="tbPath" Foreground="White" FontSize="13" HorizontalAlignment="Center" VerticalAlignment="Center" Style="{Binding Null}" />
      </Grid>
    </Grid>
  </Border>
</Popup>
private void Path_MouseMove(object sender, MouseEventArgs e)
{
    Path path = (Path)sender;
    grpopPath.Background = path.Stroke;
    tbPath.Text = path.ToolTip.ToString();


    Point p = e.GetPosition(mainGrid);
    popPath.IsOpen = true;
    popPath.HorizontalOffset = p.X - 60;
    popPath.VerticalOffset = p.Y - mainGrid.ActualHeight - 40;
}

private void Path_MouseLeave(object sender, MouseEventArgs e)
{
    popPath.IsOpen = false;
}
-
效果如图 
五、扩展
1)Grid
-
这个控件,我一直使用,也习惯了用 Grid,但是在做的过程中,确确实实学习到了不少东西,在此感谢羽神(不知道羽神的博客园地址),问题是这样的,就是绘制Path和Textblock的时候,都没有问题,但是绘制Ellipse的时候,却出现问题了,定位的位置不对,严重便宜到右下方,但是也设置了Grid的HorizontalAlignment="Left" VerticalAlignment="Top",但是都不起作用。
-
羽神一语道破,是因为 Grid的内部控件,都是默认全部填充的,需要设置控件自身的HorizontalAlignment和VerticalAlignment,当时设置完以后,就搞定了这个问题,感谢羽神的帮助。
2)Canvas
-
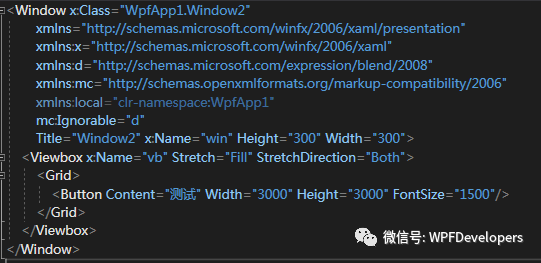
群里有人问,为什么不用 Canvas而用Grid,我当时确实没有考虑过用Canvas,说白了,我不太习惯除非必要,我个人喜欢用Grid,所以,当时给出的回答是“没想那么多”,但是当做完以后,后来想想,改成Canvas试下效果,但是发现了原因,此处,还真不能用Canvas,需要用Grid,因为我的外层用了Viewbox,因为百度地图上趴下了的数据,Path的路径和定位都特别的大,都是2000多,3000多大的样子,用了Canvas,没法显示下。可能大家不太好理解,我举个例子:外层用Viewbox,窗体的大小是300*300的,Viewbox下我们测试Canvas和Grid,Canvas和Grid下,放置一个3000*3000的Button。
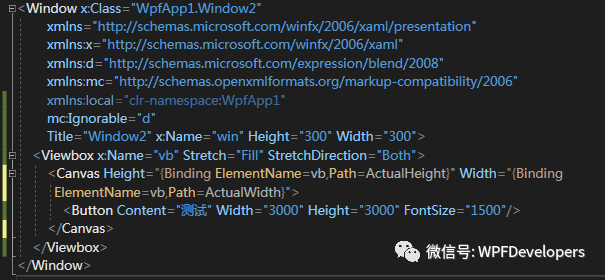
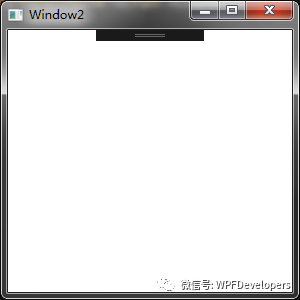
-
上面是 Canvas的例子代码和效果,明细可以看到,展示不出来Button,就是最大化也不行,我的电脑屏幕比较小。
-
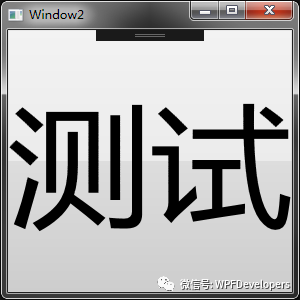
上面是
Grid的例子,能够看出,Button是可以显示出来的,填充了整个Viewbox,这和地铁图的原理是一样的。 -
有人可能会问,
Canvas如果不给宽和高呢,如果Canvas不给宽和高,则会在左侧顶点上,你可以试验下,就知道了。
六、总结
-
这个例子用到的知识点: XML的读取,控件的拖拽缩放,内容不多,但是,与我个人而言,每次做个小Demo都有所收获和成长,因为公司不忙,所以不想手生了,只能没事做个小Demo,补充自己的不足,提高自己,就像做的时候,遇到的两个问题,李伟哥和羽神给了很好的回答,我都学习到了,谢谢。源码
