在B/S系统开发中,前后端分离开发设计已成为一种标准,而VUE作为前端三大主流框架之一,越来越受到大家的青睐,Antdv是Antd在Vue中的实现。本系列文章主要通过Antdv和Asp.net WebApi开发学生信息管理系统,简述前后端分离开发的主要相关内容,仅供学习分享使用,如有不足之处,还请指正。.

注意:源码下载方式在文章底部
在本示例项目中,主要包含两大部分:1.前端web项目【vsims.web】2.后端webapi项目【vsims.webapi】,经过前四篇文章的讲解,已经对前端项目的架构和组成部分,以及后端webapi项目的开发有了大致了解,熟悉了学生管理模块所涉及到的列表,表单开发的相关内容,并且对学生管理其他几个模块【如:班级管理,课程管理,成绩管理】的讲解。今天继续讲解系统管理项目模块的开发,希望能对大家有所帮助。
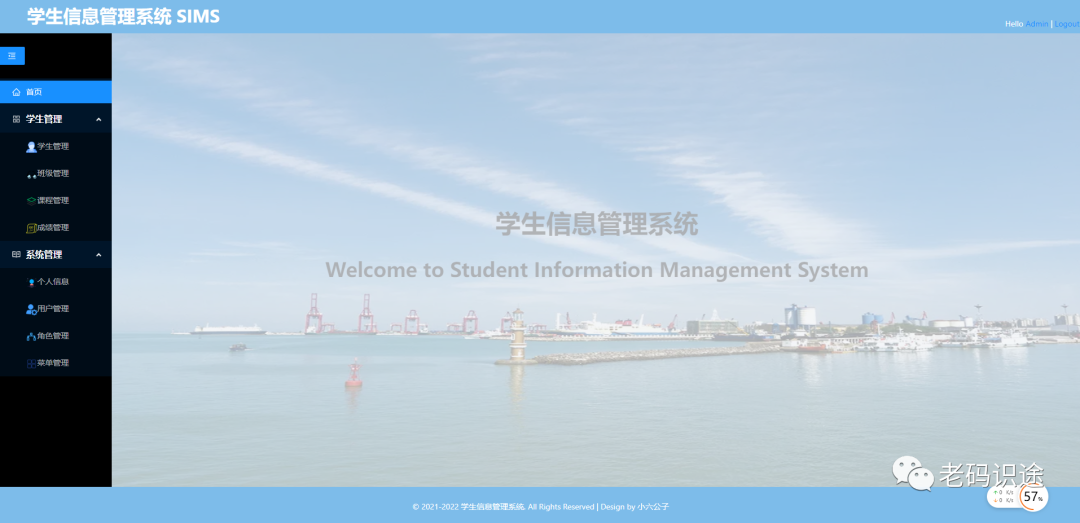
整体布局
系统整体功能分为学生管理【包括:学生管理,成绩管理,课程管理,班级管理】和系统管理【包括:个人信息,用户管理,角色管理,菜单管理】。关于系统管理各个模块的详细说明,下面分别进行讲解【由于篇幅有限,仅贴出页面Html代码,其他代码可通过下载源码进行查看】。整体页面布局,如下所示:
个人信息
个人信息主要展示当前登录用户的个人信息,包括个人账户,昵称,角色等,如下所示:
<template><a-card hoverable style="width: 300px;"><template #cover><img alt="example" src="https://gw.alipayobjects.com/zos/rmsportal/JiqGstEfoWAOHiTxclqi.png" /></template><a-card-meta title="个人信息" description="个人信息展示"><template #avatar><a-image :width="30" :height="30" src="/images/icon_student.png" /></template></a-card-meta><p>用户名: {{userName}}</p><p>昵 称: {{nickName}}</p><p>角 色: {{roleName}}</p></a-card></template>
个人信息截图,如下所示:

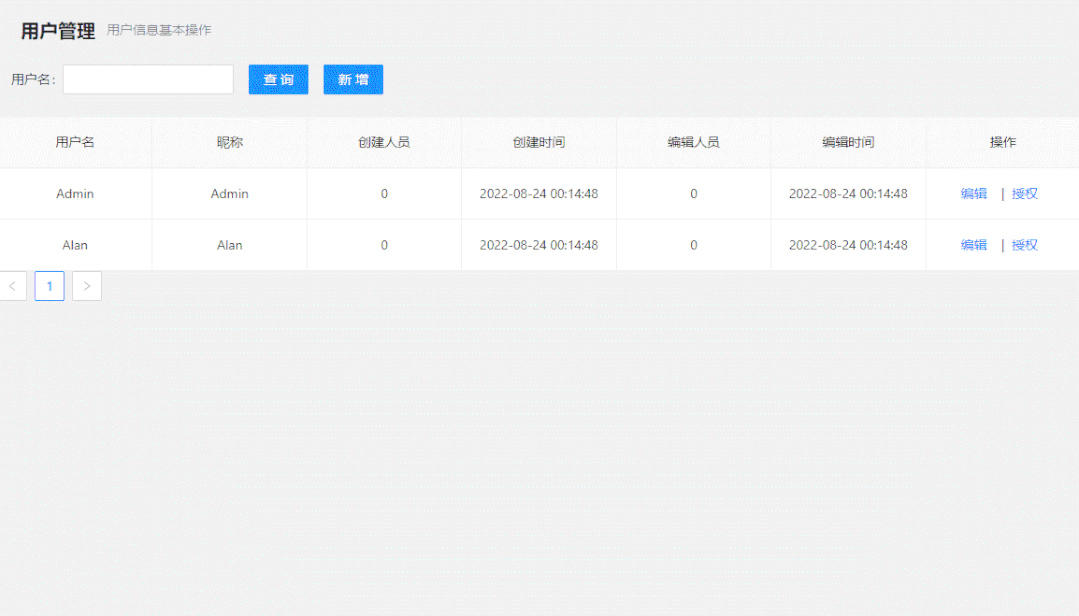
用户管理
用户管理主要用于创建用户,修改用户,及授权角色等功能。具体如下所示:
<template><a-page-header style="border: 1px solid rgb(235, 237, 240)" title="用户管理" sub-title="用户信息基本操作" /><a-form :model="formState" name="horizontal_query" layout="inline" autocomplete="off" @finish="onFinish" @finishFailed="onFinishFailed"><a-form-item label="用户名"><a-input v-model:value="formState.userName"></a-input></a-form-item><a-form-item><a-button type="primary" html-type="submit">查询</a-button></a-form-item><a-form-item><a-button type="primary" @click="add">新增</a-button></a-form-item></a-form><a-table :columns="columns" :data-source="dataSource" bordered :pagination="false" :row-key="record => record.id"><template #bodyCell="{ column, text, record }"><template v-if="[ 'name','teacher', 'createUser','lastEditUser'].includes(column.dataIndex)"><div>{{ text }}</div></template><template v-else-if="[ 'createTime','lastEditTime'].includes(column.dataIndex)"><div>{{formatDateString(text)}}</div></template><template v-else-if="column.dataIndex === 'operation'"><div class="editable-row-operations"><a @click="edit(record.id)">编辑</a>|<a @click="edit1(record.id)">授权</a></div></template></template></a-table><a-pagination v-model:current="pagination.current" :total="pagination.total" @change="change" /><a-modal ref="modalUserRef" v-model:visible="visible" okText="保存" cancelText="取消" :wrap-style="{ overflow: 'hidden' }" @ok="handleOk"><div><a-page-header style="border: 1px solid rgb(235, 237, 240)" title="用户管理" sub-title="新增或编辑用户信息" /><br /><a-form :model="addEditFormState"><a-form-item label="用户名"><a-input v-model:value="addEditFormState.userName" /></a-form-item><a-form-item label="昵称"><a-input v-model:value="addEditFormState.nickName" /></a-form-item><a-form-item label="密码"><a-input-password v-model:value="addEditFormState.password" /></a-form-item><a-form-item label="确认密码"><a-input-password v-model:value="addEditFormState.confirmPassword" /></a-form-item></a-form></div></a-modal><a-modal ref="modalRoleRef" v-model:visible="visible1" okText="保存" cancelText="取消" :wrap-style="{ overflow: 'hidden' }" @ok="handleOk1"><div class="userrole"><a-page-header style="border: 1px solid rgb(235, 237, 240)" title="用户授权" sub-title="用户权限信息" /><br /><div><div style="margin-bottom: 16px"><span style="margin-left: 8px"><template v-if="hasSelected">{{ `选择了 ${selectedRowKeys.length} 个角色` }}</template></span></div><a-table :row-selection="{ selectedRowKeys: selectedRowKeys, onChange: onSelectChange }" :columns="columnRoles" :data-source="roleDataSource" :pagination="false" :row-key="record => record.id" /></div></div></a-modal></template>
用户管理示例截图
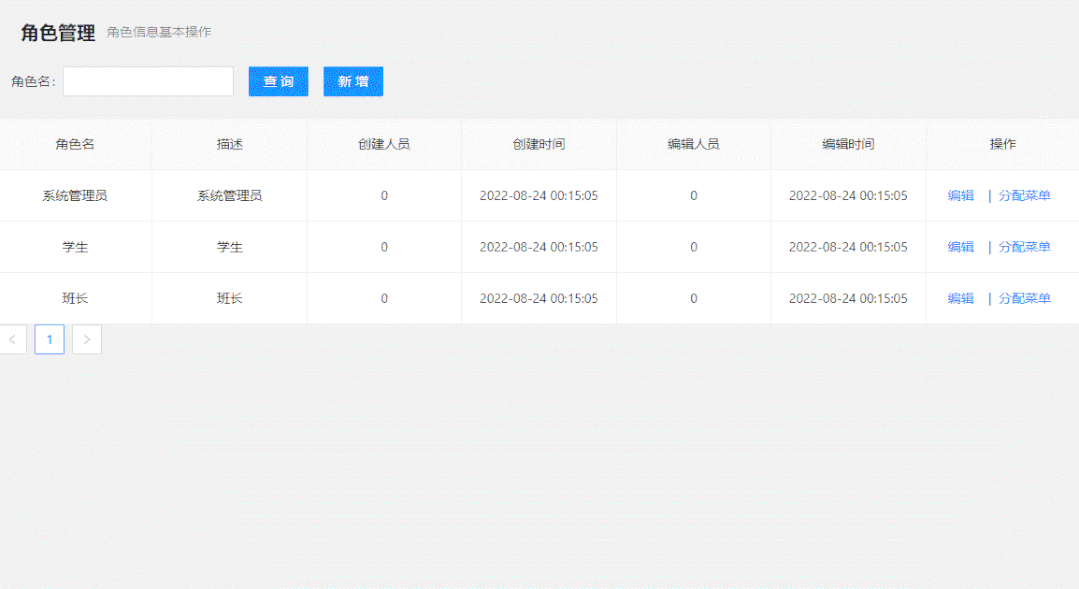
角色管理
角色管理主要用于对角色的创建,编辑,查询,及分配菜单等操作,代码如下所示:
<template><a-page-header style="border: 1px solid rgb(235, 237, 240)" title="角色管理" sub-title="角色信息基本操作" /><a-form :model="formState" name="horizontal_query" layout="inline" autocomplete="off" @finish="onFinish" @finishFailed="onFinishFailed"><a-form-item label="角色名"><a-input v-model:value="formState.roleName"></a-input></a-form-item><a-form-item><a-button type="primary" html-type="submit">查询</a-button></a-form-item><a-form-item><a-button type="primary" @click="add">新增</a-button></a-form-item></a-form><a-table :columns="columns" :data-source="dataSource" bordered :pagination="false" :row-key="record => record.id"><template #bodyCell="{ column, text, record }"><template v-if="[ 'name','teacher', 'createUser','lastEditUser'].includes(column.dataIndex)"><div>{{ text }}</div></template><template v-else-if="[ 'createTime','lastEditTime'].includes(column.dataIndex)"><div>{{formatDateString(text)}}</div></template><template v-else-if="column.dataIndex === 'operation'"><div class="editable-row-operations"><a @click="edit(record.id)">编辑</a>|<a @click="edit1(record.id)">分配菜单</a></div></template></template></a-table><a-pagination v-model:current="pagination.current" :total="pagination.total" @change="change" /><a-modal ref="modalRoleRef" v-model:visible="visible" okText="保存" cancelText="取消" :wrap-style="{ overflow: 'hidden' }" @ok="handleOk"><div><a-page-header style="border: 1px solid rgb(235, 237, 240)" title="角色管理" sub-title="新增或编辑角色信息" /><br /><a-form :model="addEditFormState"><a-form-item label="角色名"><a-input v-model:value="addEditFormState.name" /></a-form-item><a-form-item label="描述"><a-input v-model:value="addEditFormState.description" /></a-form-item></a-form></div></a-modal><a-modal ref="modalMenuRef" v-model:visible="visible1" okText="保存" cancelText="取消" :wrap-style="{ overflow: 'hidden' }" @ok="handleOk1"><div class="rolemenu"><a-page-header style="border: 1px solid rgb(235, 237, 240)" title="角色分配菜单" sub-title="菜单分配信息" /><br /><div><div style="margin-bottom: 8px"><span style="margin-left: 8px"><template v-if="hasSelected">{{ `选择了 ${selectedRowKeys.length} 个菜单` }}</template></span></div><a-table :row-selection="{ selectedRowKeys: selectedRowKeys, onChange: onSelectChange }" :columns="columnMenus" :data-source="menuDataSource" :pagination="false" :row-key="record => record.id" /></div></div></a-modal></template>
角色模块,截图如下所示:
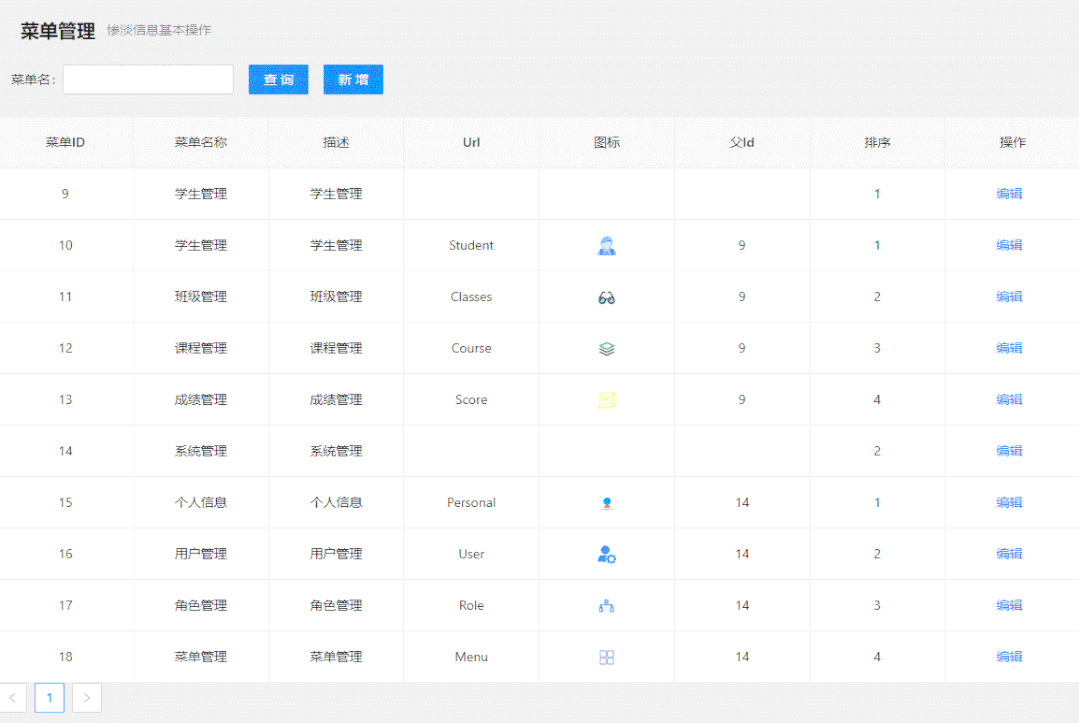
菜单管理
菜单管理,主要用于管理导航相关配置,包括图标,顺序,层级等相关内容,如下所示:
<template><a-page-header style="border: 1px solid rgb(235, 237, 240)" title="菜单管理" sub-title="惨淡信息基本操作" /><a-form :model="formState" name="horizontal_query" layout="inline" autocomplete="off" @finish="onFinish" @finishFailed="onFinishFailed"><a-form-item label="菜单名"><a-input v-model:value="formState.menuName"></a-input></a-form-item><a-form-item><a-button type="primary" html-type="submit">查询</a-button></a-form-item><a-form-item><a-button type="primary" @click="add">新增</a-button></a-form-item></a-form><a-table :columns="columns" :data-source="dataSource" bordered :pagination="false" :row-key="record => record.id"><template #bodyCell="{ column, text, record }"><template v-if="[ 'name','id','parentId','sortId','description','url'].includes(column.dataIndex)"><div>{{ text }}</div></template><template v-else-if="[ 'icon'].includes(column.dataIndex)"><div><a-image :width="20" :height="20" :src="text"/></div></template><template v-else-if="column.dataIndex === 'operation'"><div class="editable-row-operations"><a @click="edit(record.id)">编辑</a></div></template></template></a-table><a-pagination v-model:current="pagination.current" :total="pagination.total" @change="change" /><a-modal ref="modalRef" v-model:visible="visible" okText="保存" cancelText="取消" :wrap-style="{ overflow: 'hidden' }" @ok="handleOk"><div><a-page-header style="border: 1px solid rgb(235, 237, 240)" title="菜单管理" sub-title="新增或编辑菜单信息" /><br /><a-form :model="addEditFormState"><a-form-item label="菜单名"><a-input v-model:value="addEditFormState.name" /></a-form-item><a-form-item label="描述"><a-input v-model:value="addEditFormState.description" /></a-form-item><a-form-item label="Url"><a-input v-model:value="addEditFormState.url" /></a-form-item><a-form-item label="图标"><a-input v-model:value="addEditFormState.icon" /></a-form-item><a-form-item label="父ID"><a-input v-model:value="addEditFormState.parentId" /></a-form-item><a-form-item label="排序"><a-input v-model:value="addEditFormState.sortId" /></a-form-item></a-form></div></a-modal></template>
菜单管理,截图如下所示:
关于源码
关于源码下载,可点击CSDN上的链接 或者关注个人公众号【老码识途】进行下载,如下所示:

备注
以上就是VUE3.0+Antdv+Asp.net WebApi开发学生信息管理系统系列课程的全部内容了,通过几个功能模块的讲解,虽然各个模块虽功能略有差异,但总归万变不离其宗,开发方法也大同小异,复杂的功能都是普通的功能累加起来的。这也是本系列文章由浅入深的渐进安排。希望能够抛砖引玉,不局限于某一功能,而是能够举一反三,自我理解,以达到自我开发的能力。
学习编程,从关注【老码识途】开始!!!
