项目背景
MAUI的出现,赋予了广大Net开发者开发多平台应用的能力,MAUI 是Xamarin.Forms演变而来,但是相比Xamarin性能更好,可扩展性更强,结构更简单。但是MAUI对于平台相关的实现并不完整。
所以MASA团队开展了一个实验性项目,意在对微软MAUI的补充和扩展,项目地址 https://github.com/BlazorComponent/MASA.Blazor/tree/main/src/Masa.Blazor.Maui.Plugin
每个功能都有单独的demo演示项目,考虑到app安装文件体积(虽然MAUI已经集成裁剪功能,但是该功能对于代码本身有影响),届时每一个功能都会以单独的nuget包的形式提供,方便测试,现在项目才刚刚开始,但是相信很快就会有可以交付的内容啦。.
前言
本系列文章面向移动开发小白,从零开始进行平台相关功能开发,演示如何参考平台的官方文档使用MAUI技术来开发相应功能。
介绍
由于蓝牙功能设计的内容比较多,篇幅有限,本文只集成一个最基本的蓝牙扫描功能,意在抛砖引玉。后续会陆续更新其他蓝牙通讯功能的文章。本文蓝牙低功耗简称为BLE
如果你对BLE的相关概念不了解,可以参考 开发者官网链接: 蓝牙低功耗-安卓(https://developer.android.google.cn/guide/topics/connectivity/bluetooth-le/)
本文JAVA相关代码均来自安卓开发者官网
开发步骤
新建项目
添加权限
由于 LE 信标通常与位置相关联,还须声明 ACCESS_FINE_LOCATION 权限。没有此权限,扫描将无法返回任何结果。
如果适配 Android 9(API 级别 28)或更低版本,可以声明 ACCESS_COARSE_LOCATION 权限而非 ACCESS_FINE_LOCATION 权限
如果想让应用启动设备发现或操纵蓝牙设置,还须声明 BLUETOOTH_ADMIN 权限。注意:如果使用 LUETOOTH_ADMIN 权限,则您必须拥有 BLUETOOTH 权限。
在MauiBlueToothDemo项目中的AndroidManifest.xml添加权限,我们这里面向Android 9以上版本。
	<!--蓝牙权限-->
	<uses-permission android:name="android.permission.BLUETOOTH" />
	<!--让应用启动设备发现或操纵蓝牙设置-->
	<uses-permission android:name="android.permission.BLUETOOTH_ADMIN" />
	<!-- 如果设配Android9及更低版本,可以申请 ACCESS_COARSE_LOCATION -->
	<uses-permission android:name="android.permission.ACCESS_FINE_LOCATION" />
我们在Masa.Maui.Plugin.Bluetooth项目的Platforms_Android下新建MasaMauiBluetoothService类,并添加一个内部类BluetoothPermissions ,MAUI的默认权限没有包含蓝牙低功耗,所以我们需要扩展一个自定义的蓝牙权限类,只要继承自 Permissions.BasePermission即可
        private class BluetoothPermissions : Permissions.BasePlatformPermission
        {
            public override (string androidPermission, bool isRuntime)[] RequiredPermissions =>
                new List<(string androidPermission, bool isRuntime)>
                {
                    (global::Android.Manifest.Permission.AccessFineLocation, true),
                    (global::Android.Manifest.Permission.Bluetooth, true),
                    (global::Android.Manifest.Permission.BluetoothAdmin, true),
                }.ToArray();
        }
{
var status = await Permissions.CheckStatusAsync<BluetoothPermissions>();
if (status == PermissionStatus.Granted)
return true;
status = await Permissions.RequestAsync<BluetoothPermissions>();
if (status == PermissionStatus.Granted)
return true;
return false;
}
向用户请求权限,使用 Permissions.RequestAsync 方法。如果用户以前授予了权限,并且尚未撤销该权限,则此方法将返回 Granted 而不向用户显示对话框。
设置BLE
为什么要设置BLE,因为我们在使用BLE进行通讯之前,需要验证设备是否支持BLE或者检查BLE是否开启。我们先看一下java的实现方式
JAVA 代码
private BluetoothAdapter bluetoothAdapter;
...
// Initializes Bluetooth adapter.
final BluetoothManager bluetoothManager =
        (BluetoothManager) getSystemService(Context.BLUETOOTH_SERVICE);
bluetoothAdapter = bluetoothManager.getAdapter();
        private readonly BluetoothManager _bluetoothManager;
        private readonly BluetoothAdapter _bluetoothAdapter;
        public MasaMauiBluetoothService()
        {
            _bluetoothManager = (BluetoothManager)Android.App.Application.Context.GetSystemService(Android.App.Application.BluetoothService);
            _bluetoothAdapter = _bluetoothManager?.Adapter;
        }
继续在MasaMauiBluetoothService添加一个检查蓝牙适配器是否存在并开启的方法
        public bool IsEnabled()
        {
            return _bluetoothAdapter is {IsEnabled: true};
        }
BLE扫描
JAVA 代码
/**
 * Activity for scanning and displaying available BLE devices.
 */
public class DeviceScanActivity extends ListActivity {

    private BluetoothAdapter bluetoothAdapter;
    private boolean mScanning;
    private Handler handler;

    // Stops scanning after 10 seconds.
    private static final long SCAN_PERIOD = 10000;
    ...
    private void scanLeDevice(final boolean enable) {
        if (enable) {
            // Stops scanning after a pre-defined scan period.
            handler.postDelayed(new Runnable() {
                @Override
                public void run() {
                    mScanning = false;
                    bluetoothAdapter.stopLeScan(leScanCallback);
                }
            }, SCAN_PERIOD);

            mScanning = true;
            bluetoothAdapter.startLeScan(leScanCallback);
        } else {
            mScanning = false;
            bluetoothAdapter.stopLeScan(leScanCallback);
        }
        ...
    }
...
}
我们再看一下LeScanCallback的Java实现
JAVA 代码
private LeDeviceListAdapter leDeviceListAdapter;
...
// Device scan callback.
private BluetoothAdapter.LeScanCallback leScanCallback =
        new BluetoothAdapter.LeScanCallback() {
    @Override
    public void onLeScan(final BluetoothDevice device, int rssi,
            byte[] scanRecord) {
        runOnUiThread(new Runnable() {
           @Override
           public void run() {
               leDeviceListAdapter.addDevice(device);
               leDeviceListAdapter.notifyDataSetChanged();
           }
       });
   }
};
我们如法炮制这部分功能,在MasaMauiBluetoothService中添加一个继承自ScanCallback内部类DevicesCallback,ScanCallback类 对应安卓的leScanCallback
private class DevicesCallback : ScanCallback
{
private readonly EventWaitHandle _eventWaitHandle = new(false, EventResetMode.AutoReset);
public List<BluetoothDevice> Devices { get; } = new();
public void WaitOne()
{
Task.Run(async () =>
{
await Task.Delay(5000);
_eventWaitHandle.Set();
});
_eventWaitHandle.WaitOne();
}
public override void OnScanResult(ScanCallbackType callbackType, ScanResult result)
{
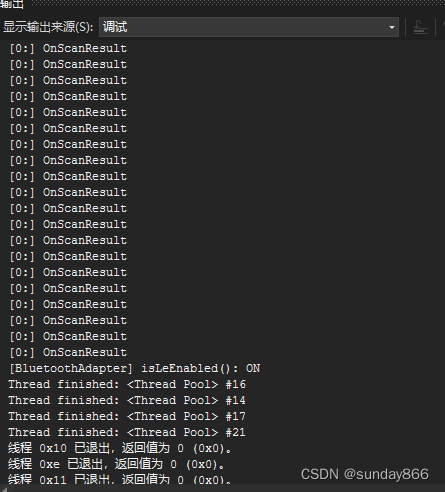
System.Diagnostics.Debug.WriteLine("OnScanResult");
if (!Devices.Contains(result.Device))
{
Devices.Add(result.Device);
}
base.OnScanResult(callbackType, result);
}
}
我们在MAUI中打印调试信息可以使用System.Diagnostics.Debug.WriteLine真机调试的信息会被打印到vs的输出控制台。
我们添加一个属性Devices用于汇总收集扫描到的设备信息。这里使用了EventWaitHandle 用于在异步操作时控制线程间的同步,线程在 EventWaitHandle 上将一直受阻,直到未受阻的线程调用 Set 方法,没用过的可以自行查看微软文档。
继续在MasaMauiBluetoothService添加字段,并在构造函数初始化。
        private readonly ScanSettings _settings;
        private readonly DevicesCallback _callback;
        public MasaMauiBluetoothService()
        {
            _bluetoothManager = (BluetoothManager)Android.App.Application.Context.GetSystemService(Android.App.Application.BluetoothService);
            _bluetoothAdapter = _bluetoothManager?.Adapter;
               _settings = new ScanSettings.Builder()
                .SetScanMode(Android.Bluetooth.LE.ScanMode.Balanced)
                ?.Build();
            _callback = new DevicesCallback();
        }
ScanSettings.SCAN_MODE_LOW_POWER 低功耗模式(默认扫描模式,如果扫描应用程序不在前台,则强制使用此模式。)
ScanSettings.SCAN_MODE_BALANCED 平衡模式
ScanSettings.SCAN_MODE_LOW_LATENCY 高功耗模式(建议仅在应用程序在前台运行时才使用此模式。)
 public async Task<IReadOnlyCollection<BluetoothDevice>> ScanLeDeviceAsync()
        {
            //第一个参数可以设置过滤条件-蓝牙名称,名称前缀,服务号等,这里暂时不设置过滤条件
            _bluetoothAdapter.BluetoothLeScanner.StartScan(null, _settings, _callback);
            await Task.Run(() =>
            {
                _callback.WaitOne();
            });
            _bluetoothAdapter.BluetoothLeScanner.StopScan(_callback);
            return _callback.Devices.AsReadOnly();
        }
测试
修改MauiBlueToothDemo的Index页面,页面使用了对MAUI支持良好的Masa Blazor组件: Masa Blazor
@page "/"
<MButton OnClick="ScanBLEDeviceAsync">扫描蓝牙设备</MButton>
<div class="text-center">
    <MDialog @bind-Value="ShowProgress" Width="500">
        <ChildContent>
            <MCard>
                <MCardTitle>
                    正在扫描蓝牙设备
                </MCardTitle>
                <MCardText>
                    <MProgressCircular Size="40" Indeterminate Color="primary"></MProgressCircular>
                </MCardText>
            </MCard>
        </ChildContent>
    </MDialog>
</div>

<MCard Class="mx-auto" MaxWidth="400" Tile>
    @foreach (var item in BluetoothDeviceList)
    {
        <MListItem>
            <MListItemContent>
                <MListItemTitle>@item</MListItemTitle>
            </MListItemContent>
        </MListItem>
    }
</MCard>
using Masa.Maui.Plugin.Bluetooth;
using Microsoft.AspNetCore.Components;

namespace MauiBlueToothDemo.Pages
{
    public partial class Index
    {
        private bool ShowProgress { get; set; }
        private List<string> BluetoothDeviceList { get; set; } = new();
        [Inject]
        private MasaMauiBluetoothService BluetoothService { get; set; }

        private async Task ScanBLEDeviceAsync()
        {
            if (BluetoothService.IsEnabled())
            {
                if (await BluetoothService.CheckAndRequestBluetoothPermission())
                {
                    ShowProgress = true;
                    var deviceList = await BluetoothService.ScanLeDeviceAsync();
                    BluetoothDeviceList = deviceList.Where(o => !string.IsNullOrEmpty(o.Name)).Select(o => o.Name).Distinct().ToList();
                    ShowProgress = false;
                }
            }
        }
    }
}
不要忘记在MauiProgram.cs注入写好的MasaMauiBluetoothService
#if ANDROID
        builder.Services.AddSingleton<MasaMauiBluetoothService>();
#endif
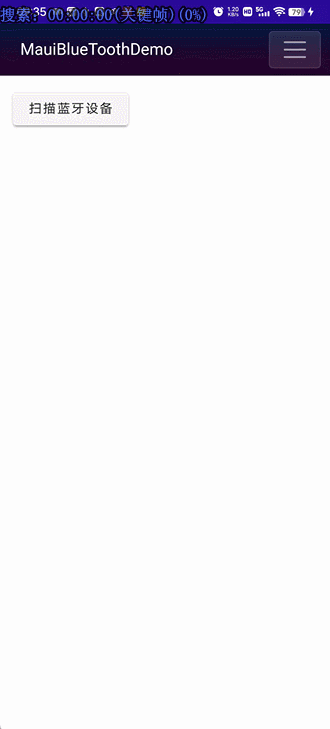
我们真机运行一下看看效果
同时在vs的输出中可以看到打印的日志
本文到此结束,下一篇我们实现具体的BLE的通讯。
