必要准备工作
安装工具服务器代理工具Nginx 和容器 Docker 基础安装使用
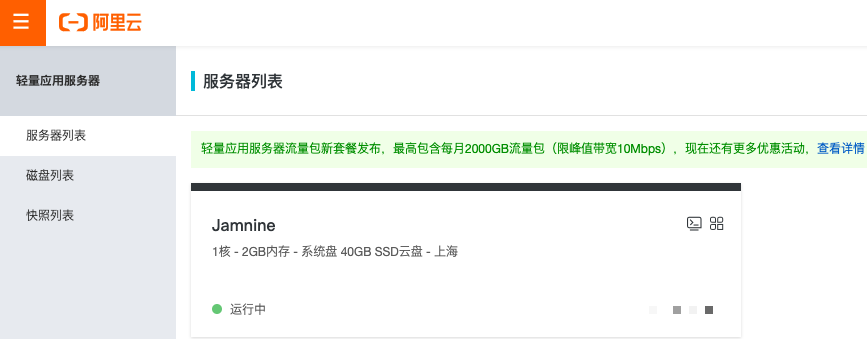
1.1 服务器配置
我用于学习的是阿里云的轻量应用服务器 CentOS系统7.3的镜像,升级为7.8 ,1C2G的配置,学习折腾还是勉强够用的,或者选择按量计费,学习几小时也就十来块的服务器费用,
当然你也可以自己搭建服务器,喜欢折腾的自己可以弄去,本文章以技术学习为重点,迟下在写一下安装Cent OS.
注:阿里云的服务器记得配置安全组和端口开放规则
1.2 Cent OS系统升级
也可以不升级,个人习惯,毕竟有些包或者依赖最新的还是更好的
[rootenine~]#cat/etc/centos-reLease
CentosLinuxrelease7.8.2003(Core)

当前系统版本 7.8.2003

# 查询centos IP地址$ ip addrvi /etc/sysconfig/network-scripts/ifcfg-ens33###原数据###TYPE="Ethernet"PROXY_METHOD="none"BROWSER_ONLY="no"BOOTPROTO="dhcp"DEFROUTE="yes"IPV4_FAILURE_FATAL="no"IPV6INIT="yes"IPV6_AUTOCONF="yes"IPV6_DEFROUTE="yes"IPV6_FAILURE_FATAL="no"IPV6_ADDR_GEN_MODE="stable-privacy"NAME="ens33"UUID="8bc76d14-7d23-4e7a-ba30-d0a8a4ccd0ca"DEVICE="ens33"ONBOOT="yes"###修改后###TYPE="Ethernet"PROXY_METHOD="none"BROWSER_ONLY="no"BOOTPROTO="dhcp"DEFROUTE="yes"IPV4_FAILURE_FATAL="no"IPV6INIT="yes"IPV6_AUTOCONF="yes"IPV6_DEFROUTE="yes"IPV6_FAILURE_FATAL="no"IPV6_ADDR_GEN_MODE="stable-privacy"NAME="ens33"UUID="8bc76d14-7d23-4e7a-ba30-d0a8a4ccd0ca"DEVICE="ens33"ONBOOT="yes"+ BOOTPROTO="static" #设置为静态IP模式+ IPADDR=192.168.2.99 #IP+ NETMASK=255.255.255.0 #子网掩码+ GATEWAY=192.168.2.1 #网关+ DNS1=192.168.2.1 #DNS+ DNS2=8.8.8.8增加以下内容BOOTPROTO="static" #设置为静态IP模式IPADDR=192.168.2.99 #IP地址NETMASK=255.255.255.0 #子网掩码GATEWAY=192.168.2.1 #默认网关DNS1=192.168.2.1 #DNS1DNS2=8.8.8.8 #DNS2systemctl restart network.service #重启网络服务systemctl status network.service #查看网络服务状态# 查看系统版本$ cat /etc/centos-releaseCentOS Linux release 7.8.2003 (Core)Anolis-8.4cat /etc/anolis-releaseAnolis OS release 8.4$ uname -aLinux nine 4.18.0-305.an8.x86_64 #1 SMP Sun Jun 20 14:13:18 CST 2021 x86_64 x86_64 x86_64 GNU/Linux$ uname -r4.18.0-305.an8.x86_64# 更新系统$ sudo yum update# 更新完查看下系统版本$ cat /etc/centos-releaseCentOS Linux release 7.9.2009 (Core)$ cat /etc/anolis-releaseAnolis OS release 8.5
1.3 Docker 基础使用与安装
安装Docker-ce(Cent OS 7)
Docker-ce安装命令
# 按顺序执行以下命令# 卸载清理系统Docker,检查系统是否自带,或者别的docker版本,执行下卸载命令检查$ sudo yum remove docker-ce# 安装必要依赖$ sudo yum install -y yum-utils device-mapper-persistent-data lvm2# 设置Docker源,这里使用的是阿里云的源,比官方的快一点$ sudo yum-config-manager --add-repo http://mirrors.aliyun.com/docker-ce/linux/centos/docker-ce.repo# 更新并安装Docker-CE$ sudo yum makecache fast$ sudo yum -y install docker-ce# 开启Docker服务$ sudo service docker start# 设置docker开机启动$ systemctl enable docker# 启动Docker$ systemctl start docker# 检查Docker版本$ docker --version[root@nine ~]# docker --versionDocker version 20.10.17, build 100c701$ docker version[root@nine ~]# docker --versionDocker version 20.10.17, build 100c701[root@nine ~]# docker versionClient: Docker Engine - CommunityVersion: 20.10.17API version: 1.41Go version: go1.17.11Git commit: 100c701Built: Mon Jun 6 23:05:12 2022OS/Arch: linux/amd64Context: defaultExperimental: trueServer: Docker Engine - CommunityEngine:Version: 20.10.17API version: 1.41 (minimum version 1.12)Go version: go1.17.11Git commit: a89b842Built: Mon Jun 6 23:03:33 2022OS/Arch: linux/amd64Experimental: falsecontainerd:Version: 1.6.7GitCommit: 0197261a30bf81f1ee8e6a4dd2dea0ef95d67ccbrunc:Version: 1.1.3GitCommit: v1.1.3-0-g6724737docker-init:Version: 0.19.0GitCommit: de40ad0docker 安装结束,接下来喜闻乐见的 Hello word补充:yum list docker-ce --showduplicates | sort -rsudo yum -y install docker-ce-3:19.03.13-3.el8 -y查看状态systemctl status docker.service查看版本docker version检测是否启动成功,可以使用search命令docker search mysqlsystemctl daemon-reloadsystemctl restart docker.service[root@nine ~]# sudo yum remove docker-ce未找到匹配的参数: docker-ce没有软件包需要移除。依赖关系解决。无需任何处理。完毕![root@nine ~]# sudo service docker startRedirecting to /bin/systemctl start docker.service[root@nine ~]# systemctl enable dockerCreated symlink /etc/systemd/system/multi-user.target.wants/docker.service → /usr/lib/systemd/system/docker.service.[root@nine ~]# systemctl start docker[root@nine ~]# docker --versionDocker version 20.10.15, build fd82621[root@nine ~]# dockerd --debugINFO[2022-05-09T10:49:00.832071693+08:00] Starting upfailed to start daemon: pid file found, ensure docker is not running or delete /var/run/docker.pid[root@nine ~]#
解决 RPM 数据库损坏的问题删除损坏的rpmdb文件$ rm /var/lib/rpm/__**$ rpm --rebuilddb$ yum clean all[root@nine ~]# sudo yum install -y yum-utils device-mapper-persistent-data lvm2上次元数据过期检查:0:19:04 前,执行于 2022年05月09日 星期一 10时19分07秒。Module yaml error: Encountered two streams with matching NSVCA virt-devel:an:8050020220504025225:bc14a129:x86_64 but differing contentModule yaml error: Encountered two streams with matching NSVCA virt-devel:an:8050020220504025225:bc14a129:x86_64 but differing content软件包 device-mapper-persistent-data-0.9.0-4.an8.x86_64 已安装。软件包 lvm2-8:2.03.12-10.0.1.an8.x86_64 已安装。依赖关系解决。============================================================================================================================================================================================================================================================================================软件包 架构 版本 仓库 大小============================================================================================================================================================================================================================================================================================安装:yum-utils noarch 4.0.21-4.0.1.an8 BaseOS 72 k事务概要============================================================================================================================================================================================================================================================================================安装 1 软件包总下载:72 k安装大小:23 k下载软件包:yum-utils-4.0.21-4.0.1.an8.noarch.rpm 272 kB/s | 72 kB 00:00--------------------------------------------------------------------------------------------------------------------------------------------------------------------------------------------------------------------------------------------------------------------------------------------总计 271 kB/s | 72 kB 00:00运行事务检查事务检查成功。运行事务测试事务测试成功。运行事务RPM软件包: 错误:db5 错误(-30969) 源自 dbenv->open:BDB0091 DB_VERSION_MISMATCH: Database environment version mismatchRPM软件包: 错误:cannot open Packages index using db5 - (-30969)RPM软件包: 错误:无法从 /var/lib/rpm 打开软件包数据库下载的软件包保存在缓存中,直到下次成功执行事务。您可以通过执行 'yum clean packages' 删除软件包缓存。错误:不能执行事务。[root@nine ~]# rm /var/lib/rpm/__**rm:是否删除普通文件 '/var/lib/rpm/__db.001'?yrm:是否删除普通文件 '/var/lib/rpm/__db.002'?yrm:是否删除普通文件 '/var/lib/rpm/__db.003'?y[root@nine ~]# rpm --rebuilddb[root@nine ~]# yum clean all33 文件已删除[root@nine ~]# sudo yum install -y yum-utils device-mapper-persistent-data lvm2AnolisOS-8 - AppStream 3.6 MB/s | 8.7 MB 00:02AnolisOS-8 - BaseOS 3.2 MB/s | 4.5 MB 00:01AnolisOS-8 - Extras 5.0 kB/s | 1.6 kB 00:00AnolisOS-8 - PowerTools 4.3 MB/s | 2.2 MB 00:00Module yaml error: Encountered two streams with matching NSVCA virt-devel:an:8050020220504025225:bc14a129:x86_64 but differing contentModule yaml error: Encountered two streams with matching NSVCA virt-devel:an:8050020220504025225:bc14a129:x86_64 but differing content软件包 device-mapper-persistent-data-0.9.0-4.an8.x86_64 已安装。软件包 lvm2-8:2.03.12-10.0.1.an8.x86_64 已安装。依赖关系解决。============================================================================================================================================================================================================================================================================================软件包 架构 版本 仓库 大小============================================================================================================================================================================================================================================================================================安装:yum-utils noarch 4.0.21-4.0.1.an8 BaseOS 72 k事务概要============================================================================================================================================================================================================================================================================================安装 1 软件包总下载:72 k安装大小:23 k下载软件包:yum-utils-4.0.21-4.0.1.an8.noarch.rpm 448 kB/s | 72 kB 00:00--------------------------------------------------------------------------------------------------------------------------------------------------------------------------------------------------------------------------------------------------------------------------------------------总计 444 kB/s | 72 kB 00:00运行事务检查事务检查成功。运行事务测试事务测试成功。运行事务准备中 : 1/1安装 : yum-utils-4.0.21-4.0.1.an8.noarch 1/1运行脚本: yum-utils-4.0.21-4.0.1.an8.noarch 1/1验证 : yum-utils-4.0.21-4.0.1.an8.noarch 1/1已安装:yum-utils-4.0.21-4.0.1.an8.noarch完毕![root@nine ~]# sudo yum makecache fastusage: yum makecache [-c [config file]] [-q] [-v] [--version][--installroot [path]] [--nodocs] [--noplugins][--enableplugin [plugin]] [--disableplugin [plugin]][--releasever RELEASEVER] [--setopt SETOPTS][--skip-broken] [-h] [--allowerasing] [-b | --nobest][-C] [-R [minutes]] [-d [debug level]] [--debugsolver][--showduplicates] [-e ERRORLEVEL] [--obsoletes][--rpmverbosity [debug level name]] [-y] [--assumeno][--enablerepo [repo]] [--disablerepo [repo] | --repo[repo]] [--enable | --disable] [-x [package]][--disableexcludes [repo]] [--repofrompath [repo,path]][--noautoremove] [--nogpgcheck] [--color COLOR][--refresh] [-4] [-6] [--destdir DESTDIR][--downloadonly] [--comment COMMENT] [--bugfix][--enhancement] [--newpackage] [--security][--advisory ADVISORY] [--bz BUGZILLA] [--cve CVES][--sec-severity {Critical,Important,Moderate,Low}][--forcearch ARCH] [--timer]yum makecache: error: argument timer: invalid choice: 'fast' (choose from 'timer')### yum makecache: error: argument timer: invalid choice: ‘fast’ (choose from ‘timer’)在使用yum makecache fast报错yum makecache: error: argument timer: invalid choice: ‘fast’ (choose from ‘timer’),是因为CentOS 8没有fast这个命令 去掉就可以了阿里云OS注意事项 注:阿里云OS(Alibaba Cloud Linux release 3)请参考官方文档,不能直接使用上面语句安装Docker-ce,很多源被限制了 出错示例
输入 :$ sudo yum install -y yum-utils device-mapper-persistent-data lvm2# 安装报错----------------------------------------------------dockerErrors during downloading metadata for repository 'docker-ce-stable':- Status code: 404 forhttps://download.docker.com/linux/centos/3/x86_64/stable/repodata/repomd.xml (IP: 13.249.162.1)# 安装报错----------------------------------------------------# 解决方案----------------------------------------------------$ cd /etc/yum.repos.d/$ rm -rf docker-ce.repo# 解决方案----------------------------------------------------
之后参照这个文档安装Docker-ce
https://help.aliyun.com/document_detail/264695.html?spm=5176.21213303.J_6028563670.38.3acf3eda1H4cBI&scm=20140722.S_help%40%40%E6%96%87%E6%A1%A3%40%40264695.S_hot.ID_264695-RL_docker%E5%AE%89%E8%A3%85-OR_s%2Bhelpmain-V_1-P0_7
Net Core SDK 冲突注意事项
注:Docker-ce与Net Core SDK的冲突
安装docker和net core SDK的顺序不同会有一些别的问题,由于微软下的docker源换掉了,
先安装SDK会导致一些组件错误,也有解决方法,最简单的就是先安装docker再安装SDK
●先安装Docker在安装SDK
可以顺利安装无需解决
●先安装SDK再安装Docker
1. 找到这个目录(/etc/yum.repos.d/microsoft-prod.repo)下的进入microsoft-prod.repo2. 备份文件microsoft-prod.repo3. 然后删除掉文件microsoft-prod.repo4. 安装Docker5. 还原文件microsoft-prod.repo
测试Docker
检查Docker是否可以正常运行
运行hello-world镜像,如果本机没有hello-world镜像,系统会自动拉取hello-world镜像
$ docker run hello-world检查服务器有什么镜像
检查服务器有什么容器
docker 容器ID:05d58bcbbf33,3分钟前创建于镜像hello-word;状态:已退出
至此,Docker安装与基础使用已经完成,接下来开始Nginx的安装和基础使用
1.4 Nginx 基础使用与安装
Nginx 是一个很强大的高性能Web和反向代理服务,它具有很多非常优越的特性:
在连接高并发的情况下,Nginx是Apache服务不错的替代品。能够支持高达 50,000 个并发连接数的响应。
重点--反向代理
正向代理 反向代理示意图
安装Nginx命令
# 安装Nginx 工具$ sudo yum install nginx# 安装报错----------------------------------------------------没有可用软件包 nginx。错误:无须任何处理# 安装报错----------------------------------------------------原因是nginx位于第三方的yum源里面,而不在centos官方yum源里面# 报错处理----------------------------------------------------# 安装第三方yum源$ sudo yum install epel-release# 更新系统(更新时间稍微长一些,耐心等待)$ yum update# 报错处理----------------------------------------------------# 启用nginx$ sudo systemctl enable nginx# 启动nginx服务$ sudo systemctl start nginx[root@nine ~]# sudo systemctl enable nginxCreated symlink /etc/systemd/system/multi-user.target.wants/nginx.service → /usr/lib/systemd/system/nginx.service.[root@nine ~]# sudo systemctl start nginx[root@nine ~]#
至此,Nginx安装完成,可以继续下一步
Docker 部署方案,学习Docker部署 (Nginx 常用命令 反向代理配置demo负载均衡 动静分离 限流跨域 高并发)这几个知识点的梳理可以后续学习 ,非本文重点
Nginx 常用命令
# 显示版本信息 $ nginx -v# 显示版本和配置项信息 $ nginx -V# 测试配置文件是否存在语法问题 $ nginx -t# 测试配置文件,转储并退出 $ nginx -T# 检测配制间时屏蔽非错误信息,只输出错误信息 $ nginx -q# 重新打开日志文件 $ nginx -s reopen # 快速停止Nginx,此方法是先查看nginx主进程号然后再使用kill 强制杀掉 $ nginx -s stop # 优雅退出Nginx (推荐使用,此方法会等待Nginx进程处理完毕再停止) $ nginx -s quit# 重新加载配置并且启动 $ nginx -s reload
# 内置变量这块主要用于日志$http_ referer :用来记录客户从哪个页面链接访问过来的$http_ _user agent :用来记录客户流量相关信息$remote_ addr和Shttp. x forwarded. for :用来记录客户端ip地址$http_ user :用来记录客户端的用户名称$request :用来记录请求的URL和HTTP协议$status :用来记录请求状态$body. bytes. sent: 用来记录发送给客户端文件主体内容大小
Nginx/1.20.1默认配置文件
# nginx默认配置文件路径$ cd /ect/nginx --nginx.conf$ vi /ect/nginx/nginx.conf--------------------以下默认配置文件-------------------------------# For more information on configuration, see:# * Official English Documentation: http://nginx.org/en/docs/# * Official Russian Documentation: http://nginx.org/ru/docs/user nginx;worker_processes auto;error_log /var/log/nginx/error.log;pid /run/nginx.pid;# Load dynamic modules. See /usr/share/doc/nginx/README.dynamic.include /usr/share/nginx/modules/*.conf;events {worker_connections 1024;}http {log_format main '$remote_addr - $remote_user [$time_local] "$request" ''$status $body_bytes_sent "$http_referer" ''"$http_user_agent" "$http_x_forwarded_for"';access_log /var/log/nginx/access.log main;sendfile on;tcp_nopush on;tcp_nodelay on;keepalive_timeout 65;types_hash_max_size 4096;include /etc/nginx/mime.types;default_type application/octet-stream;# Load modular configuration files from the /etc/nginx/conf.d directory.# See http://nginx.org/en/docs/ngx_core_module.html#include# for more information.include /etc/nginx/conf.d/*.conf;server {listen 80;listen [::]:80;server_name _;root /usr/share/nginx/html;# Load configuration files for the default server block.include /etc/nginx/default.d/*.conf;error_page 404 /404.html;location = /404.html {}error_page 500 502 503 504 /50x.html;location = /50x.html {}}# Settings for a TLS enabled server.## server {# listen 443 ssl http2;# listen [::]:443 ssl http2;# server_name _;# root /usr/share/nginx/html;## ssl_certificate "/etc/pki/nginx/server.crt";# ssl_certificate_key "/etc/pki/nginx/private/server.key";# ssl_session_cache shared:SSL:1m;# ssl_session_timeout 10m;# ssl_ciphers HIGH:!aNULL:!MD5;# ssl_prefer_server_ciphers on;## # Load configuration files for the default server block.# include /etc/nginx/default.d/*.conf;## error_page 404 /404.html;# location = /40x.html {# }## error_page 500 502 503 504 /50x.html;# location = /50x.html {# }# }}
反向代理配置demo
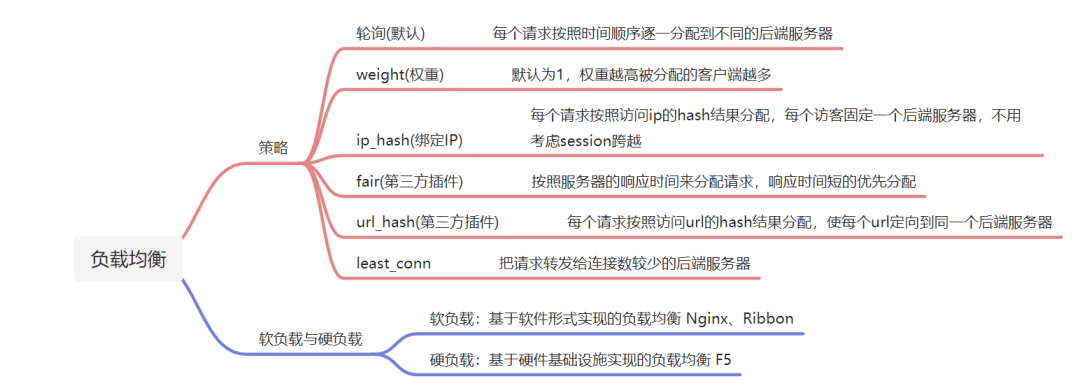
http {server {listen 80;server_name localhost;……location / {root html;index index.html index.htm;}# 路由到商品服务location /api-product {proxy_pass http://localhost:8081/;}# 路由到订单服务location /api-order {proxy_pass http://localhost:8082/;}}}---------------------------实例--------------------------# For more information on configuration, see:# * Official English Documentation: http://nginx.org/en/docs/# * Official Russian Documentation: http://nginx.org/ru/docs/user nginx;worker_processes auto;error_log /var/log/nginx/error.log;pid /run/nginx.pid;# Load dynamic modules. See /usr/share/doc/nginx/README.dynamic.include /usr/share/nginx/modules/*.conf;events {worker_connections 1024;}http {log_format main '$remote_addr - $remote_user [$time_local] "$request" ''$status $body_bytes_sent "$http_referer" ''"$http_user_agent" "$http_x_forwarded_for"';access_log /var/log/nginx/access.log main;sendfile on;tcp_nopush on;tcp_nodelay on;types_hash_max_size 2048;client_max_body_size 1000m;include /etc/nginx/mime.types;default_type application/octet-stream;#跨域#add_header Access-Control-Allow-Origin *;#add_header Access-Control-Allow-Methods 'GET,POST,PUT,DELETE';#add_header Access-Control-Allow-Headers 'DNT,X-Mx-ReqToken,Keep-Alive,User-Agent,X-Requested-With,If-Modified-Since,Cache-Control,Content-Type,Authorization';#add_header Access-Control-Allow-Origin *;#add_header Access-Control-Allow-Headers X-Requested-With;#add_header Access-Control-Allow-Methods GET,POST,OPTIONS;# Load modular configuration files from the /etc/nginx/conf.d directory.# See http://nginx.org/en/docs/ngx_core_module.html#include# for more information.include /etc/nginx/conf.d/*.conf;keepalive_timeout 600;proxy_read_timeout 600;proxy_send_timeout 65;proxy_buffer_size 128k;proxy_buffers 32 32k;proxy_busy_buffers_size 128k;proxy_http_version 1.1;proxy_set_header Upgrade $http_upgrade;proxy_set_header Connection "upgrade";server {listen 80 default_server;listen [::]:80 default_server;server_name _;root /usr/share/nginx/html;# Load configuration files for the default server block.include /etc/nginx/default.d/*.conf;location / {}error_page 404 /404.html;location = /40x.html {}error_page 500 502 503 504 /50x.html;location = /50x.html {}}# 服务器集群名称 和下面的location地址对应upstream DevServer {# weigth参数表示权值,权值越高被分配到的几率越大# server 127.0.0.1:8080 weight=1;# server 127.0.0.1:8060 weight=1;ip_hash;server localhost:5000 weight=10;server localhost:5001 weight=10;server localhost:5002 weight=10;server localhost:5003 weight=10;server localhost:5004 weight=10;}# API-代理配置server {# 跨域请求,也可以在程序内进行配置appsetting.jsonadd_header Access-Control-Allow-Origin *;add_header Access-Control-Allow-Methods 'GET,POST,PUT,DELETE';add_header Access-Control-Allow-Headers 'DNT,X-Mx-ReqToken,Keep-Alive,User-Agent,X-Requested-With,If-Modified-Since,Cache-Control,Content-Type,Authorization';listen 6007;#server_name localhost;location / {proxy_set_header X-Real-IP Sremote_addr;proxy_set_header Host $http_host;proxy_pass http://DevServer;rewrite ^.+apb/?(.*)$ /$1 break;include uwsgi_params;proxy_http_version 1.1;proxy_set_header Upgrade $http_upgrade;#proxy_set_header Connection "upgrade";#proxy_set_header Host $host;proxy_set_header X-Real-IP $remote_addr;proxy_set_header X-Forwarded-For $proxy_add_x_forwarded_for;}location /api2/ {rewrite ^.+apb/?(.*)$ /$1 break;include uwsgi_params;proxy_pass http://DevServer;proxy_http_version 1.1;proxy_set_header Upgrade $http_upgrade;proxy_set_header Connection "upgrade";proxy_set_header Host $host;proxy_set_header X-Real-IP $remote_addr;proxy_set_header X-Forwarded-For $proxy_add_x_forwarded_for;}error_page 404 /404.html;location = /40x.html {}error_page 500 502 503 504 /50x.html;location = /50x.html {}}# 客户端-代理配置server {listen 6008;location / {proxy_set_header X-Real-IP Sremote_addr;proxy_set_header Host $http_host;proxy_pass http://localhost:2003;}location /api/ {rewrite ^.+apb/?(.*)$ /$1 break;include uwsgi_params;proxy_pass http://localhost:2003;proxy_http_version 1.1;proxy_set_header Upgrade $http_upgrade;#proxy_set_header Connection "upgrade";#proxy_set_header Host Shost;proxy_set_header X-Real-IP $remote_addr;proxy_set_header X-Forwarded-For $proxy_add_x_forwarded_for;}error_page 404 /404.html;location = /40x.html {}error_page 500 502 503 504 /50x.html;location = /50x.html {}}# Jenkins CI/CD 代理配置server {# 跨域请求,也可以在程序内进行配置appsetting.json#add_header Access-Control-Allow-Origin *;#add_header Access-Control-Allow-Methods 'GET,POST,PUT,DELETE';#add_header Access-Control-Allow-Headers 'DNT,X-Mx-ReqToken,Keep-Alive,User-Agent,X-Requested-With,If-Modified-Since,Cache-Control,Content-Type,Authorization';listen 6020;location / {proxy_set_header X-Real-IP Sremote_addr;proxy_set_header Host $http_host;proxy_pass http://localhost:8099;}location /api/ {rewrite ^.+apb/?(.*)$ /$1 break;include uwsgi_params;proxy_pass http://localhost:8099;proxy_http_version 1.1;proxy_set_header Upgrade $http_upgrade;#proxy_set_header Connection "upgrade";#proxy_set_header Host Shost;proxy_set_header X-Real-IP $remote_addr;proxy_set_header X-Forwarded-For $proxy_add_x_forwarded_for;}error_page 404 /404.html;location = /40x.html {}error_page 500 502 503 504 /50x.html;location = /50x.html {}}# Settings for a TLS enabled server.## server {# listen 443 ssl http2 default_server;# listen [::]:443 ssl http2 default_server;# server_name _;# root /usr/share/nginx/html;## ssl_certificate "/etc/pki/nginx/server.crt";# ssl_certificate_key "/etc/pki/nginx/private/server.key";# ssl_session_cache shared:SSL:1m;# ssl_session_timeout 10m;# ssl_ciphers HIGH:!aNULL:!MD5;# ssl_prefer_server_ciphers on;## # Load configuration files for the default server block.# include /etc/nginx/default.d/*.conf;## location / {# }## error_page 404 /404.html;# location = /40x.html {# }## error_page 500 502 503 504 /50x.html;# location = /50x.html {# }# }}知识点梳理--负载均衡
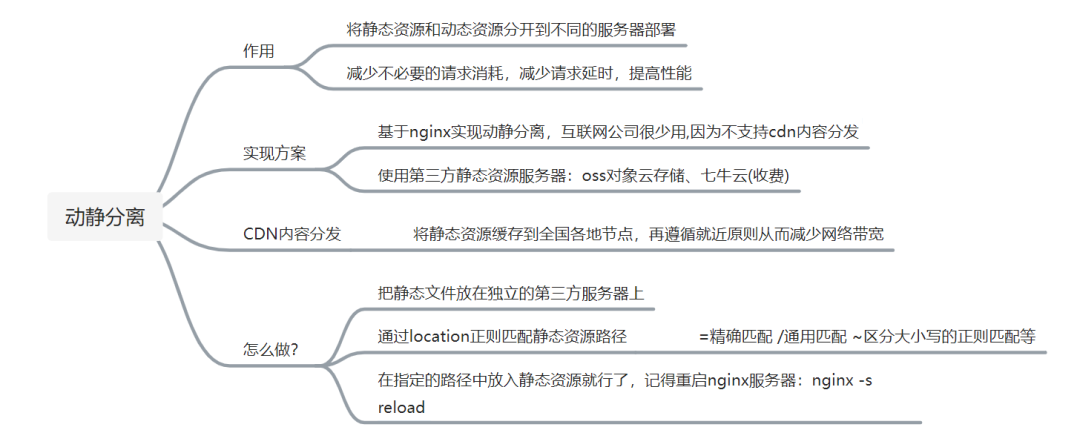
知识点梳理--动静分离
知识点梳理--限流/跨域

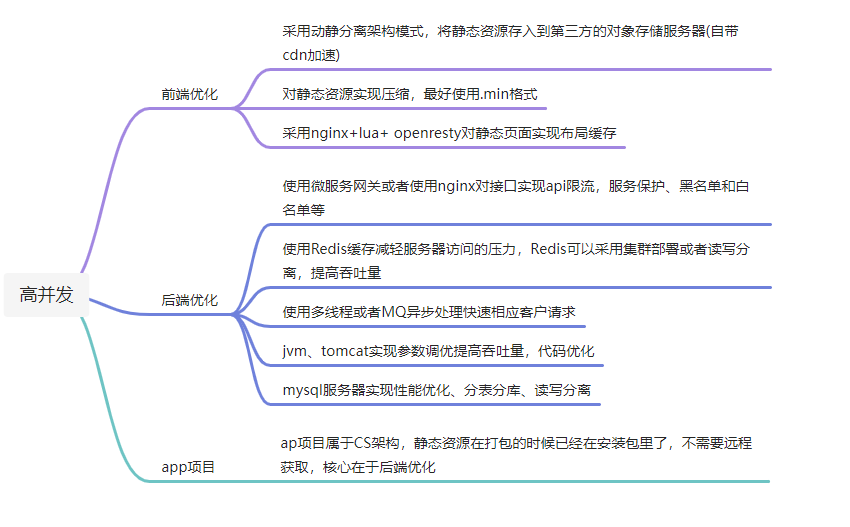
知识点梳理--高并发解决方案