背景
前言
本系列文章面向移动开发小白,从零开始进行平台相关功能开发,演示如何参考平台的官方文档使用MAUI技术来开发相应功能。.
介绍
上一篇文章我们集成了个推的消息通知,那么消息到达移动端之后,除了会在通知栏显示之外,在应用的角标也会显示未读消息的数量(小红点),然后用户点击查看消息之后,这些数字角标也可以自动消除,这个功能在MAUI中如何实现呢?
一、iOS部分
思路
https://developer.apple.com/documentation/uikit/uiapplication/1622918-applicationiconbadgenumber
我们参考一下官方文档,UIApplication下有一个applicationIconBadgeNumber的属性
var applicationIconBadgeNumber: Int { get set }
我们只需要给这个属性赋值具体的整数即可
https://developer.apple.com/documentation/uikit/uiapplication/1622975-shared
https://developer.apple.com/documentation/usernotifications/unusernotificationcenter/1649527-requestauthorization
开发步骤
using UIKit;
using UserNotifications;
namespace Masa.Blazor.Maui.Plugin.Badger
{
public static partial class MasaMauiBadgerService
{
private static void PlatformSetNotificationCount(int count)
{
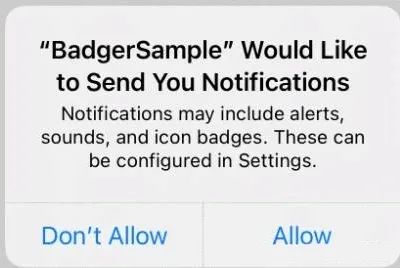
// Requests the user’s authorization to allow local and remote notifications for your app.
UNUserNotificationCenter.Current.RequestAuthorization(UNAuthorizationOptions.Badge, (r, e) =>{});
// The number currently set as the badge of the app icon on the Home screen
// Set to 0 (zero) to hide the badge number. The default value of this property is 0.
UIApplication.SharedApplication.ApplicationIconBadgeNumber = count;
}
}
}
RequestAuthorization方法有两个参数
1、UNAuthorizationOptions 代表应用请求的授权选项,这里我们使用Badge
2、completionHandle 这是一个Action,有两个参数,第一个参数是一个bool值,代表是否已授予授权,第二个参数是一个NSError类型,表示包含错误信息或未发生错误的对象。我们这里暂不处理出错的情况
namespace Masa.Blazor.Maui.Plugin.Badger
{
    // All the code in this file is included in all platforms.
    public static partial class MasaMauiBadgerService
    {
        public static void SetNotificationCount(int count)
        {
            PlatformSetNotificationCount(count);
        }
    }
}
二、安卓部分
思路
安卓部分比iOS相对复杂,我们本着不造轮子的思想,找了一个现成的aar包,ShortcutBadger
项目maven地址:https://repo1.maven.org/maven2/me/leolin/ShortcutBadger
开发步骤
右键生成这个项目,这里很顺利没有任何报错。
	<ItemGroup Condition="'$(TargetFramework)' == 'net7.0-android'">
	  <ProjectReference Include="..\Masa.Blazor.Maui.Plugin.BadgerBinding\Masa.Blazor.Maui.Plugin.BadgerBinding.csproj" />
	</ItemGroup>
3、从 Android 8.0(API 级别 26)开始,所有通知都必须分配到相应的渠道,关于通知通道的信息,可以参考以下官方文档
https://developer.android.google.cn/training/notify-user/channels?hl=zh-cn
Java 代码
    private void createNotificationChannel() {
        // Create the NotificationChannel, but only on API 26+ because
        // the NotificationChannel class is new and not in the support library
        if (Build.VERSION.SDK_INT >= Build.VERSION_CODES.O) {
            CharSequence name = getString(R.string.channel_name);
            String description = getString(R.string.channel_description);
            int importance = NotificationManager.IMPORTANCE_DEFAULT;
            NotificationChannel channel = new NotificationChannel(CHANNEL_ID, name, importance);
            channel.setDescription(description);
            // Register the channel with the system; you can't change the importance
            // or other notification behaviors after this
            NotificationManager notificationManager = getSystemService(NotificationManager.class);
            notificationManager.createNotificationChannel(channel);
        }
    }
using Android.App;
using AndroidX.Core.App;

namespace Masa.Blazor.Maui.Plugin.Badger
{
    // All the code in this file is included in all platforms.
    public static partial class MasaMauiBadgerService
    {
        private static void CreateNotificationChannel()
        {
            if (OperatingSystem.IsAndroidVersionAtLeast(26))
            {
                using var channel = new NotificationChannel($"{Android.App.Application.Context.PackageName}.channel", "Notification channel", NotificationImportance.Default)
                {
                    Description = "Masa notification channel"
                };
                var notificationManager = NotificationManager.FromContext(Android.App.Application.Context);
                notificationManager?.CreateNotificationChannel(channel);
            }
        }
    }
}
1、通过OperatingSystem.IsAndroidVersionAtLeast来判断当前的Android版本。
2、NotificationChannel的创建方式与Java一致,三个参数分别为ChannelID,name、Importance,这里注意第三个参数代表重要性级别,我们这里使用了NotificationImportance.Default。
用户可见的重要性级别 重要性(Android 8.0 及更高版本) 紧急:发出提示音,并以浮动通知的形式显示 IMPORTANCE_HIG 高:发出提示音 IMPORTANCE_DEFAULT 中:无提示音 IMPORTANCE_LOW 低:无提示音,且不会在状态栏中显示 IMPORTANCE_MIN 3、Description 指定用户在系统设置中看到的说明。
4、通过NotificationManager.FromContext 创建 notificationManager,然后调用CreateNotificationChannel来创建通知通道。
        private static void PlatformSetNotificationCount(int count)
        {
            ME.Leolin.Shortcutbadger.ShortcutBadger.ApplyCount(Android.App.Application.Context, count);
            NotificationCompat.Builder builder = new(Android.App.Application.Context, $"{Android.App.Application.Context.PackageName}.channel");
            builder.SetNumber(count);
            builder.SetContentTitle(" ");
            builder.SetContentText("");
            builder.SetSmallIcon(Android.Resource.Drawable.SymDefAppIcon);
            var notification = builder.Build();
            var notificationManager = NotificationManager.FromContext(Android.App.Application.Context);
            CreateNotificationChannel();
            notificationManager?.Notify((int)DateTimeOffset.UtcNow.ToUnixTimeMilliseconds(), notification);
        }
1、调用ShortcutBadger的ApplyCount方法来添加角标
2、创建NotificationCompat.Builder示例,并以此设置角标显示数量(SetNumber),通知的标题(SetContentTitle)和内容(SetContentText),以及通知图标(SetSmallIcon)。
3、调用我们刚写好的方法创建通知通道。
4、通过NotificationManager.Notify方法在状态栏发布一条通知。
该方法有两个参数,第一个参数是一个int类型id,这个id是通知的标识符,在应用程序中应该唯一。这里需要注意:如果你发布了相同id的通知,并且前一个并没有取消,那么该id对应的通知会被更新。第二个参数是一个notification 对象,是通过NotificationCompat.Builder创建出来的。
三、创建Demo项目
2、添加Android权限:修改Android平台目录中的AndroidManifest.xml文件,添加必要的权限。
<?xml version="1.0" encoding="utf-8"?>
<manifest xmlns:android="http://schemas.android.com/apk/res/android">
<application android:allowBackup="true" android:icon="@mipmap/appicon" android:roundIcon="@mipmap/appicon_round" android:supportsRtl="true"></application>
<uses-permission android:name="android.permission.ACCESS_NETWORK_STATE" />
<uses-permission android:name="android.permission.INTERNET" />
<uses-permission android:name="android.permission.POST_NOTIFICATIONS"/>
<uses-permission android:name="android.permission.READ_APP_BADGE" />
<uses-permission android:name="com.android.launcher.permission.READ_SETTINGS"/>
<uses-permission android:name="com.android.launcher.permission.WRITE_SETTINGS"/>
<uses-permission android:name="com.android.launcher.permission.INSTALL_SHORTCUT" />
<uses-permission android:name="com.android.launcher.permission.UNINSTALL_SHORTCUT" />
</manifest>
注意:国内不同手机厂家可能需要额外的权限配置,需要参考具体厂家的配置说明。
3、修改Index.razor文件
实际的使用场景应该是移动端接收消息推送,在处理消息推送的方法内修改角标,我们这里为了简化,在页面直接通过按钮触发修改角标显示的数量。
@page "/"
@using Masa.Blazor.Maui.Plugin.Badger;

<h1>Masa blazor badger sample</h1>

Masa blazor badger sample.

<button @onclick="OnIncrementClicked">Add</button>
<button @onclick="OnClearClicked">Clear</button>
@code{
	int count;
	private void OnIncrementClicked()
	{
		count++;

		MasaMauiBadgerService.SetNotificationCount(count);
	}
	private void OnClearClicked()
	{
		count = 0;
		MasaMauiBadgerService.SetNotificationCount(count);
	}
}
Android 演示:演示机:vivo x70 pro+

iOS 演示:演示机:iPhone 14 iOS16 模拟器