在这节中我们主要介绍在ASP.NET Core Identity如何使用Claims,ASP.NET Core Identity Claims是颁发给用户键值对(name=value)表示用户允许做什么。例如,驾驶执照颁发机构给个人颁发驾驶执照,如果驾照上的DOB是1990年12月21日,那么在这种情况下,claim name 是DOB,claim value是1990年12月21日,签发人是驾驶执照当局。这意味着用户是由驾驶执照当局授权驾驶汽车
public class ClaimsController : Controller{public ClaimsController(){}public IActionResult Index(){return View(User.Claims);}}
@model IEnumerable<System.Security.Claims.Claim>@{ViewData["Title"] = "Claims";}<div class="container"><div class="row mb-3"><div class="col-sm"><table class="table table-bordered align-middle"><thead><tr><th>名称</th><th>颁发机构</th><th>类型</th><th>值</th></tr></thead><tbody>@foreach (var claim in Model.OrderBy(x => x.Type)){<tr><td>@claim?.Subject?.Name</td><td>@claim?.Issuer</td><td>@claim?.Type</td><td>@claim?.Value</td></tr>}</tbody></table></div></div></div>
我们运行应用程序使用并使用如下邮箱和密码进行登陆(如果没有可以自行添加)
导航到 https://localhost:7296/Claims

对一个用户创建和删除Identity Claims,首先创建一个新的Create.cshtml,在Views -> Claims 目录下,代码如下:
@{ViewData["Title"] = "新增Claim";}<div asp-validation-summary="All" class="text-danger"></div><form method="post"><div class="mb-3 row align-items-center"><div class="col-sm-1"><label for="ClaimType" class="control-label">Claim 类型:</label></div><div class="col-sm-11"><input name="ClaimType" class="form-control" /></div></div><div class="mb-3 row align-items-center"><div class="col-sm-1"><label for="ClaimValue">Claim 值:</label></div><div class="col-sm-11"><input name="ClaimValue" class="form-control" /></div></div><div class="mb-3 row align-items-center"><div class="col-sm-11 offset-sm-1"><button type="submit" class="btn btn-primary">保存</button><button asp-action="Index" class="btn btn-secondary">返回</button></div></div></form>
@model IEnumerable<System.Security.Claims.Claim>@{ViewData["Title"] = "Claims";}<div class="container"><div class="row mb-3"><div class="col-sm-3"><a asp-action="Create" class="btn btn-primary">新增</a></div><div class="col-sm-3"></div><div class="col-sm-3"></div><div class="col-sm-3"></div></div><div class="row mb-3"><div class="col-sm"><table class="table table-bordered align-middle"><thead><tr><th>名称</th><th>颁发机构</th><th>类型</th><th>值</th><td>删除</td></tr></thead><tbody>@foreach (var claim in Model.OrderBy(x => x.Type)){<tr><td>@claim?.Subject?.Name</td><td>@claim?.Issuer</td><td>@claim?.Type</td><td>@claim?.Value</td><td><form asp-action="Delete" method="post"><input type="hidden" name="claimValues" value="@claim?.Type;@claim?.Value;@claim?.Issuer" /><button type="submit" class="btn btn-sm btn-danger">删除</button></form></td></tr>}</tbody></table></div></div></div>
public class ClaimsController : Controller{private UserManager<AppUser> _userManager;public ClaimsController(UserManager<AppUser> userManager){_userManager = userManager;}public IActionResult Index(){return View(User.Claims);}public IActionResult Create() => View();[HttpPost]public async Task<IActionResult> Create(string claimType, string claimValue){var user = await _userManager.GetUserAsync(HttpContext.User);Claim claim = new Claim(claimType, claimValue, ClaimValueTypes.String);IdentityResult result = await _userManager.AddClaimAsync(user ?? new AppUser(), claim);if (result.Succeeded)return RedirectToAction("Index");elseErrors(result);return View();}[HttpPost]public async Task<IActionResult> Delete(string claimValues){var user = await _userManager.GetUserAsync(HttpContext.User);string[] claimValuesArray = claimValues.Split(";");string claimType = claimValuesArray[0], claimValue = claimValuesArray[1], claimIssuer = claimValuesArray[2];Claim? claim = User.Claims.Where(x => x.Type == claimType && x.Value == claimValue && x.Issuer == claimIssuer).FirstOrDefault();IdentityResult result = await _userManager.RemoveClaimAsync(user ?? new AppUser(), claim);if (result.Succeeded)return RedirectToAction("Index");elseErrors(result);return View("Index");}void Errors(IdentityResult result){foreach (IdentityError error in result.Errors)ModelState.AddModelError("", error.Description);}}
首先我们从_userManager.GetUserAsync()获取当前用户,接着我们添加Claim对象,最后我们将Claim对象添加到用户中。_userManager.AddClaimAsync()可以为用户创建claim
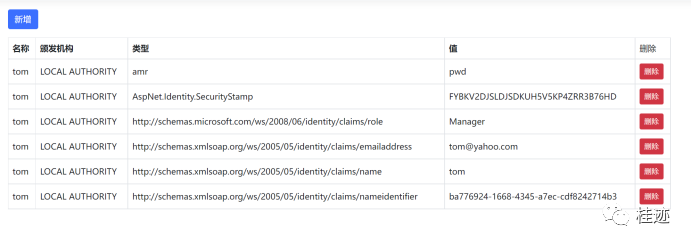
Claim claim = User.Claims.Where(x => x.Type == claimType && x.Value == claimValue && x.Issuer == claimIssuer).FirstOrDefault();测试这个特性,运行应用程序并且使用tom用户进行登录,进入https://localhost:7296/Claims 页面,点击新增按钮:
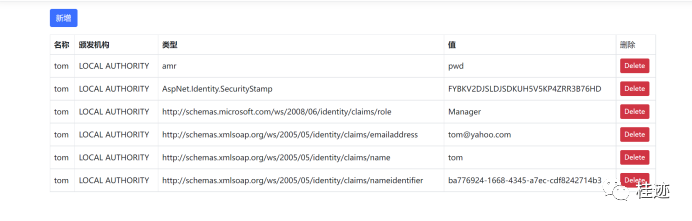
我们在新增页面输入下面值:


源代码地址:
https://github.com/bingbing-gui/Asp.Net-Core-Skill/tree/master/AspNetCore.Identity/Identity
