一、前言
从上一篇关于客户端凭证模式中,我们通过创建一个认证授权访问服务,定义一个API和要访问它的客户端,客户端通过IdentityServer上请求访问令牌,并使用它来控制访问API。其中,我们也注意到了在4.x版本中于之前3.x版本之间存在的差异。
所以在这一篇中,我们将通过多种授权模式中的资源所有者密码凭证授权模式进行说明,主要针对介绍IdentityServer保护API的资源,资源密码凭证授权访问API资源。.

二、初识
如果你高度信任某个应用Client,也允许用户把用户名和密码,直接告诉该应用Client。该应用Client就使用你的密码,申请令牌,这种方式称为"密码式"(password)。
这种模式适用于鉴权服务器与资源服务器是高度相互信任的,例如两个服务都是同个团队或者同一公司开发的。
2.1 适用范围
资源所有者密码凭证授权模式,适用于当资源所有者与客户端具有良好信任关系的场景,比如客户端是设备的操作系统或具备高权限的应用。授权服务器在开放此种授权模式时必须格外小心,并且只有在别的模式不可用时才允许这种模式。
这种模式下,应用client可能存了用户密码这不安全性问题,所以才需要高可信的应用。
主要适用于用来做遗留项目升级为oauth2的适配授权使用,当然如果client是自家的应用,也是可以的,同时支持refresh token。
例如,A站点 需要添加了 OAuth 2.0 作为对其现有基础架构的一个授权机制。对于现有的客户端转变为这种授权方案,资源所有者密码凭据授权将是最方便的,因为他们只需使用现有的帐户详细信息(比如用户名和密码)来获取访问令牌。
2.2 密码授权流程:
     +----------+
     | Resource |
     |  Owner   |
     |          |
     +----------+
          v
          |    Resource Owner
         (A) Password Credentials
          |
          v
     +---------+                                  +---------------+
     |         |>--(B)---- Resource Owner ------->|               |
     |         |         Password Credentials     | Authorization |
     | Client  |                                  |     Server    |
     |         |<--(C)---- Access Token ---------<|               |
     |         |    (w/ Optional Refresh Token)   |               |
     +---------+                                  +---------------+
资源所有者密码凭证授权流程描述
(A)资源所有者向客户端提供其用户名和密码。
(B)客户端从授权中请求访问令牌服务器的令牌端点,以获取访问令牌。当发起该请求时,授权服务器需要认证客户端的身份。
(C) 授权服务器验证客户端身份,同时也验证资源所有者的凭据,如果都通过,则签发访问令牌。
2.2.1 过程详解
访问令牌请求
| 参数 | 是否必须 | 含义 |
|---|---|---|
| grant_type | 必需 | 授权类型,值固定为“password”。 |
| username | 必需 | 用户名 |
| password | 必需 | 密码 |
| scope | 可选 | 表示授权范围。 |
同时将允许其他请求参数client_id和client_secret,或在HTTP Basic auth标头中接受客户端ID和密钥。
验证用户名密码
示例:客户端身份验证两种方式
1、Authorization: Bearer base64(resourcesServer:123)
2、client_id(客户端标识),client_secret(客户端秘钥),username(用户名),password(密码)。
(用户的操作:输入账号和密码)
A 网站要求用户提供 B 网站的用户名和密码。拿到以后,A 就直接向 B 请求令牌。
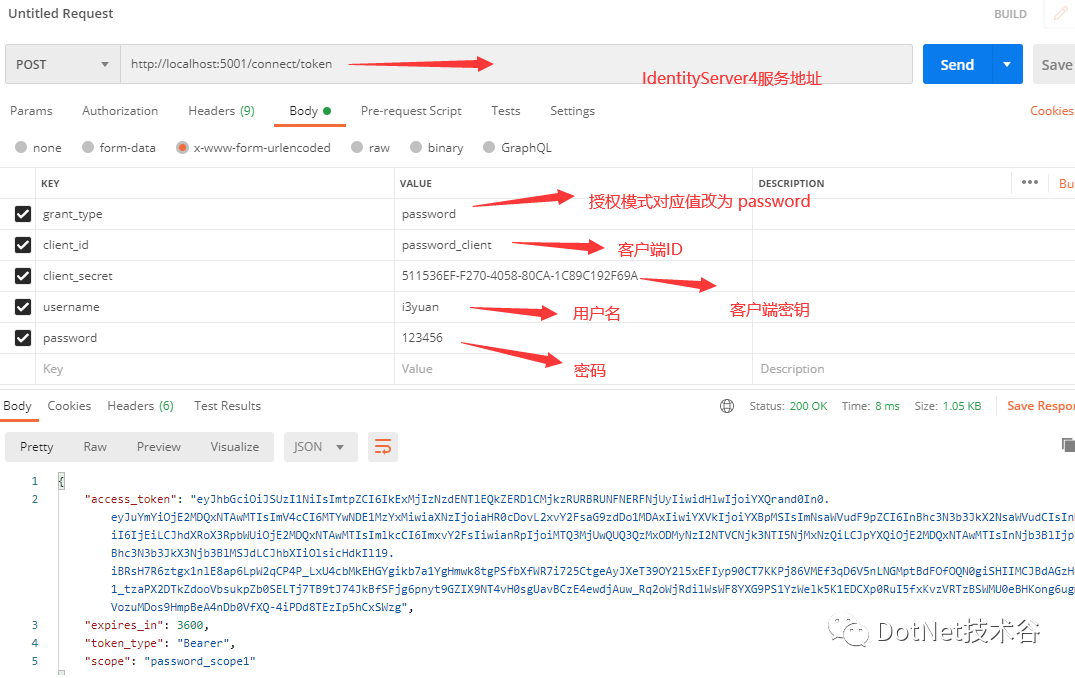
POST /oauth/token HTTP/1.1
Host: authorization-server.com

grant_type=password
&username=user@example.com
&password=1234luggage
&client_id=xxxxxxxxxx
&client_secret=xxxxxxxxxx
上面URL中,grant_type参数是授权方式,这里的password是“密码式”,username和password是B的用户名和密码。
2.2.2 访问令牌响应
第二步,B 网站验证身份通过后,直接给出令牌。注意,这时不需要跳转,而是把令牌放在 JSON 数据里面,作为 HTTP 回应,A 因此拿到令牌。
响应给用户令牌信息(access_token),如下所示
{
  "access_token": "访问令牌",
  "token_type": "Bearer",
  "expires_in": 4200,
  "scope": "server",
  "refresh_token": "刷新令牌"
}
用户使用这个令牌访问资源服务器,当令牌失效时使用刷新令牌去换取新的令牌。
这种方式需要用户给出自己的用户名/密码,显然风险很大,因此只适用于其他授权方式都无法采用的情况,而且必须是用户高度信任的应用。
三、实践
在示例实践中,我们将创建一个授权访问服务,定义一个API和要访问它的客户端,客户端通过IdentityServer上请求访问令牌,并使用它来访问API。
3.1 搭建 Authorization Server 服务
搭建认证授权服务
3.1.1 安装Nuget包
IdentityServer4程序包
3.1.2 配置内容
建立配置内容文件Config.cs
    public static class Config
    {
        public static IEnumerable<IdentityResource> IdentityResources =>
            new IdentityResource[]
            {
                new IdentityResources.OpenId(),
                new IdentityResources.Profile(),
            };


        public static IEnumerable<ApiScope> ApiScopes =>
            new ApiScope[]
            {
                new ApiScope("password_scope1")
            };

        public static IEnumerable<ApiResource> ApiResources =>
            new ApiResource[]
            {

                new ApiResource("api1","api1")
                {
                    Scopes={ "password_scope1" },
                    ApiSecrets={new Secret("apipwd".Sha256())}  //api密钥
                }
            };

        public static IEnumerable<Client> Clients =>
            new Client[]
            {
                 new Client
                {
                    ClientId = "password_client",
                    ClientName = "Resource Owner Password",

                    AllowedGrantTypes = GrantTypes.ResourceOwnerPassword,
                    ClientSecrets = { new Secret("511536EF-F270-4058-80CA-1C89C192F69A".Sha256()) },

                    AllowedScopes = { "password_scope1" }
                },
            };
    }
因为是资源所有者密码凭证授权的方式,所以我们通过代码的方式来创建几个测试用户。
新建测试用户文件TestUsers.cs
    public class TestUsers
    {
        public static List<TestUser> Users
        {
            get
            {
                var address = new
                {
                    street_address = "One Hacker Way",
                    locality = "Heidelberg",
                    postal_code = 69118,
                    country = "Germany"
                };

                return new List<TestUser>
                {
                    new TestUser
                    {
                        SubjectId = "1",
                        Username = "i3yuan",
                        Password = "123456",
                        Claims =
                        {
                            new Claim(JwtClaimTypes.Name, "i3yuan Smith"),
                            new Claim(JwtClaimTypes.GivenName, "i3yuan"),
                            new Claim(JwtClaimTypes.FamilyName, "Smith"),
                            new Claim(JwtClaimTypes.Email, "i3yuan@email.com"),
                            new Claim(JwtClaimTypes.EmailVerified, "true", ClaimValueTypes.Boolean),
                            new Claim(JwtClaimTypes.WebSite, "http://i3yuan.top"),
                            new Claim(JwtClaimTypes.Address, JsonSerializer.Serialize(address), IdentityServerConstants.ClaimValueTypes.Json)
                        }
                    }
                };
            }
        }
    }
返回一个TestUser的集合。
通过以上添加好配置和测试用户后,我们需要将用户注册到IdentityServer4服务中,接下来继续介绍。
3.1.3 注册服务
在startup.cs中ConfigureServices方法添加如下代码:
        public void ConfigureServices(IServiceCollection services)
        {
            var builder = services.AddIdentityServer()
               .AddTestUsers(TestUsers.Users); //添加测试用户

            // in-memory, code config
            builder.AddInMemoryIdentityResources(Config.IdentityResources);
            builder.AddInMemoryApiScopes(Config.ApiScopes);
            builder.AddInMemoryApiResources(Config.ApiResources);
            builder.AddInMemoryClients(Config.Clients);

            // not recommended for production - you need to store your key material somewhere secure
            builder.AddDeveloperSigningCredential();
        }
3.1.4 配置管道
在startup.cs中Configure方法添加如下代码:
        public void Configure(IApplicationBuilder app, IWebHostEnvironment env)
        {
            if (env.IsDevelopment())
            {
                app.UseDeveloperExceptionPage();
            }
            app.UseRouting();
            app.UseIdentityServer();
            app.UseEndpoints(endpoints =>
            {
                endpoints.MapGet("/", async context =>
                {
                    await context.Response.WriteAsync("Hello World!");
                });
            });
        }
以上内容是快速搭建简易IdentityServer项目服务的方式。
这搭建 Authorization Server 服务跟上一篇客户端凭证模式有何不同之处呢?
在Config中配置客户端(client)中定义了一个 AllowedGrantTypes的属性,这个属性决定了Client可以被哪种模式被访问,GrantTypes.ClientCredentials为客户端凭证模式,GrantTypes.ResourceOwnerPassword为资源所有者密码凭证授权。所以在本文中我们需要添加一个Client用于支持资源所有者密码凭证授权模式(ResourceOwnerPassword)。因为资源所有者密码凭证授权需要用到用户名和密码所以要添加用户,而客户端凭证模式不需要,这也是两者的不同之处。
3.2 搭建API资源
实现对API资源进行保护
3.2.1 快速搭建一个API项目
3.2.2 安装Nuget包
IdentityServer4.AccessTokenValidation 包
3.2.3 注册服务
在startup.cs中ConfigureServices方法添加如下代码:
    public void ConfigureServices(IServiceCollection services)
    {
        services.AddControllersWithViews();
        services.AddAuthorization();

        services.AddAuthentication("Bearer")
          .AddIdentityServerAuthentication(options =>
          {
              options.Authority = "http://localhost:5001";
              options.RequireHttpsMetadata = false;
              options.ApiName = "api1";
              options.ApiSecret = "apipwd"; //对应ApiResources中的密钥
          });
    }
AddAuthentication把Bearer配置成默认模式,将身份认证服务添加到DI中。
AddIdentityServerAuthentication把IdentityServer的access token添加到DI中,供身份认证服务使用。
3.2.4 配置管道
在startup.cs中Configure方法添加如下代码:
        public void Configure(IApplicationBuilder app, IWebHostEnvironment env)
        {
            if (env.IsDevelopment())
            {
                app.UseDeveloperExceptionPage();
            }
            app.UseRouting();
            app.UseAuthentication();
            app.UseAuthorization();
            app.UseEndpoints(endpoints =>
            {
                endpoints.MapDefaultControllerRoute();
            });
        }
UseAuthentication将身份验证中间件添加到管道中;
UseAuthorization 将启动授权中间件添加到管道中,以便在每次调用主机时执行身份验证授权功能。
3.2.5 添加API资源接口
[Route("api/[Controller]")]
[ApiController]
public class IdentityController:ControllerBase
{
    [HttpGet("getUserClaims")]
    [Authorize]
    public IActionResult GetUserClaims()
    {
        return new JsonResult(from c in User.Claims select new { c.Type, c.Value });
    }
}
在IdentityController 控制器中添加 [Authorize] , 在进行请求资源的时候,需进行认证授权通过后,才能进行访问。
这搭建API资源跟上一篇客户端凭证模式有何不同之处呢?
我们可以发现这跟上一篇基本相似,但是可能需要注意的地方应该是
ApiName和ApiSecret,要跟你配置的API资源名称和API资源密钥相同。
3.3 搭建Client客户端
实现对API资源的访问和获取资源
3.3.1 搭建一个窗体程序
3.3.2 安装Nuget包
IdentityModel 包
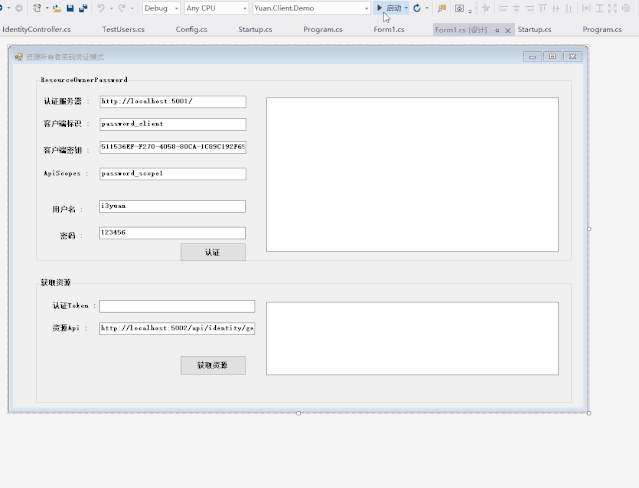
3.3.3 获取令牌
客户端与授权服务器进行身份验证并向令牌端点请求访问令牌。授权服务器对客户端进行身份验证,如果有效,颁发访问令牌。
IdentityModel 包括用于发现 IdentityServer 各个终结点(EndPoint)的客户端库。
我们可以使用从 IdentityServer 元数据获取到的Token终结点请求令牌:
        private void getToken_Click(object sender, EventArgs e)
        {
            var client = new HttpClient();
            var disco = client.GetDiscoveryDocumentAsync(this.txtIdentityServer.Text).Result;
            if (disco.IsError)
            {
                this.tokenList.Text = disco.Error;
                return;
            }
            //请求token
            tokenResponse = client.RequestPasswordTokenAsync(new PasswordTokenRequest
            {
                Address = disco.TokenEndpoint,
                ClientId =this.txtClientId.Text,
                ClientSecret = this.txtClientSecret.Text,
                Scope = this.txtApiScopes.Text,
                UserName=this.txtUserName.Text,
                Password=this.txtPassword.Text
            }).Result;

            if (tokenResponse.IsError)
            {
                this.tokenList.Text = disco.Error;
                return;
            }
            this.tokenList.Text = JsonConvert.SerializeObject(tokenResponse.Json);
            this.txtToken.Text = tokenResponse.AccessToken;
        }
3.3.4 调用API
要将Token发送到API,通常使用HTTP Authorization标头。这是使用
SetBearerToken扩展方法完成。
        private void getApi_Click(object sender, EventArgs e)
        {
            //调用认证api
            if (string.IsNullOrEmpty(txtToken.Text))
            {
                MessageBox.Show("token值不能为空");
                return;
            }
            var apiClient = new HttpClient();
            //apiClient.SetBearerToken(tokenResponse.AccessToken);
            apiClient.SetBearerToken(this.txtToken.Text);

            var response = apiClient.GetAsync(this.txtApi.Text).Result;
            if (!response.IsSuccessStatusCode)
            {
                this.resourceList.Text = response.StatusCode.ToString();
            }
            else
            {
                this.resourceList.Text = response.Content.ReadAsStringAsync().Result;
            }

        }
这搭建Client客户端跟上一篇客户端凭证模式有何不同之处呢?
客户端请求token多了两个参数,一个用户名,一个密码 请求Token中使用 IdentityModel包的方法RequestPasswordTokenAsync,实现用户密码方式获取令牌。
以上展示的代码有不明白的,可以看本篇项目源码,项目地址为 :资源所有者密码凭证模式
https://github.com/i3yuan/Yuan.IdentityServer4.Demo/tree/main/DiffAuthMode/ResourceOwnerPasswords
3.4 效果
3.4.1 项目测试
3.4.2 postman测试
四、拓展
从上一篇的客户端凭证模式到这一篇的资源所有者资源密码凭证模式,我们都已经初步掌握了大致的授权流程,以及项目搭建获取访问受保护的资源,但是我们也可能发现了,如果是仅仅为了访问保护的API资源的话,加不加用户和密码好像也没什么区别呢。
但是如果仔细对比两种模式在获取token,以及访问api返回的数据可以发现,资源所有者密码凭证模式返回的Claim的数量信息要多一些,但是客户端模式返回的明显少了一些,这是因为客户端不涉及用户信息。所以资源密码凭证模式可以根据用户信息做具体的资源权限判断。
比如,在TestUser有一个Claims属性,允许自已添加Claim,有一个ClaimTypes枚举列出了可以直接添加的Claim。所以我们可以为用户设置角色,来判断角色的权限功能,做简单的权限管理。
4.1 添加用户角色
在之前创建的TestUsers.cs文件的User方法中,添加Cliam的角色熟悉,如下:
public class TestUsers
{
public static List<TestUser> Users
{
get
{
var address = new
{
street_address = "One Hacker Way",
locality = "Heidelberg",
postal_code = 69118,
country = "Germany"
};
return new List<TestUser>
{
new TestUser
{
SubjectId = "1",
Username = "i3yuan",
Password = "123456",
Claims =
{
new Claim(JwtClaimTypes.Name, "i3yuan Smith"),
new Claim(JwtClaimTypes.GivenName, "i3yuan"),
new Claim(JwtClaimTypes.FamilyName, "Smith"),
new Claim(JwtClaimTypes.Email, "i3yuan@email.com"),
new Claim(JwtClaimTypes.EmailVerified, "true", ClaimValueTypes.Boolean),
new Claim(JwtClaimTypes.WebSite, "http://i3yuan.top"),
new Claim(JwtClaimTypes.Address, JsonSerializer.Serialize(address), IdentityServerConstants.ClaimValueTypes.Json),
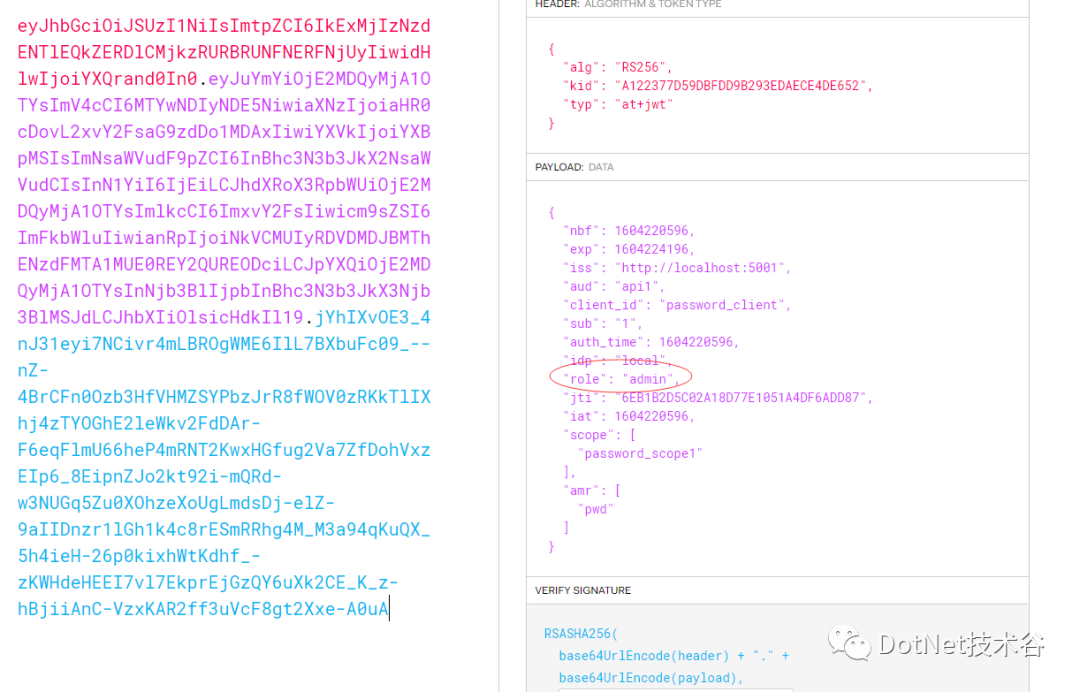
new Claim(JwtClaimTypes.Role,"admin") //添加角色
},
}
};
}
}
}
4.2 配置API资源需要的Cliam
因为要用到ApiResources,ApiResources的构造函数有一个重载支持传进一个Claim集合,用于允许该Api资源可以携带那些Claim, 所以在项目下的Config类的ApiResources做出如下修改:
        public static IEnumerable<ApiResource> ApiResources =>
            new ApiResource[]
            {

                new ApiResource("api1","api1")
                {
                    Scopes={ "password_scope1" },
                    UserClaims={JwtClaimTypes.Role},  //添加Cliam 角色类型
                    ApiSecrets={new Secret("apipwd".Sha256())}
                }
            };
4.3 添加支持Role验证
在API资源项目中,修改下被保护Api的,使其支持Role验证。
    [HttpGet("getUserClaims")]
    //[Authorize]
    [Authorize(Roles ="admin")]
    public IActionResult GetUserClaims()
    {
        return new JsonResult(from c in User.Claims select new { c.Type, c.Value });
    }
4.4 效果
可以看到,为我们添加了一个Role Claim,效果如下:
五、总结
-
本篇主要阐述以资源所有者密码凭证授权,编写一个客户端,以及受保护的资源,并通过客户端请求IdentityServer上请求获取访问令牌,从而获取受保护的资源。 -
这种模式主要使用client_id和client_secret以及用户名密码通过应用Client(客户端)直接获取秘钥,但是存在client可能存了用户密码这不安全性问题,如果client是自家高可信的应用,也是可以使用的,同时如果遗留项目升级为oauth2的授权机制也是适配适用的。 -
在后续会对其中的其他授权模式,数据库持久化问题,以及如何应用在API资源服务器中和配置在客户端中,会进一步说明。 -
如果有不对的或不理解的地方,希望大家可以多多指正,提出问题,一起讨论,不断学习,共同进步。 -
项目地址 https://github.com/i3yuan/Yuan.IdentityServer4.Demo/tree/main/DiffAuthMode/ResourceOwnerPasswords
