一、前言
在上篇中简单介绍了 Asp.Net Core 自带的 Identity,一个负责对用户的身份进行认证的框架,当我们按需选择这个框架作为管理和存储我们应用中的用户账号数据的时候,就会添加到自己的项目当中去。这个时候,默认情况我们会使用自带的数据模型,但是考虑到需求的情况,我们可以通过自定义的方式更新数据模型,来达到我们的需求。.
二、初识
在上篇中我们完成了数据迁移加上项目的搭建,其中ApplicationDbContext是负责与Identity标识相关的用户,继承于IdentityDbContext上下文。当然了,我们发现根据这个上下文的扩展性,可以自定义用户数据,进行配置。
比如:自定义扩展的用户数据类来继承于IdentityUser类,更改用户数据模型属性,更改主键、更改表名列名等来满足我们的业务要求。
三、实践
接着上篇的WebIdentityDemoV3.1项目,将自定义用户数据添加到Identity DB,自定义扩展的用户数据类应继承IdentityUser类, 文件名为Areas / Identity / Data / {项目名称}User.cs。
3.1 表说明
这个就是我们要准备自定义的用户数据,本示例是直接继承于 「Asp.Net Core 自带的 Identity」的。
光从数据库表名上,我们就知道其中的含义了,就是用户角色管理。
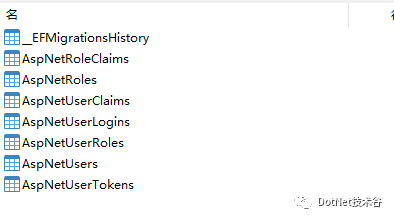
数据说明:
_EFMigrationsHistory 是 Ef的迁移历史表。
AspNetUserClaims、AspNetRoleClaims是用户和角色的声明表,Claim在其中扮演者很重要的角色,甚至角色(Role)都被转换成了Claim,可以了解之前说到的认证授权模式。
AspNetUsers、AspNetRoles和AspNetUserRoles存储用户和角色信息。
AspNetUserTokens 用于外部验证的「Token」存储。
AspNetUserLogins 保留如 Google, Facebook, Twitter ,QQ等第三方登录的信息。
3.2 自定义模型
上下文用于通过两种方式配置模型:
-
为泛型类型参数提供实体和键类型。 -
重写 OnModelCreating以修改这些类型的映射。
重写时 OnModelCreating , base.OnModelCreating 应首先调用,然后调用重写配置。EF Core 通常具有用于配置的最后一个 wins 策略。例如,如果 ToTable 先使用一个表名称调用实体类型的方法,然后再使用另一个表名称再次调用该方法,则使用第二个调用中的表名。
3.3 自定义数据
这里以用户类进行举例说明:
3.3.1 自定义用户类
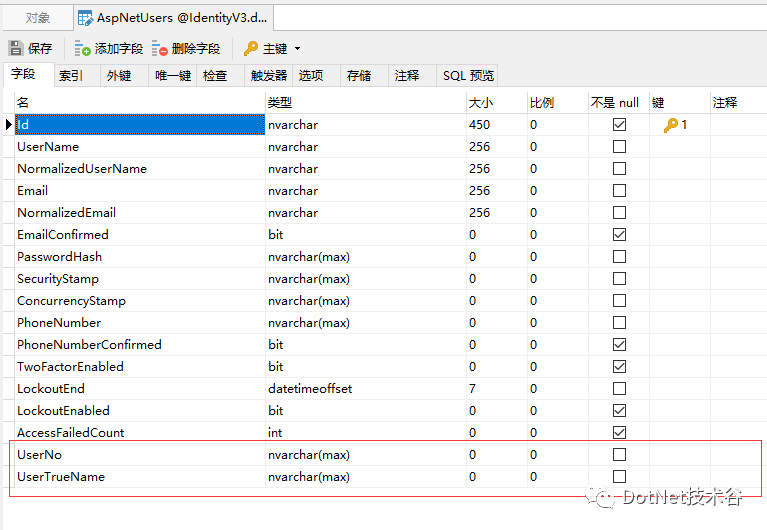
定义ApplicationUser类继承于IdentityUser用户数据类, 自定义类命名约定 {Application}User。
    public class ApplicationUser:IdentityUser
    {
        /// <summary>
        /// 用户编号
        /// </summary>
        public string UserNo { get; set; }
        /// <summary>
        /// 真实姓名
        /// </summary>
        public string UserTrueName { get; set; }

    }
3.3.2 修改服务配置
将原来Startup文件中的ConfigureServices服务配置中的IdentityUser改成ApplicationUser
services.AddDefaultIdentity<IdentityUser>(options => options.SignIn.RequireConfirmedAccount = true)
                .AddEntityFrameworkStores<ApplicationDbContext>();
改成:
services.AddDefaultIdentity<ApplicationUser>(options => options.SignIn.RequireConfirmedAccount = true)
                .AddEntityFrameworkStores<ApplicationDbContext>();
3.3.3 修改上下文
将原来ApplicationDbContext上下文继承于IdentityDbContext,改成IdentityDbContext<ApplicationUser>
「原来的」
public class ApplicationDbContext : IdentityDbContext
{
    public ApplicationDbContext(DbContextOptions<ApplicationDbContext> options)
    : base(options)
    {
    }
}
「改成:」
将 ApplicationUser 类型用作上下文的泛型参数
public class ApplicationDbContext : IdentityDbContext<ApplicationUser>
{
    public ApplicationDbContext(DbContextOptions<ApplicationDbContext> options)
        : base(options)
        {
        }
}
3.3.4 数据迁移
#1.存在数据库则先删除数据库
#  Drop-Database (PMC) 或 dotnet ef database drop ( .NET Core CLI)
#2.确认删除数据库后,删除迁移
#  Remove-Migration (PMC) 或 dotnet ef migrations remove ( .NET Core CLI)
# 再进行更新数据模型 ,添加迁移,转换成相应的数据库
PM> Add-Migration CreateIdentitySchema2 -c ApplicationDbContext -o Data/Migrations
PM> Update-Database CreateIdentitySchema2
「效果如下:」
可以发现,有对应的自定义字段了。
3.3.5 更新替换
如果之前已经搭建好了项目,那么你需要将IdentityUser类改成自定义的ApplicationUser类。
更新 Pages/Shared/_LoginPartial ,并将替换 IdentityUser 为 ApplicationUser :
@using Microsoft.AspNetCore.Identity
@using WebApp1.Areas.Identity.Data
@inject SignInManager<ApplicationUser> SignInManager
@inject UserManager<ApplicationUser> UserManager
❝具体的其他替换修改方法就不说明演示了。
❞
3.4 更改主键类型
在创建数据库之后更改PK列的数据类型在许多数据库系统上都存在问题。更改PK通常涉及删除和重新创建表。「因此,在创建数据库时,应在初始迁移中指定PK类型」。下面是更改主键类型步骤:
3.4.1 更改表主键类型
这里以ApplicationUser类为例,修改相关代码
    // 用户表设置主键为Int
    public class ApplicationUser : IdentityUser<Guid>
    {
        /// <summary>
        /// 用户编号
        /// </summary>
        public string UserNo { get; set; }
        /// <summary>
        /// 真实姓名
        /// </summary>
        public string UserTrueName { get; set; }
    }
3.4.2 修改上下文
public class ApplicationDbContext : IdentityDbContext<ApplicationUser, IdentityRole<Guid>, Guid>
3.4.3 修改服务配置
       services.AddDefaultIdentity<ApplicationUser>(options => options.SignIn.RequireConfirmedAccount = true)
                .AddEntityFrameworkStores<ApplicationDbContext>();
3.4.4 数据迁移
#1.存在数据库则先删除数据库
#  Drop-Database (PMC) 或 dotnet ef database drop ( .NET Core CLI)
#2.确认删除数据库后,删除迁移
#  Remove-Migration (PMC) 或 dotnet ef migrations remove ( .NET Core CLI)
# 再进行更新数据模型 ,添加迁移,转换成相应的数据库
PM> Add-Migration CreateIdentitySchema2 -c ApplicationDbContext -o Data/Migrations
PM> Update-Database CreateIdentitySchema2
此时表的主键类型已修改完成,包括关系表的外键类型也同步更新了,
「效果如下:」 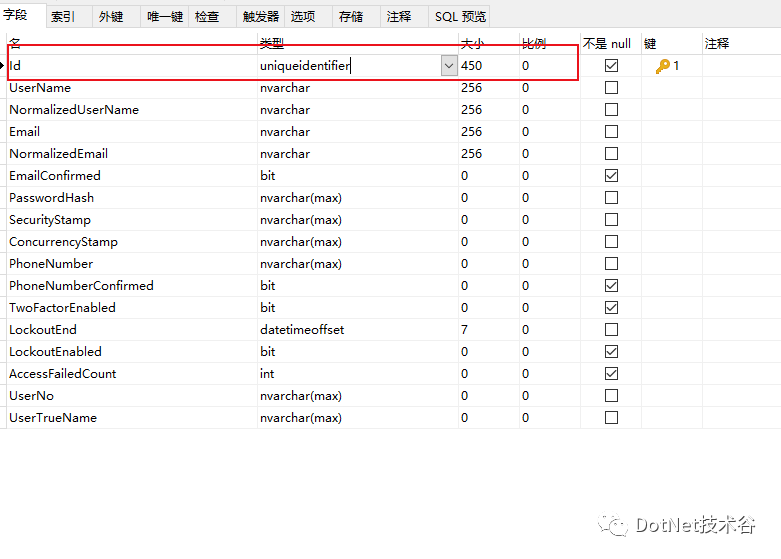
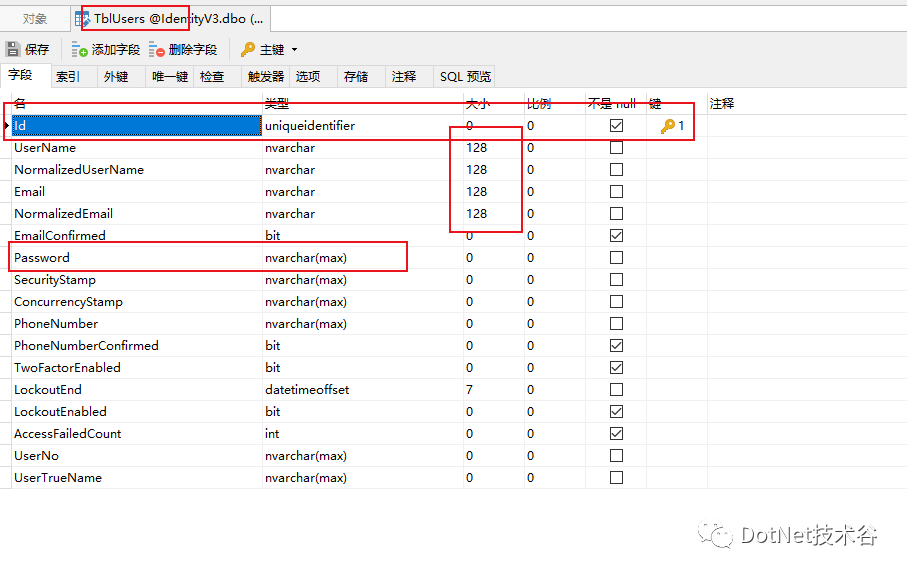
3.5 更改表名和列名
3.5.1 更改表名
再更改表名之前,请先调用 base.OnModelCreating 。然后,添加配置覆盖默认表名,同时定义主键。这里的示例以将默认表名改为以tbl开头命名的表名
        protected override void OnModelCreating(ModelBuilder builder)
        {
            var maxKeyLength = 256;
            base.OnModelCreating(builder);
            //自定义修改表名,以tbl命名开头
            builder.Entity<ApplicationUser>(b =>
            {
                b.ToTable("TblUsers");
            });

            builder.Entity<IdentityUserClaim<Guid>>(b =>
            {
                //定义主键
                b.HasKey(u => u.Id);
                b.ToTable("TblUserClaims");
            });

            builder.Entity<IdentityUserLogin<Guid>>(b =>
            {
                b.HasKey(u => new { u.LoginProvider, u.ProviderKey });
                b.ToTable("TblUserLogins");
            });

            builder.Entity<IdentityUserToken<Guid>>(b =>
            {
                b.HasKey(u => new { u.UserId, u.LoginProvider, u.Name });
                b.ToTable("TblUserTokens");
            });

            builder.Entity<IdentityRole<Guid>>(b =>
            {
                b.HasKey(u => u.Id);
                b.ToTable("TblRoles");
            });

            builder.Entity<IdentityRoleClaim<Guid>>(b =>
            {
                b.HasKey(u => u.Id);
                b.ToTable("TblRoleClaims");
            });

            builder.Entity<IdentityUserRole<Guid>>(b =>
            {
                b.HasKey(u => new { u.UserId, u.RoleId });
                b.ToTable("TblUserRoles");
            });
        }
    }
如果使用之类的应用类型 ApplicationUser ,请配置该类型而不是默认类型。
3.5.2 更改列名
下面的示例将更改某些列名,按需更改
protected override void OnModelCreating(ModelBuilder builder)
{
    base.OnModelCreating(modelBuilder);

    modelBuilder.Entity<ApplicationUser>(b =>
    {
         b.Property(e => e.PasswordHash).HasColumnName("Password");
    });
}
3.5.3 更改长度
某些类型的数据库列可以配置某些 方面 (例如, string 允许) 最大长度。
protected override void OnModelCreating(ModelBuilder builder)
{
    base.OnModelCreating(modelBuilder);

    modelBuilder.Entity<ApplicationUser>(b =>
    {
        b.Property(u => u.UserName).HasMaxLength(128);
        b.Property(u => u.NormalizedUserName).HasMaxLength(128);
        b.Property(u => u.Email).HasMaxLength(128);
        b.Property(u => u.NormalizedEmail).HasMaxLength(128);
    });
}
3.5.4 数据迁移
#进行更新数据模型 ,添加迁移,转换成相应的数据库
PM> Add-Migration CreateIdentitySchema2 -c ApplicationDbContext -o Data/Migrations
PM> Update-Database CreateIdentitySchema2
此时表的主键类型已修改完成,包括关系表的外键类型也同步更新了,
「效果如下:」
3.6 初始化数据库
在创建项目时候,我们可以提前做好初始化数据的准备,将数据作为种子处理迁移到创建的数据库中进行初始化操作。
3.6.1 创建文件
创建SeedData.cs文件,用于初始化基础数据:
    public class SeedData
    {
        public static void EnsureSeedData(IServiceProvider serviceProvider)
        {
            Console.WriteLine("Seeding database...");
            using (var scope = serviceProvider.GetRequiredService<IServiceScopeFactory>().CreateScope())
            {
                var context = scope.ServiceProvider.GetService<ApplicationDbContext>();
                context.Database.Migrate();

                var userMgr = scope.ServiceProvider.GetRequiredService<UserManager<ApplicationUser>>();
                var alice = userMgr.FindByNameAsync("alice").Result;
                if (alice == null)
                {
                    alice = new ApplicationUser
                    {
                        UserName = "alice"
                    };
                    var result = userMgr.CreateAsync(alice, "Pass123$").Result;
                    if (!result.Succeeded)
                    {
                        throw new Exception(result.Errors.First().Description);
                    }

                    result = userMgr.AddClaimsAsync(alice, new Claim[]{
                        new Claim(JwtClaimTypes.Name, "Alice Smith"),
                        new Claim(JwtClaimTypes.GivenName, "Alice"),
                        new Claim(JwtClaimTypes.FamilyName, "Smith"),
                        new Claim(JwtClaimTypes.Email, "AliceSmith@email.com"),
                        new Claim(JwtClaimTypes.EmailVerified, "true", ClaimValueTypes.Boolean),
                        new Claim(JwtClaimTypes.WebSite, "http://alice.com")
                    }).Result;
                    if (!result.Succeeded)
                    {
                        throw new Exception(result.Errors.First().Description);
                    }
                    Console.WriteLine("alice created");
                }
                else
                {
                    Console.WriteLine("alice already exists");
                }

                var bob = userMgr.FindByNameAsync("bob").Result;
                if (bob == null)
                {
                    bob = new ApplicationUser
                    {
                        UserName = "bob"
                    };
                    var result = userMgr.CreateAsync(bob, "Pass123$").Result;
                    if (!result.Succeeded)
                    {
                        throw new Exception(result.Errors.First().Description);
                    }
                    result = userMgr.AddClaimsAsync(bob, new Claim[]{
                        new Claim(JwtClaimTypes.Name, "Bob Smith"),
                        new Claim(JwtClaimTypes.GivenName, "Bob"),
                        new Claim(JwtClaimTypes.FamilyName, "Smith"),
                        new Claim(JwtClaimTypes.Email, "BobSmith@email.com"),
                        new Claim(JwtClaimTypes.EmailVerified, "true", ClaimValueTypes.Boolean),
                        new Claim(JwtClaimTypes.WebSite, "http://bob.com"),
                        new Claim("location", "somewhere")
                    }).Result;
                    if (!result.Succeeded)
                    {
                        throw new Exception(result.Errors.First().Description);
                    }
                    Console.WriteLine("bob created");
                }
                else
                {
                    Console.WriteLine("bob already exists");
                }
            }

            Console.WriteLine("Done seeding database.");
            Console.WriteLine();
        }
    }
配置添加自定义用户信息和身份。
3.6.2 调用方法
然后我们可以从主入口Main方法调用它:
        public static void Main(string[] args)
        {
            var seed = args.Contains("/seed");
            if (seed)
            {
                args = args.Except(new[] { "/seed" }).ToArray();
            }
            var host = CreateHostBuilder(args).Build();
            if (seed)
            {
                SeedData.EnsureSeedData(host.Services);
            }
            host.Run();
        }
3.6.3 程序运行
输入 dotnet run /seed
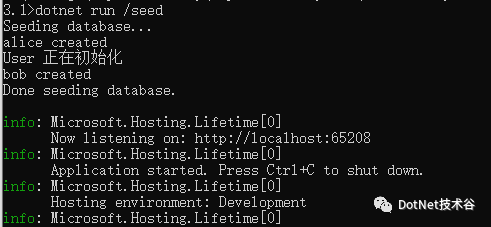
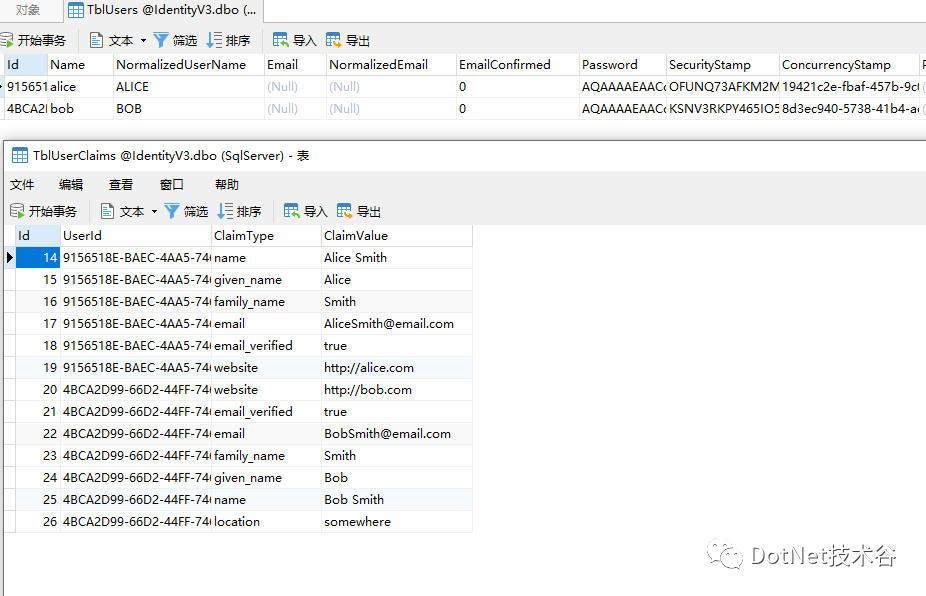
3.6.4 效果
总结
-
本篇简单介绍了对 Identity自定义用户以及表结构说明,以及根据自定义更改生成模型,并添加到示例项目当中。 -
后续会将此身份认证机制来应用到「IdentityServer4」中使用,进行用户角色管理存储操作。 -
如果有不对的或不理解的地方,希望大家可以多多指正,提出问题,一起讨论,不断学习,共同进步。 -
项目地址
