这节我们主要了解使用EF Core向数据库中插入数据,同时EF Core可以单条插入也可以批量,插入数据时我们需要将实体的EntityState值设为"Added"状态
EntityState枚举类型是用来存储实体状态,该枚举定义了下面5个值(Added,Deleted,Detached,Modified & Unchanged),当我们想要在数据库中创建一条新的记录时,EntityState值是Added,这将告诉EF Core我们将要插入记录,类似的如果我们想要更新一个实体时,EntityState值是Modified,删除实体时状态为Deleted,Unchanged状态表示实体没有任何改变,EF Core 会跟踪实体的变化,而Detached表示EF Core 没有启用实体跟踪.
public class Department{public int Id { get; set; }public string Name { get; set; }public ICollection<Employee> Employee { get; set; }}
public class Employee{public int Id { get; set; }public int DepartmentId { get; set; }public string Name { get; set; }public string Designation { get; set; }public Department Department { get; set; }}
public ICollection Employee { get; set;}是一个拥有Employee实体集合的导航属性,Employee类Department属性
public Department Department { get; set; }这个导航属性引用了关联的Department实体
在应用程序的Models 文件夹下创建EF Core的DBContext 我们命名为CompanyContext.cs,这个类定义了两个实体Department和Employee
public class CompanyContext : DbContext{public CompanyContext(DbContextOptions<CompanyContext> options) : base(options){}public DbSet<Department> Department { get; set; }public DbSet<Employee> Employee { get; set; }protected override void OnModelCreating(ModelBuilder modelBuilder){}}
我们在启动文件中注册DbContext服务
builder.Services.AddDbContext<CompanyContext>(options =>options.UseSqlServer(builder.Configuration.GetConnectionString("DefaultConnection")));
下面的例子给出了链接字符串
{"ConnectionStrings": {"DefaultConnection": "Data Source=(localdb)\\MSSQLLocalDB;Initial Catalog=EFCoreInsertRecords;Trusted_Connection=True;MultipleActiveResultSets=true"}}
3 向数据库中插入单挑数据
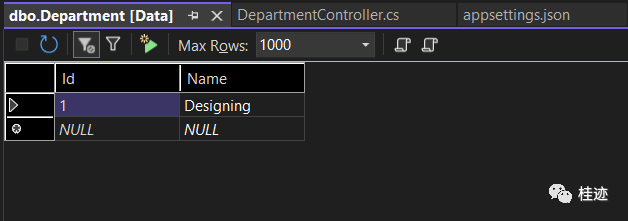
var dept = new Department(){Name = "Designing"};context.Entry(dept).State = EntityState.Added;context.SaveChanges();
我们创建了一个新的Department类的对象,并且设置EntityState状态Added,调用DbContext.SaveChanges()方法将会向Department表中插入一条数据,context变量是数据库的上下文对象,可以通过依赖注入从Controller中获取该对象,代码如下:
public class DepartmentController : Controller{private CompanyContext context;public DepartmentController(CompanyContext cc){context = cc;}//... action methods creating recordpublic IActionResult Create(){var dept = new Department(){Name = "Designing"};context.Entry(dept).State = EntityState.Added;context.SaveChanges();}}
下面图片显示了最近创建的数据
var dept = new Department(){Name = "Designing"};context.Add(dept);context.SaveChanges();
4 使用SaveChangesAsync()异步方法
var dept = new Department(){Name = "Designing"};context.Add(dept);await context.SaveChangesAsync();
5 TryUpdateModelAsync
var emptyEmployee = new Employee();if (await TryUpdateModelAsync<Employee>(emptyEmployee, "", s => s.Name, s => s.DepartmentId, s => s.Designation)){context.Employee.Add(emptyEmployee);await context.SaveChangesAsync();return RedirectToAction("Index");}
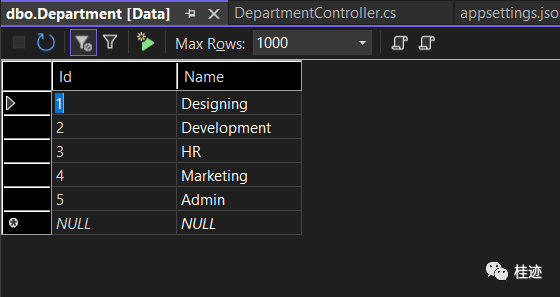
var dept1 = new Department() { Name = "Development" };var dept2 = new Department() { Name = "HR" };var dept3 = new Department() { Name = "Marketing" };context.AddRange(dept1, dept2, dept3);await context.SaveChangesAsync();
var dept1 = new Department() { Name = "Development" };var dept2 = new Department() { Name = "HR" };var dept3 = new Department() { Name = "Marketing" };var deps = new List<Department>() { dept1, dept2, dept3 };context.AddRange(deps);await context.SaveChangesAsync();
7 EF Core 插入关联数据
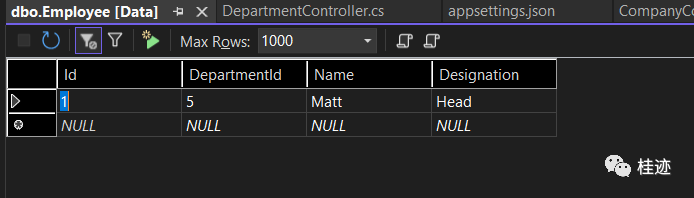
Department & Employee 表是一对多的关系,现在我们向每张表中插入新纪录(Department & Employee)
var dept = new Department(){Name = "Admin"};var emp = new Employee(){Name = "Matt",Designation = "Head",Department = dept};context.Add(emp);await context.SaveChangesAsync();
检查数据库发现两条记录在他们各自的表中
使用EF Core 实现CRUD操作,我们先做一个新增数据功能针对Department实体类,在Controllers文件夹中创建DepartmentController.cs 类并添加Create方法,该方法从View提交的表单中获取一个新的Department
代码如下:
using EFCoreExample.Models;using Microsoft.AspNetCore.Mvc;namespace EFCoreExample.Controllers{public class DepartmentController : Controller{private CompanyContext context;public DepartmentController(CompanyContext cc){context = cc;}public IActionResult Create(){return View();}[HttpPost]public async Task<IActionResult> Create(Department dept){context.Add(dept);await context.SaveChangesAsync();return View();}}}
通过依赖注入从Controller中获取DbContext对象并且使用它新增数据
@{ViewData["Title"] = "Create Department";}@model Department<form class="form-horizontal" role="form" method="post"><div class="mb-3 row"><label asp-for="Name" class="col-sm-1 control-label"></label><div class="col-sm-11"><input asp-for="Name" class="form-control" /></div></div><div class="mb-3 row"><div class="col-sm-11 offset-sm-1"><button type="submit" class="btn btn-primary">保存</button><button asp-action="Index" class="btn btn-secondary">返回</button></div></div></form>
/Department/Create,我们将看到department表单

输入部门名称并点击保持创建一条新的记录
using EFCoreExample.Models;using Microsoft.AspNetCore.Mvc;using Microsoft.AspNetCore.Mvc.Rendering;using Microsoft.EntityFrameworkCore;namespace EFCoreExample.Controllers{public class EmployeeController : Controller{private CompanyContext context;public EmployeeController(CompanyContext cc){context = cc;}public IActionResult Index(){return View();}public IActionResult Create(){List<SelectListItem> dept = new List<SelectListItem>();dept = context.Department.Select(x => new SelectListItem { Text = x.Name, Value = x.Id.ToString() }).ToList();ViewBag.Department = dept;return View();}[HttpPost]public async Task<IActionResult> Create(Employee emp){context.Add(emp);await context.SaveChangesAsync();return RedirectToAction("Index");}}}
department和employee是一对多的关系,因此我们需要为每个员工插入一个department
List<SelectListItem> dept = new List<SelectListItem>();dept = context.Department.Select(x => new SelectListItem { Text = x.Name, Value = x.Id.ToString() }).ToList();ViewBag.Department = dept;
在View中我们读取Viewbag值并且展示在HTML的选择控件中,Create方法中也使用TryUpdateModelAsync方法,使用下面的代码替换原有的post版本Create方法
[HttpPost][ActionName("Create")]public async Task<IActionResult> Create_Post(){var emptyEmployee = new Employee();if (await TryUpdateModelAsync<Employee>(emptyEmployee, "", s => s.Name, s => s.DepartmentId, s => s.Designation)){context.Employee.Add(emptyEmployee);await context.SaveChangesAsync();return RedirectToAction("Index");}return View();}
s => s.Name, s => s.DepartmentId, s => s.Designation当razor表单被提交时通过模型绑定绑定employee的值,我们检查TryUpdateModelAsync 是否返回true,通过lambda表达式给emptyEmployee对象赋值,我们将emptyEmployee记录添加到context中,调用EF Core的SaveChangesAsync 方法将数据插入到数据库中
context.SaveChangesAsync();@{ViewData["Title"] = "Create Employee";}@model Employee<form method="post"><div class="mb-3 row"><label asp-for="Name" class="col-sm-1 control-label"></label><div class="col-sm-11"><input asp-for="Name" class="form-control" /></div></div><div class="mb-3 row"><label asp-for="Department" class="col-sm-1 control-label"></label><div class="col-sm-11"><select asp-for="DepartmentId" asp-items="ViewBag.Department" class="form-control"></select></div></div><div class="mb-3 row"><label asp-for="Designation" class="col-sm-1 control-label"></label><div class="col-sm-11"><input asp-for="Designation" class="form-control" /></div></div><div class="mb-3 row"><div class="col-sm-11 offset-sm-1"><button type="submit" class="btn btn-primary">保存</button><button asp-action="Index" class="btn btn-secondary">返回</button></div></div></form>
使用下面代码显示所有部门:
<select asp-for="DepartmentId" asp-items="ViewBag.Department" class="form-control"></select>运行应用程序并在浏览器中输入https://localhost:7018/

