SignalR是一个.NET的开源框架,SignalR可使用Web Socket, Server Sent Events 和 Long Polling作为底层传输方式实现服务端和客户端的实时数据交互。
Hangfire是一个.NET的开源后台任务框架提供统一的编程模型,以可靠的方式处理后台任务.
目的
通过SignalR+Hangfire我们可以实现一些需要较长时间处理的任务,并在完成及时的通知前端处理结果。
以下是我使用SignalR+Hangfire的开发需求
在.NET6 WebAPI的情况下,前端是vue+ts,我现在有个需要就是,我写了一个接口,是对接stable diffusion webui 文生图的接口,前端第一个人请求,返回图没有问题,但是,此时在生成图的过程中,第二个人请求,我希望加入到一个队列或者别的方式 ,把这个请求放着,我处理完第一个请求之后继续处理第二个,并且告诉用户,前面有多少个任务需要等待?
开发环境.NET 7+vue3.0,下面是对应安装和使用教程:
二、Hangfire使用
1、安装nuget包
由于我使用的mysql,对应包为Hangfire.MySqlStorage,大家根据自己的数据库选择安装对应的包
<PackageReference Include="Hangfire" Version="1.8.2" />
<PackageReference Include="Hangfire.MySqlStorage" Version="2.0.3" />
2、添加Hangfire配置
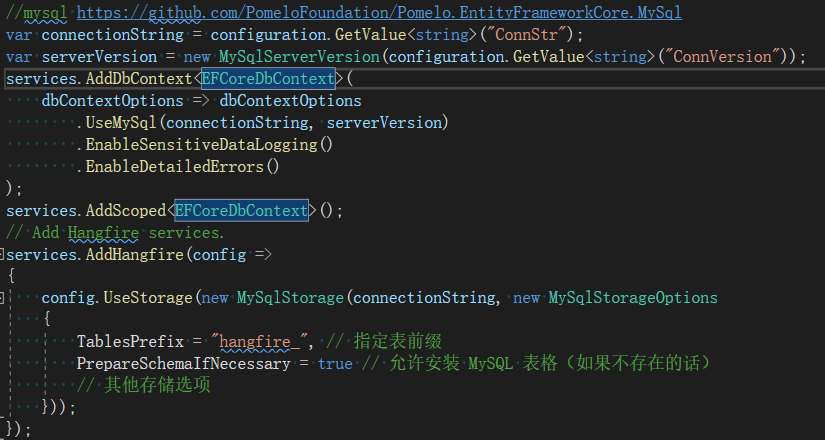
Hangfire的数据是存在数据库中的,所以在添加配置时候要使用对应的数据库连接字符串。
同时,在UseHangfireServer时,我使用了自定义的队列名称,并将同时执行的任务数设置为1,以实现任务队列中的任务唯一,且任务依次执行。
在program.cs中添加以下配置
1、添加Hangfire
代码内容
var connectionString = configuration.GetValue<string>("ConnStr");//数据库连接配置
// Add Hangfire services.
services.AddHangfire(config =>
{
    config.UseStorage(new MySqlStorage(connectionString, new MySqlStorageOptions
    {
        TablesPrefix = "hangfire_", // 指定表前缀
        PrepareSchemaIfNecessary = true // 允许安装 MySQL 表格(如果不存在的话)
        // 其他存储选项
    }));
});
2、应用Hangfire

代码内容
// Use Hangfire server and dashboard.
app.UseHangfireServer(new BackgroundJobServerOptions
{
    Queues = new[] { "default", "img-queue" },
    WorkerCount = 1
});
app.UseHangfireDashboard();// 使用 Hangfire 控制面板
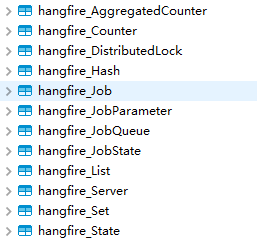
3、数据库配置
配置完成,在使用时,数据库会生成Hangfire的工作表,如下:
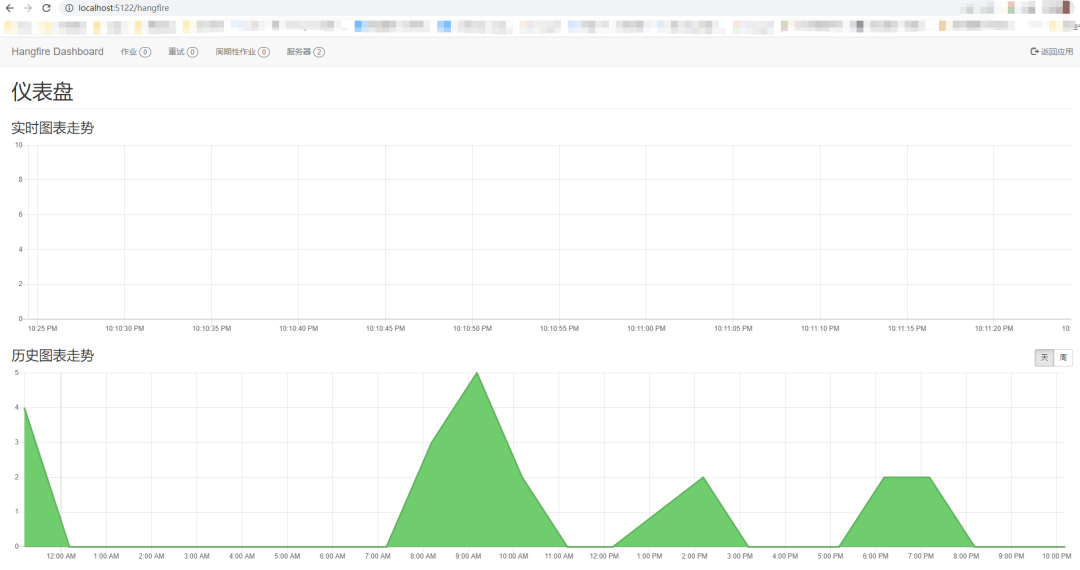
4、Hangfire 控制面板
对应Hangfire 控制面板为 /hangfire
http://localhost:5122/hangfire
仪表盘
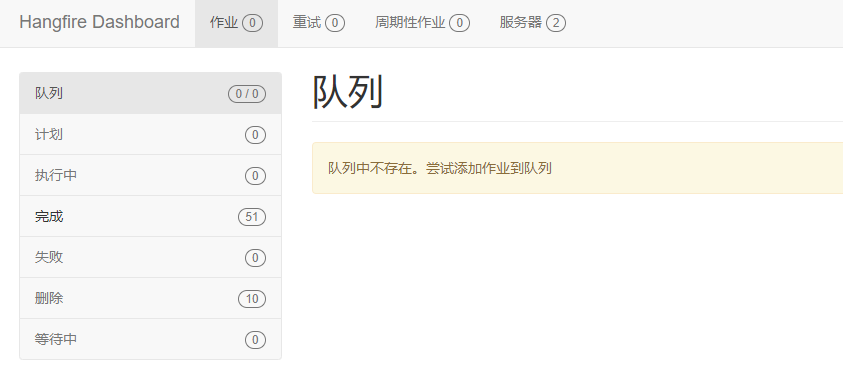
队列
5、代码中的应用
1、发起一个后台任务
//添加后台任务
BackgroundJob.Enqueue(() => BackServiceCreateImg(request));
2、后台任务方法
/// <summary>
/// 后台任务生成图片(DisableConcurrentExecution 设置超时时间 Queue设置任务类型)
/// </summary>
/// <param name="request"></param>
/// <returns></returns>
[DisableConcurrentExecution(timeoutInSeconds: 180)]
[Queue("img-queue")]
public async Task BackServiceCreateImg(GraphGenerationRequest request)
{
    //...代码逻辑省略
}
3、查询队列等待任务数
var queueLength = JobStorage.Current.GetMonitoringApi()
                            .EnqueuedCount("img-queue");//指定的队列类型的队列等待任务数
三、SignalR使用
后端SignalR使用
由于我使用的.NET 7,微软自带SignalR,我们使用时只需要添加引用
using Microsoft.AspNetCore.SignalR;
添加SignalR配置
在program.cs中添加以下配置
1、添加SignalR
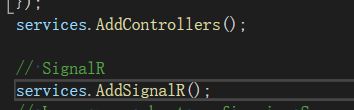
代码内容
// SignalR
services.AddSignalR();
2、配置SignalR hub
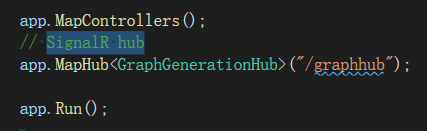
代码内容
// SignalR hub
app.MapHub<GraphGenerationHub>("/graphhub");
创建SignalR hub类
using Hangfire;
using Microsoft.AspNetCore.Cors;
using Microsoft.AspNetCore.SignalR;

namespace ChatGptWebApi.Hubs
{
    [EnableCors("MyPolicy")]
    public class GraphGenerationHub : Hub
    {

        public GraphGenerationHub()
        {
        }

        public long GetWaitingCount()
        {
            return  JobStorage.Current.GetMonitoringApi()
                .EnqueuedCount("img-queue");
        }
    }
}
代码中的应用
依赖注入
通过依赖注入,在要使用的类中注入
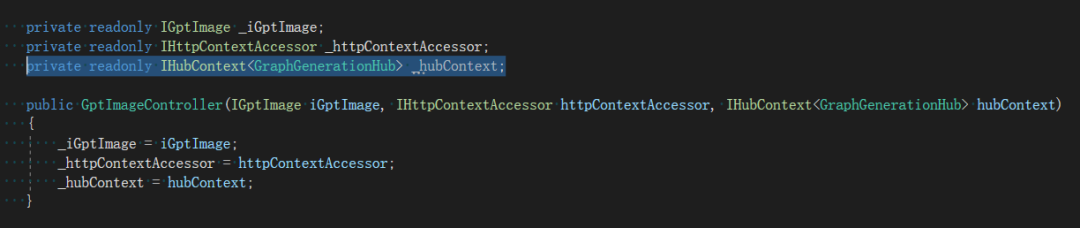
private readonly IHubContext<GraphGenerationHub> _hubContext;
发送消息
向全体发送
_hubContext.Clients.All.SendAsync("updateWaitingCount", "消息内容.....");
向指定客户端发送
_hubContext.Clients.Client(request.ConnectionId).SendAsync("updateImgUrl", $"生成图片失败:{ex.Message}");
前端SignalR使用
前端我用的是VUE+TS
安装SignalR包
通过命令使用 pnpm 安装 @microsoft/signalr:
pnpm install @microsoft/signalr
页面中引用@microsoft/signalr
import * as signalR from "@microsoft/signalr";
创建一个useSignalR.ts
创建一个useSignalR.ts来专门处理SignalR消息,然后在需要用到的页面中引用即可。
代码内容
import { onUnmounted, ref } from 'vue';
import { useMessage } from 'naive-ui'
import { HubConnectionBuilder, HubConnection } from '@microsoft/signalr';

export  function useSignalR(
  hubUrl: string,
  hubName: string
) {
  const connection = ref<HubConnection | null>(null);
  const waitingCount = ref(0);
  const imgUrl = ref([]);
  const ms = useMessage();
  const start = async () => {
    if (connection.value && connection.value.state === 'Connected') return;
    connection.value = getConnection(hubUrl);
    if (connection.value) {
     // 连接 SignalR
     connection.value.start()
     .then(() => {
       console.log('SignalR Connected.');
       // 调用 GraphGenerationHub 的 GetWaitingCount 方法获取队列等待数
       connection.value?.invoke('GetWaitingCount')
         .then(count => {
           console.log('Waiting Count:', count);
           waitingCount.value = count;
         });
       // 注册 signalR 接收方法
       connection.value?.on('updateWaitingCount', count => {
         console.log('Waiting Count:', count);
         waitingCount.value = count;
       });
       connection.value?.on('updateImgUrl', newImgUrl => {
        console.log('Waiting imgUrl:', newImgUrl);
        if(typeof newImgUrl === 'string'){
          ms.error(newImgUrl);
        }else{
          ms.success('图片生成成功。');
        imgUrl.value = newImgUrl;
        }
      });
     })
     .catch(error => {
       console.log('SignalR Connection Error:', error);
     });
    }
  };
  const stop = () => {
    connection.value!.stop();
    connection.value = null;
  };

  const getConnection = (
    hubUrl: string
  ): HubConnection => {
    return new HubConnectionBuilder()
      .withUrl(hubUrl)
      .withAutomaticReconnect().build();
  };

  start();

  onUnmounted(() => {
    if (connection.value?.state === 'Connected') connection.value!.stop();
  });

  return {
    connection,
    waitingCount,
    imgUrl,
    start,
    stop
  };
}
页面中的使用
在需要使用signalR的页面引用useSignalR
 import {useSignalR} from '@/views/chat/hooks/useSignalR';
setup() {
//signalR
const { waitingCount,connection,imgUrl } = useSignalR(apiBaseUrl+'/graphhub');
}
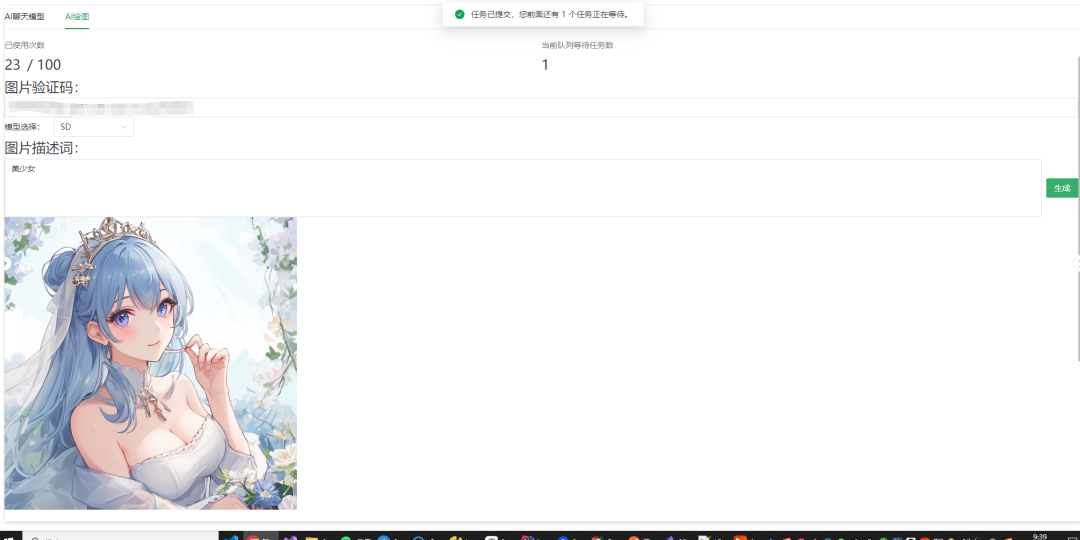
案例SignalR+Hangfire+StableDiffusionAPI 生成图片
Hangfire实现后台调用StableDiffusion web接口,然后通过SignalR将结果返回给前端。这样,对StableDiffusion web的性能要求很低。
不会因为生成图片慢,导致http请求超时的情况。大大改善了前后端交互。
1、前端建立SignalR
入上述页面中使用介绍的一样,当添加了
const { waitingCount,connection,imgUrl } = useSignalR(apiBaseUrl+'/graphhub');
打开对应页面时,就创建了SignalR的连接了。
2、前端发起请求
前端的提交按钮对应的方法,使用的是axios发送http请求生成图片。
代码如下
const submit = async () => {
        const params = {
          Prompt: description.value,
          connectionId:connection.value?.connectionId //SignalR的客户端连接ID
        };
      try {
      //signalR
      const response = await axios.post(apiUrl+'/GenerateGraph', params);
      if(response.data.status ==='Fail'){
        ms.error(response.data.message ?? 'error')
      return
      }
      usedCount.value=response.data.data;
      ms.success(response.data.message);

    } catch (error) {
      ms.error('报错拉!:'+error);
    }
    console.log("提交的参数:", params); // 在控制台输出提交的参数
  };
四、后端接口和实现
后端接口和实现方法完成定时任务的发起和signalR的消息推送
后端接口如下
/// <summary>
/// signalR+hangfire生成图片
/// </summary>
/// <param name="request"></param>
/// <returns></returns>
[HttpPost]
public async Task<ApiResult<int?>> GenerateGraph(GraphGenerationRequest request)
{
    var res=await _iGptImage.GenerateGraph(request);
    return res;
}
方法实现
/// <summary>
/// 生成图片,返回队列信息和剩余次数
/// </summary>
/// <param name="request"></param>
/// <returns></returns>
/// <exception cref="NotImplementedException"></exception>
public async Task<ApiResult<int?>> GenerateGraph(Form.GraphGenerationRequest request)
{
    //添加后台任务
    BackgroundJob.Enqueue(() => BackServiceCreateImg(request));
    string message = await SendWaitingCount("img-queue");
    return new ApiResult<int?>(HttpResultTypeEnum.Success, count - 1, message);
}
 /// <summary>
/// 推送队列的等待信息
/// </summary>
/// <param name="enqueue">任务类型</param>
/// <returns></returns>
private async Task<string> SendWaitingCount(string enqueue)
{
    var queueLength = JobStorage.Current.GetMonitoringApi()
        .EnqueuedCount(enqueue);
    string message = $"任务已提交,您前面还有 {queueLength} 个任务正在等待。";
    await _hubContext.Clients.All.SendAsync("updateWaitingCount", queueLength);
    return message;
}
五、案例成果
案例地址(AI聊天+图片生成):https://ai.terramours.site/
拥抱ChatGPT:https://ai.terramours.site/
开源项目地址:https://github.com/firstsaofan/TerraMours
