概述
超链接
-
linkText:超链接显示文本,不可以为空。 -
actionName:链接的目标方法名称ActionName。 -
controllerName:链接的控制器名称,可跨控制器跳转。 -
routeValues:object类型的路由数据,可以接收匿名对象,如:new {id=1,name="公子小六"}。 -
htmlAttributes:超链接Html属性,如:style,class,width,height等,可以接收匿名对象,如:new {style="color:red;width:100px",@class="link"}。 -
protocol:协议,如:http,https等。 -
hostname:主机服务器名称。 -
fragment:URL 片段名称(定位点名称)。
@*<a class="link" href="/Student/Index/1?name=%E5%85%AC%E5%AD%90%E5%B0%8F%E5%85%AD" style="color:red;width:100px">点击跳转</a>等价于*@@Html.ActionLink("点击跳转","Index","Student",new {id=1,name="公子小六"},new {style="color:red;width:100px",@class="link"})
-
linkText:超链接显示文本,不可以为空。 -
routeName:路由名称。 -
routeValues:object类型的路由数据,可以接收匿名对象,如:new {id=1,name="公子小六"}。 -
htmlAttributes:超链接Html属性,如:style,class,width,height等,可以接收匿名对象,如:new {style="color:red;width=100px",@class="link"}。
<!--以下RouteLink和ActionLink输出结果一致-->@Html.RouteLink("点击跳转","Default",new {controller="Student",action="Index", id=1,name="公子小六"},new {style="color:red;width:100px",@class="link"})
form标签
<form action="/User/Save" method="post"></form>
@using (Html.BeginForm("Save","User",FormMethod.Post)){}
-
actionName:链接的目标方法名称ActionName。
-
controllerName:链接的控制器名称,可跨控制器跳转。
-
method:是form请求传递参数的方式,是一个枚举类型FormMethod,有Get和Post两种方式。
-
routeValues:object类型的路由数据,可以接收匿名对象,如:new {id=1,name="公子小六"}。
-
htmlAttributes:超链接Html属性,如:style,class,width,height等,可以接收匿名对象,如:new {style="color:red;width=100px",@class="link"}。
-
antiforgery:是否将身份验证令牌添加到表单中有助于防止请求伪造。
文本框与Label
-
expression:表达式名称,一般用于表示文本框的name。
-
value:文本框中的值,可以绑定模型中的值。
-
htmlAttributes:超链接Html属性,如:style,class,width,height等,可以接收匿名对象,如:new {style="color:red;width:100px",@class="link"}。
-
format:格式
-
expression:表达式名称,一般用于表示当时显示的文本是对应于哪个控件。
-
labelText:要显示的 文本内容。
-
htmlAttributes:超链接Html属性,如:style,class,width,height等,可以接收匿名对象,如:new {style="color:red;width:100px",@class="link"}。
@Html.Label("Id","User Id",new { style="width:90px;"});@Html.TextBox("Id",Model.Id)<br /><br />@Html.Label("Name","User Name",new { style="width:90px;"})@Html.TextBox("Name",Model.Name)<br /><br />@Html.Label("Mail","E-Mail",new { style="width:90px;"})@Html.TextBox("Mail",Model.Email)
密码框
-
expression:表达式名称,一般用于表示文本框的name。
-
value:密码框中的值,可以绑定模型中的值,也可以为空
-
htmlAttributes:超链接Html属性,如:style,class,width,height等,可以接收匿名对象,如:new { placeHolder="请输入密码"}。
@Html.Label("Pwd","Password",new { style="width:90px;"})@Html.Password("Pwd",null,new {placeHolder="请输入密码"})
单选框和复选框
-
expression:表达式名称,一般用于表示文本框的name。 -
value:单选框的值 -
isChecked:是否默认选中 -
htmlAttributes:超链接Html属性,如:style,class,width,height等,可以接收匿名对象。
@Html.Label("Sex","性别",new { style="width:90px;"})@Html.RadioButton("Sex","Male",false) <span>男</span>@Html.RadioButton("Sex", "FeMale", false) <span>女</span>
-
expression:表达式名称,一般用于表示文本框的name。 -
isChecked:是否默认选中 -
htmlAttributes:超链接Html属性,如:style,class,width,height等,可以接收匿名对象,如:new { value="pingpang" }
@Html.Label("Hobby","爱好",new { style="width:90px;"})@Html.CheckBox("Hobby",false,new { value="football" }) <span>足球</span>@Html.CheckBox("Hobby",false,new { value="basketball" }) <span>篮球</span>@Html.CheckBox("Hobby",false,new { value="pingpang" }) <span>乒乓球</span>
文本域
-
expression:表达式名称,一般用于表示文本框的name。
-
value:文本域内容
-
rows:行数
-
columns:列数
-
htmlAttributes:超链接Html属性,如:style,class,width,height等,可以接收匿名对象。
@Html.Label("Description","简介",new { style="width:90px;"})@Html.TextArea("Description",null,3,20,new {})
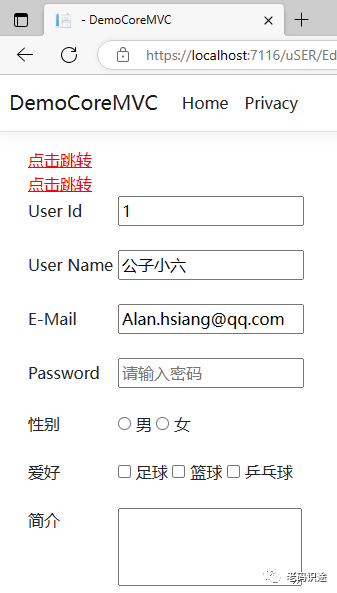
完整示例
@model DemoCoreMVC.Models.User;@*<a class="link" href="/Student/Index/1?name=%E5%85%AC%E5%AD%90%E5%B0%8F%E5%85%AD" style="color:red;width=100px">点击跳转</a>等价于*@@Html.ActionLink("点击跳转","Index","Student",new {id=1,name="公子小六"},new {style="color:red;width:100px",@class="link"})<br />@Html.RouteLink("点击跳转","Default",new {controller="Student",action="Index", id=1,name="公子小六"},new {style="color:red;width:100px",@class="link"})@using (Html.BeginForm("Save","User",FormMethod.Post)){@Html.Label("Id","User Id",new { style="width:90px;"});@Html.TextBox("Id",Model.Id)<br /><br />@Html.Label("Name","User Name",new { style="width:90px;"})@Html.TextBox("Name",Model.Name)<br /><br />@Html.Label("Mail","E-Mail",new { style="width:90px;"})@Html.TextBox("Mail",Model.Email)<br /><br />@Html.Label("Pwd","Password",new { style="width:90px;"})@Html.Password("Pwd",null,new {placeHolder="请输入密码"})<br /><br />@Html.Label("Sex","性别",new { style="width:90px;"})@Html.RadioButton("Sex","Male",false) <span>男</span>@Html.RadioButton("Sex", "FeMale", false) <span>女</span><br /><br />@Html.Label("Hobby","爱好",new { style="width:90px;"})@Html.CheckBox("Hobby",false,new { value="football" }) <span>足球</span>@Html.CheckBox("Hobby",false,new { value="basketball" }) <span>篮球</span>@Html.CheckBox("Hobby",false,new { value="pingpang" }) <span>乒乓球</span><br /><br />@Html.Label("Description","简介",new { style="width:90px;vertical-align:top;"})@Html.TextArea("Description",null,3,20,new {})}
<a class="link" href="/Student/Index/1?name=%E5%85%AC%E5%AD%90%E5%B0%8F%E5%85%AD" style="color:red;width:100px">点击跳转</a><br><a class="link" href="/Student/Index/1?name=%E5%85%AC%E5%AD%90%E5%B0%8F%E5%85%AD" style="color:red;width:100px">点击跳转</a><form action="/User/Save" method="post"><label for="Id" style="width:90px;">User Id</label><input data-val="true" data-val-required="The Id field is required." id="Id" name="Id" type="text" value="1"> <br><br><label for="Name" style="width:90px;">User Name</label><input data-val="true" data-val-required="The Name field is required." id="Name" name="Name" type="text" value="公子小六"> <br><br><label for="Mail" style="width:90px;">E-Mail</label><input id="Mail" name="Mail" type="text" value="Alan.hsiang@qq.com"><br><br><label for="Pwd" style="width:90px;">Password</label><input id="Pwd" name="Pwd" placeholder="请输入密码" type="password"><br><br><label for="Sex" style="width:90px;">性别</label><input id="Sex" name="Sex" type="radio" value="Male"> <span>男</span><input id="Sex" name="Sex" type="radio" value="FeMale"> <span>女</span><br><br><label for="Hobby" style="width:90px;">爱好</label><input id="Hobby" name="Hobby" type="checkbox" value="football"> <span>足球</span><input id="Hobby" name="Hobby" type="checkbox" value="basketball"> <span>篮球</span><input id="Hobby" name="Hobby" type="checkbox" value="pingpang"> <span>乒乓球</span><br><br><label for="Description" style="width:90px;vertical-align:top;">简介</label><textarea cols="20" id="Description" name="Description" rows="3"></textarea><input name="__RequestVerificationToken" type="hidden" value="CfDJ8BFjNYa4u1JEvSFtRevYkrqryxwT0_r_eRNKsK4VToEBDTdl_uU7Qt7Z3_2Eu8xd0eiz_eMhzkSssfX-kTgLnui_qq7uXql9na9LwfkmvViszQE499vE9vrap83T6vhV16A9nEK6PPY6gzpPMlnWiVc"><input name="Hobby" type="hidden" value="false"><input name="Hobby" type="hidden" value="false"><input name="Hobby" type="hidden" value="false"></form>