前言
本文将以 C# 语言来实现一个简单的布隆过滤器,为简化说明,设计得很简单,仅供学习使用。
感谢@时总 InCerry大佬百忙之中的指导。.
布隆过滤器简介
布隆过滤器(Bloom filter)是一种特殊的 Hash Table,能够以较小的存储空间较快地判断出数据是否存在。常用于允许一定误判率的数据过滤及防止缓存击穿及等场景。
相较于 .NET 中的 HashSet 这样传统的 Hash Table,存在以下的优劣势。
优势:
-
占用的存储空间较小。不需要像 HashSet 一样存储 Key 的原始数据。
劣势:
-
存在误判率,过滤器认为不存在的数据一定不存在,但是认为存在的数据不一定真的存在。这个和布隆过滤器的实现方式有关。
-
不支持数据的删除,下文会讲为什么不支持删除。
数据的存储#
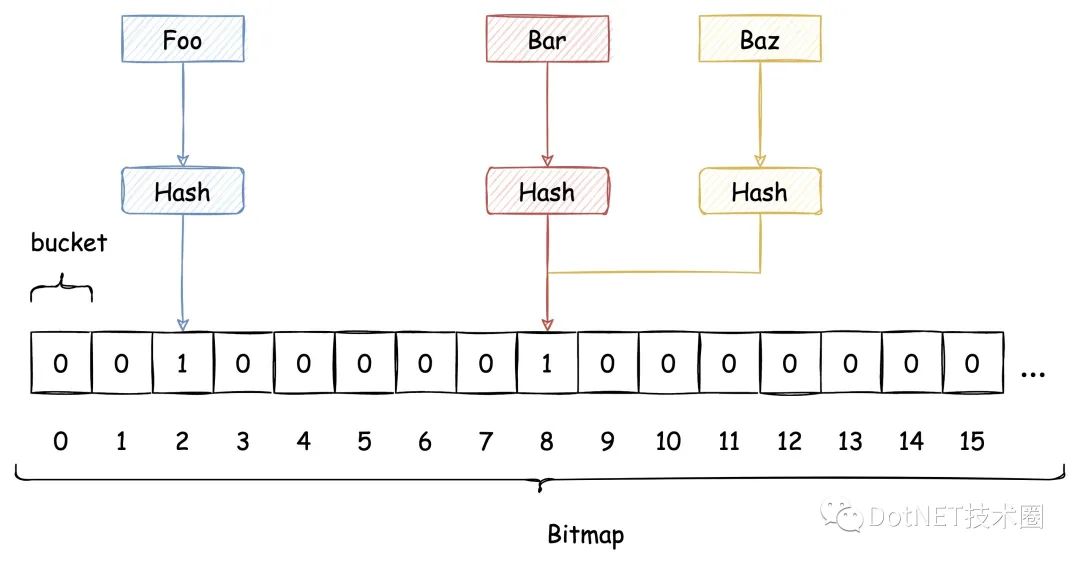
布隆过滤器的数据保存在 位图(Bitmap)上。Bitmap 简而言之是二进制位(bit)的数组。Hash Table 保存每个元素的位置,我们称之为 桶(bucket), Bitmap 上的每一位就是布隆过滤器的 bucket。
布隆过滤器的每一个 bucket 只能存储 0 或 1。数据插入时,布隆过滤器会通过 Hash 函数计算出插入的 key 对应的 bucket,并将该 bucket 设置为 1。
查询时,再次根据 Hash 函数计算出 key 对应的 bucket,如果 bucket 的值是 1,则认为 key 存在。
HASH 冲突的解决方案#
布隆过滤器使用了 Hash 函数,自然也逃不过 Hash 冲突的问题。对布隆过滤器而言,发生 Hash 冲突也就意味着会发生误判。
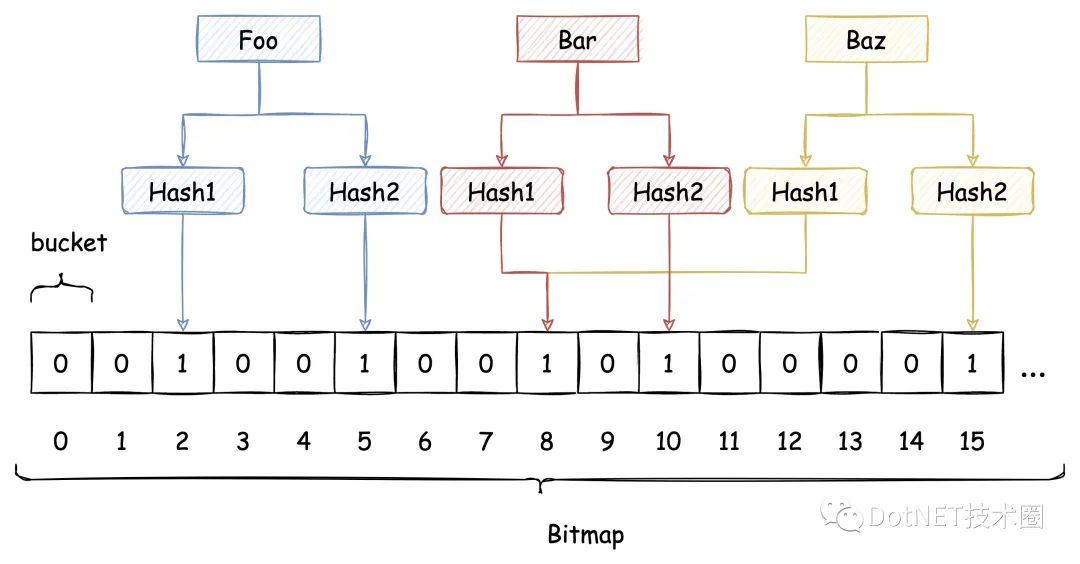
传统 Hash 算法解决 Hash 冲突的方式有 开放定址法、链表法等。而布隆过滤器解决 Hash 冲突的方式比较特殊,它使用了多个 Hash 函数来解决冲突问题。
下图中插入布隆过滤器的 Bar 和 Baz 经过 Hash1 计算出的位置是同一个,但 Hash2 计算出的位置是不一样的,Bar 和 Baz 得以区分。
即使布隆过滤器使用了这种方式来解决 Hash冲突,冲突的可能性依旧存在,如下图所示:
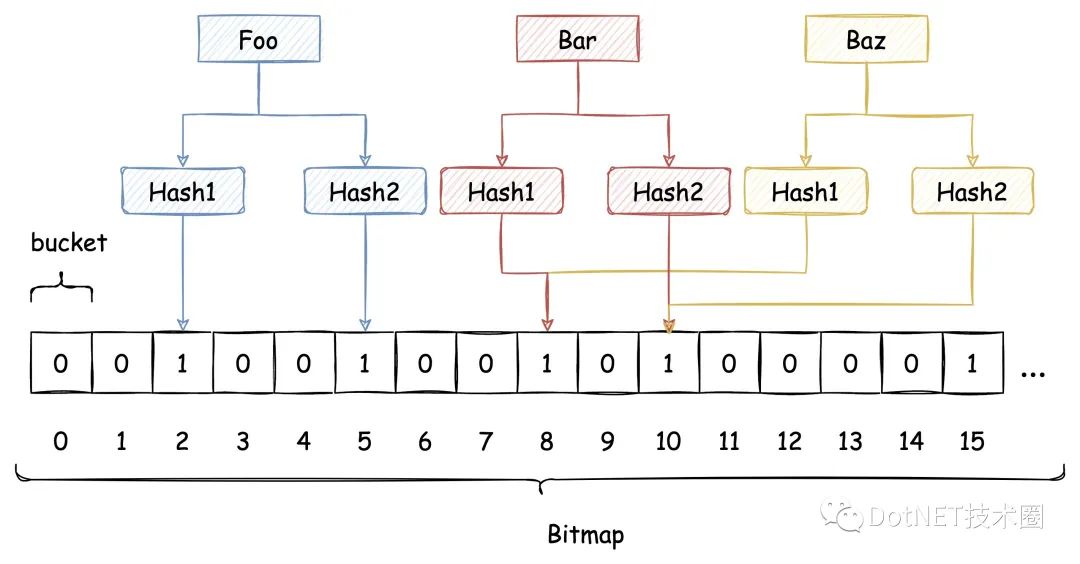
由于布隆过滤器不保留插入的 Key 的原始值,Hash 冲突是无法避免的。我们只能通过增加 Hash 函数的数量来减少冲突的概率,也就是减少误判率。
假设布隆过滤器有 m 个 bucket,包含 k 个哈希函数,已经插入了 n 个 key。经数学推导可得误判率 ε 的公式如下:

具体推断过程可参考 https://en.wikipedia.org/wiki/Bloom_filter。
布隆过滤器的误判概率大致和 已经插入的 key 的数量 n 成正比,和 hash函数数量 k、bucket 数 m 成反比。为了减少误判率,我们可以增加 m 或 增加 k,增加 m 意味着过滤器占用存储空间会增加,增加 k 则意味着插入和查询时的效率会降低。
为什么布隆过滤器不支持删除#
布隆过滤器通过多个 Hash 函数来解决冲突的设计,也意味着多着插入元素可能会共享同样的 bucket,删掉一个元素的同时,也会被其他元素的一部分 bucket 给删掉。因此基于 Bitmap 实现的布隆过滤器是不支持删除的。
用 C# 实现 BITMAP
在实现布隆过滤器之前,我们首先要实现一个 Bitmap。
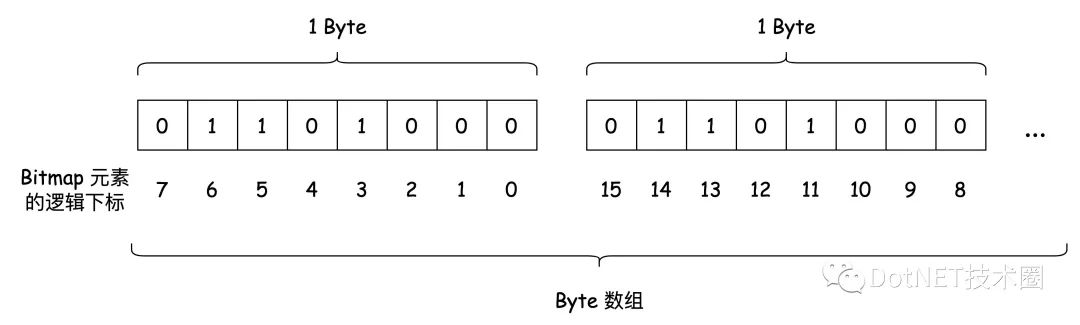
在 C# 中,我们并不能直接用 bit 作为最小的数据存储单元,但借助位运算的话,我们就可以基于其他数据类型来表示,比如 byte。下文用 byte 作为例子来描述 Bitmap 的实现,但不仅限于 byte,int、long 等等也是可以的。
位运算#
下面是 C# 中位运算的简单介绍:
| 符号 | 描述 | 运算规则 |
|---|---|---|
| & | 与 | 两个位都为1时,结果才为1 |
| | | 或 | 两个位都为0时,结果才为0 |
| ^ | 异或 | 两个位相同为0,相异为1 |
| ~ | 取反 | 0变1,1变0 |
| << | 左移 | 各二进位全部左移若干位,低位补0 |
| >> | 右移 | 各二进位全部右移若干位,高位补0 |
一般来说,我们要进行位运算计算的数据通常都是由多个二进位组成的。对两个数字使用 &、|、^ 这三个运算符时,需要对齐两个数字的右边,不等长时,左边会补0,一位位地进行计算。
// 0b 代表值用二进制表示数字
short a =                     0b0111111111111001;
byte  b =                             0b01111111;
short c = (short)(a & b);  // 0b0000000001111001
short d = (short)(a | b);  // 0b0111111111111111
short e = (short)(a ^ b);  // 0b0111111110000110
byte  f = (byte)~b;        //         0b10000000
short g = (short)(b << 1); // 0b0000000011111110
short h = (short)(b >> 1); // 0b0000000000111111
利用位运算创建 BITMAP#
借助 byte 实现 Bitmap,也就是要能够修改和查看 byte 上的每一个 bit 的值,同时,修改要能够实现幂等。
-
指定位设置成 1按前面说的位运算的规则,是不能够单独修改 bit 序列中某一位的。位运算需要从右到左一对对计算。使用
|可以实现这个功能。假设我们要改变从右开始下标为 3(初始位置0) 的 bit 的值,则需要准备一个该位置为 1,其他位置都是 0 的 bit 序列,与要改变的 bit 序列进行|运算。
// 为了将 a 的右边数起第 3 位改成 1,需要准备一个 b
byte a =            0b010100010;
byte b = 1 << 3; // 0b000001000
a |= b;          // 0b010101010
-
指定位设置成 0和设置成 1 正好相反,需要准备一个指定位置为 0,其他位置都是 1 的 bit 序列,与要改变的 bit 序列进行
&运算。
byte a =            0b010101010;
byte b = 1 << 3; // 0b000001000
b = ~b;          // 0b111110111
a &= b;          // 0b010100010
-
查看指定位的值利用 & 运算符,只要计算结果不为 0,就代表指定位置的值为 1。
byte a =            0b010101010;
byte b = 1 << 3; // 0b000001000;
a &= b;          // 0b000001000;
了解了基本的操作之后,我们把数据存储到 byte 数组上。
class Bitmap
{
   private readonly byte[] _bytes;
   private readonly long _capacity;

   public Bitmap(long capacity)
  {
       _capacity = capacity;
       _bytes = new byte[_capacity / 8 + 1];
  }

   public long Capacity => _capacity;

   public void Set(long index)
  {
       if (index >= _capacity)
      {
           throw new IndexOutOfRangeException();
      }

       // 计算出数据存在第几个 byte 上
       long byteIndex = index / 8;
       // 计算出数据存在第几个 bit 上
       int bitIndex = (int)(index % 8);
       _bytes[byteIndex] |= (byte)(1 << bitIndex);
  }

   public void Remove(long index)
  {
       if (index >= _capacity)
      {
           throw new IndexOutOfRangeException();
      }

       long byteIndex = index / 8;
       int bitIndex = (int)(index % 8);
       _bytes[byteIndex] &= (byte)~(1 << bitIndex);
  }

   public bool Get(long index)
  {
       if (index >= _capacity)
      {
           throw new IndexOutOfRangeException();
      }

       long byteIndex = index / 8;
       int bitIndex = (int)(index % 8);

       return (_bytes[byteIndex] & (byte)(1 << bitIndex)) != 0;
  }
}

折叠
用 C# 实现 布隆过滤器
有了 Bitmap,我们再把 Hash 函数的实现准备好,一个简单的布隆过滤器就可以完成了。这里,我们参考 guava 这个 java 库的实现。
https://github.com/google/guava/blob/master/guava/src/com/google/common/hash/BloomFilter.java
MURMURHASH3 的使用#
我们使用和 guava 一样的 MurmurHash3 作为 Hash 函数的实现。
下面是笔者在 github 上找到的一个可用实现。
https://github.com/darrenkopp/murmurhash-net
使用这个库,我们可以将任意长的 byte 数组转换成 128 位的二进制位,也就是 16 byte。
byte[] data = Guid.NewGuid().ToByteArray();
// returns a 128-bit algorithm using "unsafe" code with default seed
HashAlgorithm murmur128 = MurmurHash.Create128(managed: false);
byte[] hash = murmur128.ComputeHash(data);
将任意类型的 KEY 转换为 BYTE 数组#
Funnel 与 Sink 的定义#
我们需要将各种类型 key 转换成 MurmurHash 能够直接处理的 byte 数组。为此我们参考 guava 引入下面两个概念:
-
Funnel:将各类数据转换成 byte 数组,包括 int、bool、string 等built-in 类型及自定义的复杂类型。
-
Sink:Funnel 的核心组件,作为数据的缓冲区。Funnel 在将自定义的复杂类型实例转换成 byte 数组时,就需要将数据拆解分批写入 sink。
Funnel 可以定义成如下的委托,接受原始值,并将其写入 sink 中。
delegate void Funnel<in T>(T from, ISink sink);
Sink 将不同类型的数据转换成 byte 数组并汇总到一起。
interface ISink
{
   ISink PutByte(byte b);

   ISink PutBytes(byte[] bytes);

   ISink PutBool(bool b);

   ISink PutShort(short s);

   ISink PutInt(int i);

   ISink PutString(string s, Encoding encoding);

   ISink PutObject<T>(T obj, Funnel<T> funnel);

   /// ... 其他 built-in 类型,读者可自行补充
}
简单的 Funnel 实现如下所示:
public class Funnels
{
    public static Funnel<string> StringFunnel = (from, sink) =>
        sink.PutString(from, Encoding.UTF8);

    public static Funnel<int> IntFunnel = (from, sink) =>
        sink.PutInt(from);
}
自定义复杂类型的 Funnel 实现则可以数据拆解分批写入 sink。复杂类型的实例成员依旧可能是复杂类型,因此我们要在 Sink 上实现一个 PutObject 来提供套娃式拆解。
Funnel<Foo> funnelFoo = (foo, sink) =>
{
    sink.PutString(foo.A, Encoding.UTF8);
    sink.PutInt(foo.B);

    Funnel<Bar> funnelBar = (bar, barSink) => barSink.PutBool(bar.C);
    sink.PutObject(foo.Bar, funnelBar);
};

class Foo
{
    public string A { get; set; }

    public int B { get; set; }

    public Bar Bar { get; set; }
}

class Bar
{
    public bool C { get; set; }
}
Sink 的实现#
Sink 的核心是 byte 数组缓冲区的实现,利用 ArrayPool 我们可以很方便的实现一个 ByteBuffer。
class ByteBuffer : IDisposable
{
    private readonly int _capacity;
    private readonly byte[] _buffer;
    private int _offset;
    private bool _disposed;

    public ByteBuffer(int capacity)
    {
        _capacity = capacity;
        _buffer = ArrayPool<byte>.Shared.Rent(capacity);
    }

    public void Put(byte b)
    {
        CheckInsertable();
        _buffer[_offset] = b;
        _offset++;
    }

    public void Put(byte[] bytes)
    {
        CheckInsertable();
        bytes.CopyTo(_buffer.AsSpan(_offset, bytes.Length));
        _offset += bytes.Length;
    }

    public void PutInt(int i)
    {
        CheckInsertable();
        BinaryPrimitives.WriteInt32BigEndian(GetRemainingAsSpan(), i);
        _offset += sizeof(int);
    }

    public void PutShort(short s)
    {
        CheckInsertable();
        BinaryPrimitives.WriteInt32BigEndian(GetRemainingAsSpan(), s);
        _offset += sizeof(short);
    }

    // ... 其他的 primitive type 的实现

    public Span<byte> GetBuffer() =>
        _buffer.AsSpan(.._offset);

    public bool HasRemaining() => _offset < _capacity;

    public void Dispose()
    {
        _disposed = true;
        ArrayPool<byte>.Shared.Return(_buffer);
    }

    private void CheckInsertable()
    {
        if (_disposed)
        {
            throw new ObjectDisposedException(typeof(ByteBuffer).FullName);
        }

        if (_offset >= _capacity)
        {
            throw new OverflowException("Byte buffer overflow");
        }
    }

    private Span<byte> GetRemainingAsSpan() => _buffer.AsSpan(_offset..);
}

折叠
Sink 则是对 ByteBuffer 的进一步封装,来适配当前使用场景。
class Sink : ISink, IDisposable
{
    private readonly ByteBuffer _byteBuffer;

    /// <summary>
    /// 创建一个新的 <see cref="Sink"/> 实例
    /// </summary>
    /// <param name="expectedInputSize">预计输入的单个元素的最大大小</param>
    public Sink(int expectedInputSize)
    {
        _byteBuffer = new ByteBuffer(expectedInputSize);
    }

    public ISink PutByte(byte b)
    {
        _byteBuffer.Put(b);
        return this;
    }

    public ISink PutBytes(byte[] bytes)
    {
        _byteBuffer.Put(bytes);
        return this;
    }

    public ISink PutBool(bool b)
    {
        _byteBuffer.Put((byte)(b ? 1 : 0));
        return this;
    }

    public ISink PutShort(short s)
    {
        _byteBuffer.PutShort(s);
        return this;
    }

    public ISink PutInt(int i)
    {
        _byteBuffer.PutInt(i);
        return this;
    }

    public ISink PutString(string s, Encoding encoding)
    {
        _byteBuffer.Put(encoding.GetBytes(s));
        return this;
    }

    public ISink PutObject<T>(T obj, Funnel<T> funnel)
    {
        funnel(obj, this);
        return this;
    }

    public byte[] GetBytes() => _byteBuffer.GetBuffer().ToArray();

    public void Dispose()
    {
        _byteBuffer.Dispose();
    }
}

折叠
K 个 HASH 函数与 布隆过滤器 实现#
上文提到了 布隆过滤器 通过 k 个 hash 函数来解决 hash 冲突问题。实践中,我们可以把一次 murmur hash 的计算结果(16 byte)拆分为两部分并转换为 long 类型(一个 long 是 8 byte)。
这两部分结果分别保存到 hash1 和 hash2,第 k 个 hash 函数是对 hash1 和 hash2 的重新组合。
hash(k) = hash1 + (k-1) * hash2
public class BloomFilter<T>
{
   private readonly int _hashFunctions;
   private readonly Funnel<T> _funnel;
   private readonly int _expectedInputSize;
   private readonly Bitmap _bitmap;
   private readonly HashAlgorithm _murmur128;

   /// <summary>
   /// 创建一个新的 <see cref="BloomFilter"/> 实例
   /// </summary>
   /// <param name="funnel">与插入元素类型相关的<see cref="Funnel"/>的实现</param>
   /// <param name="buckets">BloomFilter 内部 Bitmap 的 bucket 数量,越大,误判率越低</param>
   /// <param name="hashFunctions">hash 函数的数量,越多,误判率越低</param>
   /// <param name="expectedInputSize">预计插入的单个元素的最大大小</param>
   public BloomFilter(Funnel<T> funnel, int buckets, int hashFunctions = 2, int expectedInputSize = 128)
  {
       _hashFunctions = hashFunctions;
       _funnel = funnel;
       _expectedInputSize = expectedInputSize;

       _bitmap = new Bitmap(buckets);
       _murmur128 = MurmurHash.Create128(managed: false);
  }

   public void Add(T item)
  {
       long bitSize = _bitmap.Capacity;

       var (hash1, hash2) = Hash(item);

       long combinedHash = hash1;
       for (int i = 0; i < _hashFunctions; i++)
      {
           _bitmap.Set((combinedHash & long.MaxValue) % bitSize);
           combinedHash += hash2;
      }
  }


   public bool MightContains(T item)
  {
       long bitSize = _bitmap.Capacity;

       var (hash1, hash2) = Hash(item);

       long combinedHash = hash1;
       for (int i = 0; i < _hashFunctions; i++)
      {
           if (!_bitmap.Get((combinedHash & long.MaxValue) % bitSize))
          {
               return false;
          }

           combinedHash += hash2;
      }

       return true;
  }


  [MethodImpl(MethodImplOptions.AggressiveInlining)]
   private (long Hash1, long Hash2) Hash(T item)
  {
       byte[] inputBytes;
       using (var sink = new Sink(_expectedInputSize))
      {
           sink.PutObject(item, _funnel);
           inputBytes = sink.GetBytes();
      }

       var hashSpan = _murmur128.ComputeHash(inputBytes).AsSpan();

       long lowerEight = BinaryPrimitives.ReadInt64LittleEndian(hashSpan.Slice(0,8));
       long upperEight = BinaryPrimitives.ReadInt64LittleEndian(hashSpan.Slice(8,8));
       return (lowerEight, upperEight);
  }
}

折叠
扩展
带计数器的布隆过滤器#
上文讲到基于 Bitmap 实现的布隆过滤器不支持删除,但如果把 Bitmap 这个 bit 数组换成 n 个 bit 作为一个bucket的数组,那单个 bucket 就具备了计数能力。这样删掉一个元素的时候,就是在这个计数器上减一,借此能够在有限的范围内实现带删除功能的布隆过滤器,代价是,存储空间会变成原来的 n 倍。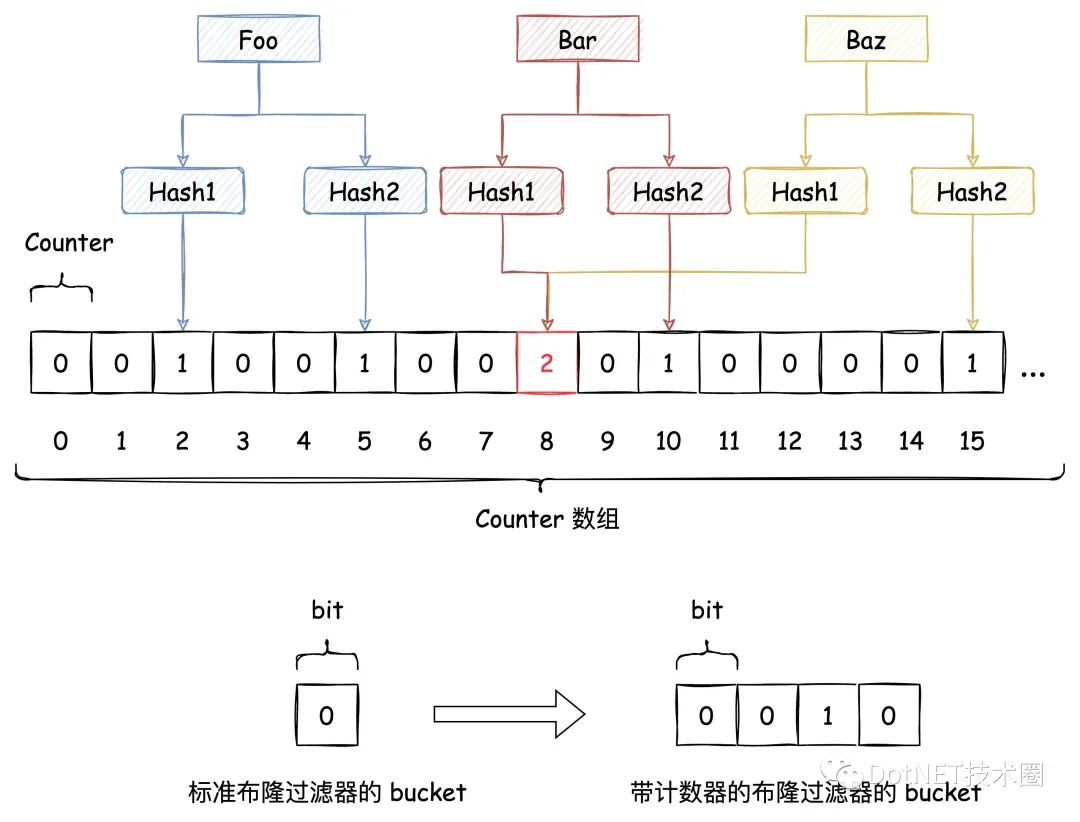
分布式布隆过滤器实现方案#
如果你有布隆过滤器的实际使用需求,并且是在分布式环境,笔者推荐下面这个库,它是作为 redis 的插件提供的,详情点击下方链接。https://github.com/RedisBloom/RedisBloom
代码地址
为方便学习,本文所有的代码均已整理在 github:https://github.com/eventhorizon-cli/EventHorizon.BloomFilter
